Octagonal Picture Frame
Description
This section is from the book "Handcrafts For The Homebound Handicapped", by Mildred Kroll Rich. Also available from Amazon: Handcrafts For The Homebound Handicapped.
Octagonal Picture Frame
Materials And Supplies
8" square heavy cardboard Duco cement 8" square paper photograph or magazine picture Scotch tape
2 spools crochet cotton size 5
(substitution for cotton: navy type cord, twine, novelty yarn)
Tools
pair of sharp scissors ruler with metal edge pencil
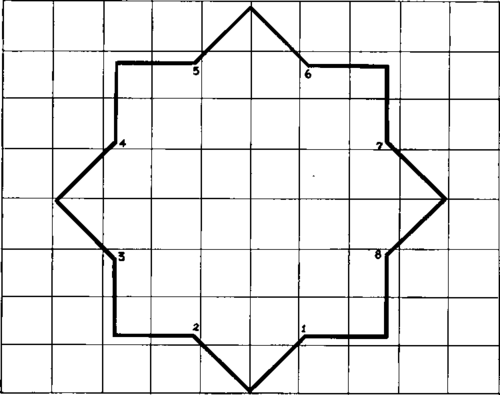
Figure 28. Pattern for Octagonal Picture Frame.
The octagonal picture frame is simple to make and attractive when completed correctly. The frame in the photograph was made of navy type cord in tan and brown. It is not advisable to use corrugated paper in place of the cardboard because it warps. The hard black speckled covers from old composition note books are excellent for this project. A pupil with severe handicaps of both arms and hands may need assistance in cutting the cardboard.
Procedure
1. Measure and draw one inch squares on the sheet of paper. Using the pattern on this page as a guide, draw the outline of the octagonal picture frame. Cut out the paper pattern. With this pattern, pencil, and ruler, mark the cardboard. Cut the cardboard accurately with the pair of scissors which must be sharp. Number the corners from 1 to 8 as in the diagram.
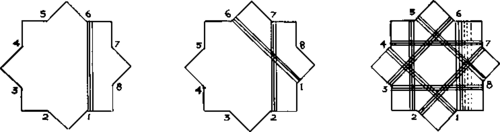
Figure 29. Working Detail of Octagonal Picture Frame.
2. ;Select a snap shot or magazine or greeting card picture not larger than five inches square, nor smaller than three inches square. Center the picture on the cardboard, and using Scotch tape attach it to the cardboard where the numbers show. Use very little Scotch tape at the corners of the picture.
3. ;Commence wrapping with the lighter of the two shades cord you are using. Wrap the first color around the frame from point 1 to 6 once and tie with three knots at the back of the frame. Wrap twice more around the same points in the same direction. Keep the cords close together but do not allow them to overlap. Work away from the numbers to the outside points. See the first diagram. After wrapping three times from point 1 to 6, turn the frame slightly so that number 2 is where 1 was, and wrap three times from point 2 to 7. See the second diagram. Cross the winding thread at the back of the frame. Observe that there are always three points to the right of where you are winding. Proceed in this manner wrapping from points 3 to 8, 4 to 1, 5 to 2, 6 to 3, 7 to 4, and 8 to 5. Cut the cord and hold it so that the completed winding does not loosen.
4. ;Tie the second color and the first color strands together at the back of the frame. Proceed the same way with, the second color beginning at point 1 and wrapping three times from point 1 to 6, three times from point 2 to 7, and all around until eight groups of the second color have been wound on. Study the third diagram where the second color is represented by a dotted line. Make sure that the cords as you work touch each other but do not overlap.
5. ;Tie the first color and the second color together again at the back and wrap around the eight points. Continue alternating colors until the cardboard is covered completely. Do not allow the strands to slip off when you get near the points. Tie the last cord to any cord at the back.
6. On the back of the completed frame, place a drop of cement on the cords at each point. The cement should not show from the front. When the cement dries it will prevent the cords from slipping off. Tie a small thread loop at the back near the top center for hanging.
Continue to:
My Books

