Wire (Suji) Figures
Description
This section is from the book "Handcrafts For The Homebound Handicapped", by Mildred Kroll Rich. Also available from Amazon: Handcrafts For The Homebound Handicapped.
Wire (Suji) Figures
Materials And Supplies
12 feet cotton covered 24 gauge soft wire (Suji wire)
1/4" plywood 2" x2" 1" brad
31/2" circle heavy cardboard Duco cement
Tools
pair of cutting pliers ruler hammer
Suji wire is a trade name for wire which can be purchased in hobby shops and department stores. It is available in several colors. Actually it is a cotton covered 24 gauge soft wire such as is used by telephone installation men, and this wire can be purchased in local hardware stores. The possibilities of making figures, animals, cars, boats, airplanes, scenes from nature, and the like, are unlimited. It is an amazingly simple craft needing no special skill. Mistakes can be rectified merely by unwinding the wire and doing it over.
These instructions are for the cowboy figure with the lasso which is the center front one in the photograph. It was covered with lacquer to give it a shiny finish.
Procedure
1. Cut four pieces of wire, each 4 inches long. Hold them together in a tight bundle with the ends even. Cut a 24 inch piece of wire, bend it in half, and hook the midpoint over the four wires at the middle. With one end of the 24 inch wire, make nine turns up toward the head of the skeleton. With the other free end, make another nine turns directly over the first nine in the same upward direction. This forms the chest. Study the diagram on this page and check each winding operation as described.
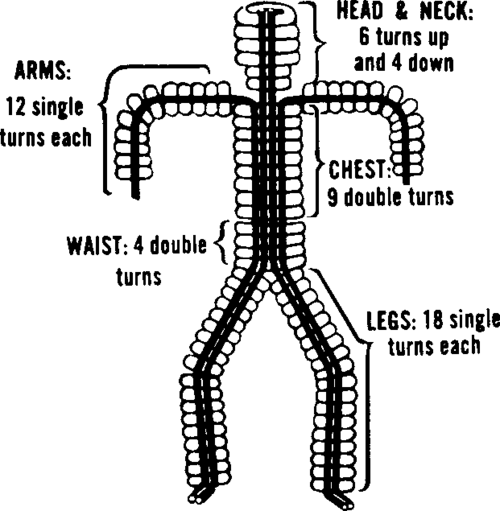
Figure 53. Working Detail of Wire (Suji) Figure.
2. ;Bend two of the top skeleton wires to the sides, one right and one left for the arms. With the free ends of the chest wire, make twelve turns on each arm. Clip off the excess wire and leave 1/16 inch of the original skeleton wire showing for the hands.
3. ;Cut a 24 inch piece of wire, bend it in half, and hook the midpoint over the skeleton just below the completed chest. With one of the free ends, make four turns down the skeleton. With the other free end, make four more turns on top of the first four and in the same direction. This forms the waist. Separate the remaining skeleton wires into two pairs to serve as legs. With the free ends of the waist wire, make eighteen turns on each leg. Clip off the excess wire and leave Vq inch of the original skeleton wire for the feet.
4. ;Cut a 10 inch piece of wire for the head and neck. Begin winding with one end between the shoulders. Make six turns up the skeleton and then just four down on top of the first six turns. Clip off the excess wire. Bend the figure at the elbows, knees, and feet as shown in the photograph.
5. ;Cut a 10 inch piece of wire for the lasso. Attach one end of it to the left hand by bending the hand around the wire. Leave a slack and have the lasso wire go through the right hand the same way. Form a circle with the remaining wire and have it go around the figure as in the photograph. Make a few turns at the end to hold the wire and clip off any excess wire.
6. ;To make the hat you will need a base jig. Drive a brad through the center of the plywood and make a small hole next to the driven nail. Cut a 10 inch piece of wire and insert one end of it into the hole next to the nail. Anchor it underneath by bending it with the pliers. Wrap five turns up on the nail and then five turns down on top of the first five turns. Make a flat spiral around the base of the nail six times for the brim of the hat. Clip off the extra wire and apply Duco cement to the -exposed surface and allow it to dry.
7. ;Attach the finished figure to the cardboard base by making two holes where each foot should stand. Bring up some wire from underneath for one foot in one hole, wrap the wire around the foot, and go back underneath through the same hole and twist the ends of the wire together. Repeat this process for the other foot.
Continue to:
My Books

