Model Establishments
Description
This section is from the book "How To Build Games And Toys", by B. W. Pelton. Also available from Amazon: How To Build Games And Toys.
Model Establishments
Under this heading are grouped a variety of models representing some of the make-believe enterprises so dear to girls and boys of various ages. If only very young tots are to be catered to, many of the smaller, seemingly "fussy" details may be omitted. However, as the children grow older it will be found that fidelity to details, no matter how small, will not only be greatly appreciated, but often demanded.
Doll Houses
The subject of doll houses is approached with some hesitancy, due to such varying factors as doll sizes, room or storage space, preferences for detached houses or apartments, as well as furniture requirements, and the like. On the assumption that the doll family will have to fit the house, that little floor space is available, and that a detached residence is preferred, the following details are presented, subject to amendment.
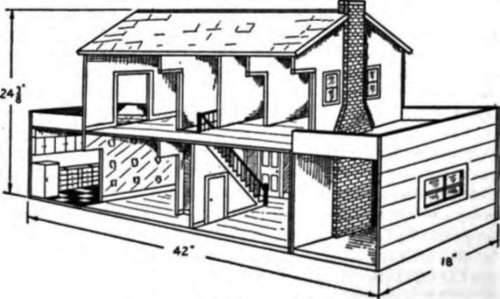
Fig. 4.3. Two story doll house.
As will be noted in Figure 4.3, the suggested house has the presently popular kitchen and garage wings which can be hinged forward against the closed front for compactness. The house is what an architect or realtor might term a "two-storied, two-bedroom, stuccoed dwelling with dining room, attached garage, and two sun decks." When both wings are extended it is 3 1/2 ft long, 1 1/2 ft. wide, and a little over 2 ft. high to the peak of the roof. Built to the scale of 1 in. = 1 ft., the 9-in. and 83/8-in. ceilings of the first and second floors are correct for adult dolls from 5 to 6 in. tall.
It is true that for quick production a cardboard carton will render considerable satisfaction, once the interior dimensions are altered to fit. Likewise, years ago the writer learned that a wooden packing box of suitable size could be remodeled to please the exacting tastes of younger sisters. Since those days, however, home craftsmen have acquired a thin, but strong medium to work with in the form of nonsplitting plywood of various thicknesses. Therefore, when building a scale house from the ground up, 3/8-in. plywood is recommended because its edges, when butted against the various sections, will take No. 3 flat-headed screws, insuring rigid construction. However, if this thickness is not readily available, 1/4-in. plywood can be glued together and fastened securely with thin finishing nails.
It will be noted that the house has the popular open "working" rear, which can be closed by a removable back if desired. If the fold-up feature is not essential, the entire front can be cut from one piece of plywood 42 in. long. This type of construction will also permit the house to be set on a base extending an inch or two on all sides. Painted green and with its edges rounded, the extended base will serve as a buffer to protect the corners if it is mounted on casters. Such a base could be at least 3/4 in. thick, permitting the lower floor to be reduced to a thickness of 3/8 in., thus raising the ceiling of the second floor to a height of 83/4 in. On the premise that the builder will prefer a fixed roof, no upstairs closets are provided, and certain minor architectural principles are violated to permit maximum entrance from the open rear.
Figure 4.4 shows the floor plans and working dimensions of the outer walls. Side walls and partitions are butted against the front walls in all cases, and the floors (and ceiling) cut 3/4 in. narrower and f in. shorter than the overall measurements, in order to fit inside the outer walls. The dimensions of the stair well and inside partitions are indicated in the floor plans. The hinges between the house and its wings should not be attached until the type and thickness of the outside wall finish has been determined. For a stuccoed effect, plaster of Paris mixed with shellac can be brushed on in a thin coat and painted over, when dry. Otherwise, it will be easier to paint the outside and then ink in the lines of window and door casings, clapboards, or shingles, and mortise the hinges in place. The chimney is cut from J-in. material and glued to the outside of the upper floor and to the inside of the garage, as shown. A piece of J-in. soft pine 5 in. wide and 41/4 in. high, cut or whittled with an appropriate firebox, is glued on the inside of the living room for a fireplace. A piece of overhanging cardboard forms the mantel.
Details of the open stairway are illustrated in Figure 4.5. An easy way to make the stairs is to saw them from a single piece of 11/8-in. stock, 3 in. wide, and a little over 15 in. long. The indicated risers and treads representing 71/2 in. and 9 in., respectively, will compare favorably with the standard 7 and 11 ratio. Piece X is a 25/8-in. width of 3/8-in. plywood scrap glued to the underside of the stairs as a cleat for the triangular wall section which is set flush with the stairs. The interior closet and hinged door can be eliminated if desired.
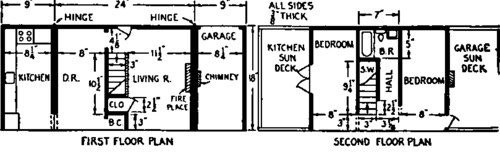
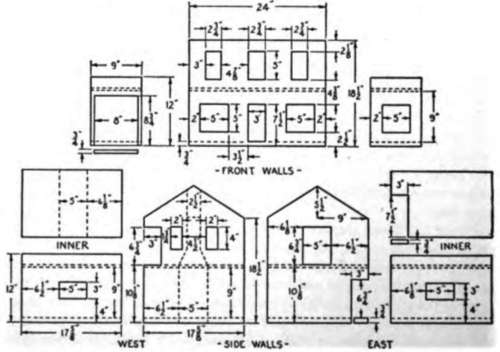
Fig. 4.4. Floor plans and dimensions.
Newel posts surmounted by wooden button molds are short lengths of J-in. dowels glued into holes drilled halfway through the floors. The handrails are lengths of J-in. doweling fitted into holes in the newel posts and walls. Maple toothpicks make ideal spindles, otherwise wooden match sticks can be scraped and sanded smooth. Before assembling, the stairs should be painted white or cream, with mahogany treads, and the newel posts, rails, and spindles stained mahogany.
The upper floor has a ceiling fastened inside the upper edges of the walls in the same manner as that of the first floor. The roof consists of a rear section 25 in. long and 101/2 in. wide which is set flush with the upper edges of the rear walls and partitions; the front, overlapping roof section is 113/8 in. wide. The eaves overhang the sides and front by 1/2 in. and are cut out to receive the chimney section. As indicated, a small scrap of J-in. material is cut to fit over the peak and is glued to the upper end of the chimney. The latter can be painted and lined to imitate brickwork, or painted to match the house, as is preferred in some localities. After the roof has been painted green, red, gray, or whatever, shingles can be outlined with India ink.
Inasmuch as the two 9-in. hinged wings do not entirely cover the front of the house when closed, a doorstep and canopy can be added, if desired; a simple setup appears in A, Figure 4.6. The front door is mounted on small hinges with brass escutcheon pins for knobs. A small bullet catch mortised into the floor directly beneath the free end of the door when closed, will keep it shut.
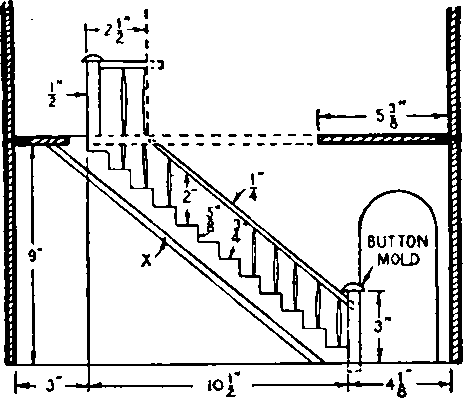
Fig. 4.5. Details of stairs.
The window assemblies can be as realistic as the builder's patience will permit. On the ground floor the three front windows are picture windows with small French windows theoretically installed at both ends. The first floor side windows in the wings are mullioned pairs of two lights each; second story front windows may be divided into four panes each, except for the narrow pair overlooking the garage sun deck. A pair of French windows opening from the master bedroom onto the kitchen sun deck can be provided by the ambitious builder.
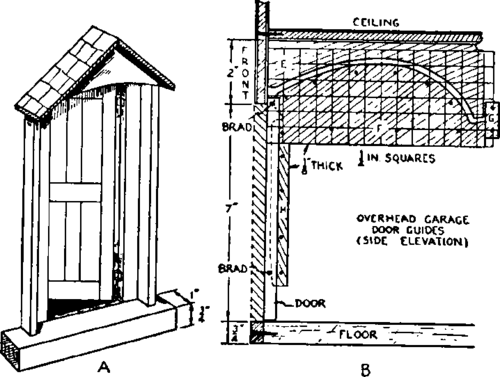
Fig. 4.6. Front doors.
An easy way to construct windows is to make muntins from well-smoothed wooden match sticks which have whittled lap joints where they cross, so that they can be wedged and glued into place with airplane cement in the window openings, flush with the inner wall surfaces. A piece of celluloid is then glued to the rear wall and its overlap covered with bristol board casing. The muntins must of course be painted before the celluloid "pane" is attached.
Details of the guides for the modern, overhead garage door are shown in B, Figure 4.6. The door itself is the shortened section of waste left from sawing out the door opening in the front of the garage. Two brads are driven into each edge of the door as indicated, so that they protrude no more than 1/8 in. These pins ride in slots provided by 1/8-in. plywood sections E, F, and H. To make the upper curved slot or track, a piece of J-in. plywood veneer 6 in. long and 63/4 in. wide is cut into two pieces along the indicated curve. The lower section (F) is then notched and shortened according to the diagram, and both curved edges sanded smooth. The upper section (E) is then butted against the ceiling and glued or bradded to the side wall; the lower section is fastened below it to form a 3/16 in- slot or groove for the door's upper pin to ride in. A stop (G) blocks the end of the groove. The lower brad pins in the door's edges ride up against the front wall of the garage in a slotted track formed by a piece of 1/8-in. veneer about f in. wide (H), cut as shown. A small flat staple in the front, near the bottom of the door serves as a handle.
Continue to:
My Books

