Playing Indian
Description
This section is from the book "How To Build Games And Toys", by B. W. Pelton. Also available from Amazon: How To Build Games And Toys.
Playing Indian
For indoor or outdoor Indian rites, appropriately feathered headdresses can be cut from paper, then colored and fitted to actual head size in a matter of minutes. If no brightly colored blankets are available to complete the ensemble, "buckskin" shirts or robes can also be cut from paper, fringed, and then colored in a manner which will satisfy the average small brave or squawat least for the time being.
Headdresses
War bonnet. Cut a piece of wrapping paper about one foot wide by two feet long, and fold it to a width of 12 inches. Fold it in half once more, then again to 3 inches, and once again, making sixteen layers in all.
Now draw the shape of a half feather on this folded strip, commencing about 4 inches from the end. Cut through all thicknesses along this pattern, discarding the shaded portion indicated in A of Figure 6.15. Unfolded, this will produce a row of feathers rising from a headband; the latter is then folded double for strength. After flattening the folds of the paper feathers, they can be suitably colored with bright crayons. The headband can then be adjusted to the warrior's head by fastening the lapover with two or more paper fasteners, by sewing, or by gluing. Decorate the headband by gluing bead-like symbols to it, such as dyed alphabet macaroni, or Christmas seals of certain types.
Instead of wrapping paper, construction paper can be used to build up a headband of two or more sections. Individual feathers can be cut from varicolored construction paper in either style A or C, and then glued to stand erect, at 1-in. intervals.
Squaw's Headdress
A different style of feather can be cut for insertion into the rear of a squaw's headband by snipping colored construction paper into three or four strips 10 inches long and 2 inches wide. These are then folded in half the long way, and "feathered" by making diagonal cut halfway in, as in C. The headband is a strip of paper 2 feet long and 4 inches wide, doubled for strength and decorated; or it can be built up from shorter strips of construction paper as previously explained. The feathers can then be glued, sewed, or attached with paper fasteners.
Necklaces
Straight, short pieces of macaroni, either white or dyed with colored ink, Tintex, or water colors, are easy to string for necklaces. Alphabet macaroni can also be used, and dried pumpkin seeds or kernels of corn make interesting "beads" when alternated between sections of tubular macaroni. To pierce corn, pumpkin or apple seeds, a darning needle or a sharp icepick will be required. A series of straight macaroni lengths strung together, will make realistic wampum for trade or peace ceremonies.
Shirts And Robes
For small Indians, lengths of wrapping paper can be quickly cut into the simple pattern indicated in A of Figure 6.16, then "fringed" as shown in B. The front of the neckline is indented and crayon designs added; these may include the owner's name or clan, or an allusion to his or her characteristics, by combining some of the symbols illustrated in Figure 6.18. The sides can then be joined with glue, thread, or fasteners.
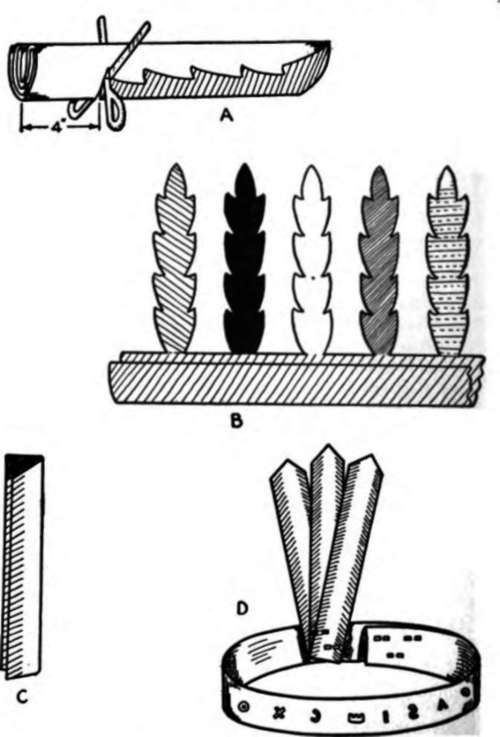
Fig. 6.15. Indian headdresses.
The squaw's garments, or robes, are usually cut longer than those of the more active braves.
Instead of wrapping paper, a more durable garment can be cut from any available material such as cambric, unbleached muslin, bunting, or flour and sugar sacking. After stitching the sides together, the garment is turned inside out and the edges fringed with the scissors. To prevent undue raveling, a line of stitching is run in about 1/4 inch back of the uncut ends. Those who keep chickens will find that the gaily colored bags, in which 100 lbs. of scratch com are sold, will be received with enthusiasm when stitched into Indian garments.
Drum
More muffled than the tom-tom described in a previous section, a satisfactory Indian drum can be assembled from a 1-lb. coffee can with its lid ou, with circular "skins" cut from burlap laced to its top and bottom surfaces with "buckskin" thongs of heavy twine. Drumsticks can be improvised from old dishmop handles, dowel lengths, or whittled sticks, with strips of cloth wound tightly around their ends and taped fast.
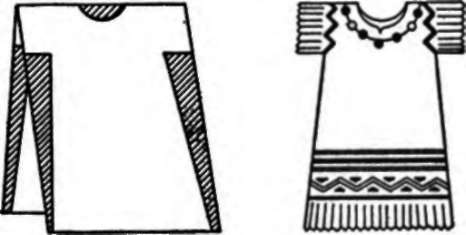
Fig. 6.16. Indian shirt.
Rattle
A No. 2 or 2 1/2 tin can with its head cut cleanly off is first painted or crayoned with Indian design before punching four holes around its rim with a nail or icepick. A hole is also punched in the center of the bottom to fit tightly over the stick which is to form its handle. The latter should be about a foot long, so that when it is bound tightly with fine wire, cord, or bicycle tape about 3 in. from its upper end, there will be plenty of handle left when it is thrust through the bottom of the can, and its upper end bound to hold it against the inner "washer." The rattles are four pairs of crimped bottle caps with their cork liners removed. Holes are punched through their centers and the pairs of rattles, back to back, are joined together by loops of thin wire which pass through the four holes in the rim of the can, as shown in A, Figure 6.17.
Weapons
The warlike urges of chiefs and their braves can be rendered painless by preparing harmless weapons such as skinning or scalping knives cut from stiff cardboard. Silver paper pasted on the blades of such knives will provide a satisfactory keenness for hunters or bloodthirsty warriors.
A short piece of rubber hose sliced at an angle at one end, will make a harmless blade for a tomahawk. As illustrated in B of Figure 6.17, the weapon will look like the real thing if it is bound crosswise with rope thongs between the ends of a split stick. If the latter is not available, the hose can be pierced to receive the end of a mop handle and then bound crosswise. Even a stone hatchet can be simulated by padding a rolled gray sock tightly into an axe-shaped stone, and binding it to a handle like the tomahawk.
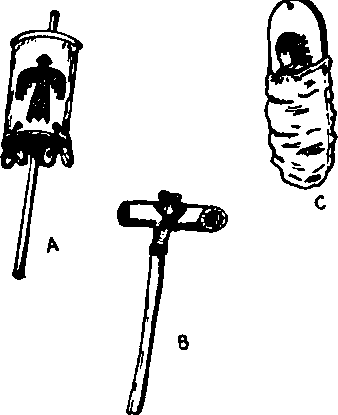
Fig. 6.17. Indian rattle, tomahawk and papoose.
Papoose
To keep the squaws occupied between scalpings and ceremonial dances, some means should be provided to care for their papooses in proper Indian fashion. In order to transform a favorite doll into a stoic papoose it is no trick at all to remove the bottom from an oblong peach basket, drill a hole near its top, and fasten a burlap or cloth pocket to the lower part of the front with tacks, as in Figure 6.16 C. A piece of wallboard or stiff cardboard will do as well, with cloth wrapped around it or the half of a brown paper bag stapled on from the back. Cords can be fastened through the hole at the top when the mother must carry her uncomplaining offspring on her back; otherwise it can be hung on a nail or a tree branch, or tilted against some upright surface.
Teepees
In the absence of a Card Table Wigwam as was illustrated in earlier pages, the framework for an indoor or outdoor teepee or wigwam can be improvised by tying together three brooms or mops near the ends of their handles, or three sections of bamboo fishing poles, drapery rods, or tree branches; even golf clubs or canes may be pressed into service for very tiny Indians. A blanket, pieces of burlap, split sacking, or other available material can then be fastened into place with safety pins, leaving, of course, a removable flap for the doorway. When the teepee is left standing for further use, the covering material can be anchored more securely with large stitches, and suitable designs and symbols painted or crayoned on with bright colors.

Fig. 6.18. Indian symbols.
By referring to the proposed shelter as a "wickiup" or "lodge" made from bark or thatched, it is often possible to satisfy the tribe's homing instinct by overturning one or more large armchairs and "thatching" them with brown or dark-colored blankets or rugs. Two or more wickiups can face the community camp-fire, which will be quite realistic when a low, sturdy electric lamp is surrounded by red, orange, and yellow crumpled tissue paper. Crumpled red cellophane is even less artificial in effect.
Symbols And Colors
When choosing from the inter-tribal designs illustrated in Figure 6.18, the following Indian beliefs may be of interest to the young braves and their squaws. There are several interpretations regarding, the Indians' use of colors; a resume" of logical explanations follows:
Greenyouth, Spring, growing things, hope. Redthe sun, warmth. Yellowthe West (sunset). Bluethe South (cloudless skies).
Orange, yellow, red, and bluematurity, peace, happiness, harvest. Brown and graydecay, Autumn, Winter, death. Blackmourning, grief, the North.
Whiteinnocence, purity, snow (hiding ugliness), the East (sunrise).
Once these interpretations are understood, the young aborigines will require little urging to select their own colored designs and titles from the samples offered, or perhaps, from further research of their own. Since the examples illustrated in Figure 6.18 cut across tribal lines, however, the young researcher will do well to confine himself to a favorite or selected Indian tribe.
Continue to:
My Books

