Fifty Christmas-Gifts For Small Fingers. Part 3
Description
This section is from the "The American Girl's Home Book of Work And Play" book, by Helen Campbell. Amazon: The American girl's home book of work and play.
Fifty Christmas-Gifts For Small Fingers. Part 3
Parasol Penwipers
Buy the smallest-sized lead-pencil for sale, provided with an ivory or ornamented tip, and sharpen the point. Cut a circle of silk, and another, rather smaller, of thin black cloth : scallop the edges, and make a tiny hole in the middle of each. Fit the sharpened point of the pencil into these holes, taking care that the silk is outside the cloth ; and then, by creasing and folding, persuade the circles to take the shape of a closed parasol, winding silk around to secure them in place, as a strap is arranged to keep the parasol closed. Cut a paper pattern first, and trim it to fit the length of your lead-pencil, before cutting the silk and cloth circles.
Work-Cases
In old times these were called"housewives,"as grandma will tell you, should you make one for her. Almost any firm material can be used for making them. But here is a very pretty pattern. Take gray or yellow Java canvas, twelve inches long and seven wide, with a bright-colored silk for lining. Feather-stitch the canvas down both sides, and across one end, leaving space to turn in the edges. Baste on the lining, and finish the edges neatly by turning in and blind-stitching ; or bind them with ribbon to match the silk lining. The feather-stitched end is then pointed by turning down the corners, and sewing them together. Turn the lower end up about four inches to form a bag, and sew the sides together firmly. Make a loop at the point, and sew a button on the outside; so that the case may be rolled up and fastened.
Presents In Birch-Bark
Birch-bark is easily obtained; and numberless pretty things may be made out of this soft and flexible material.
A few are suggested here, and your invention will help you to more. Think of some other useful and pretty gifts besides the letter-cases, wall-baskets, glove-boxes, napkin-rings, handkerchief-cases, portfolios, and table-mats, that may be constructed of birch-bark.
There are two ways of using the bark; but in all cases a pasteboard shape, like the article to be made, must be first cut out. This shape may be covered with a thin, smooth piece of bark lined with silk, and the edges bound with bright ribbon. Or the bark, of the exact shape to be covered, is cut in strips, united at one end, and ribbon is woven across the strips, and fastened neatly at either end. The pasteboard is then covered with the braided bark, lined with silk to match the ribbon, and the edges bound as before. Bows of ribbon finish the dainty present.
Straw Wall-Basket
Little girls who can work patiently may make a very pretty basket out of straw braided with ribbon, if mamma will give a little help. Select a number of smooth, perfect straws. Cut a half-circle of pasteboard, nine inches long, and make a row of small holes around the edge, half an inch apart. Cut a strip of the pasteboard a little less than half an inch wide and nine inches long, and make small holes in it one inch apart. Cut a second strip sixteen inches long, and treat it in the same way Now take a straw twelve inches long, and fit one end into the middle hole of the short strip of pasteboard, and the other end into the middle hole of the half-circle's straight edge, letting the straw project about two inches below. The half-circle forms the bottom of the basket, and you are beginning to make the back, which is flat, and hangs against the wall. On either side of the middle straw insert a straw three-quarters of an inch shorter; and so proceed until all the holes are filled, and the pointed back is complete. The holes must be small enough to keep the straws in place without other fastening.
The rounded front of the basket is made by fitting straws in the same way into the longer strip of pasteboard, and the rounding edge of the half-circle; all the straws being six inches in length. Fasten the two ends of the long strip firmly to the ends of the short strip. Sew blue chenille over the pasteboard edges wherever they show, and weave blue ribbon in and out of the straws that make the basket-front. Run ribbon once across the back, following the outline of the point, and an inch from the edge. Make a bow in the middle. Girls of fourteen or fifteen, who have a brother with a jack-knife to help them, might make beautiful and more durable baskets in the same way, by using strips of fine bamboo, or cane (which can be obtained at a Japanese store), in place of the straw.
Feather Screens
The making of screens and fans in feathers is both pleasant and ornamental work.
To make a screen, begin as follows : mould a piece of wire into the shape of a heart, and cover this, by means of a needle
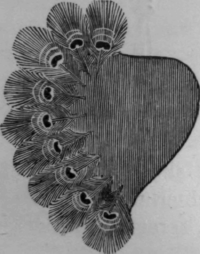
Fig. 85. - Feather Screen.
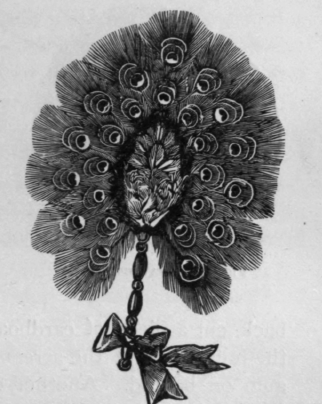
Fig. 86. - Feather Screen.
and thread, with dark-colored gauze or tarlatan. Round the edge of this frame fasten a row of peacock's feathers with gum. A very little gum put under the quills, and left to dry with a weight on them, will make them easily adhere. Place a second row of feathers, so that the eyes of them come just between those of the first row. Next make another frame in the same manner as before, but let the edge of it only extend as far as the quills of the second row of feathers. Border this with the side fringe-feathers of the peacock's tail, and then dispose of some red ones at the top, or any kind fancy may dictate or you possess, finishing off with a bunch of gray fluff feathers, or a knot of crimson ribbon and a gilt handle. For the back, cut a piece of cardboard the exact shape and size of the foundation of the screen, cover it with crimson silk, and gum on behind. Another, even prettier, screen is made as follows, both sides alike : Prepare a frame (circular in shape) as before. Edge it thickly all round, by means of a needle and thread, with the fringe-feathers of the peacock's tail. Then put alternately, in the six spaces between the points of the star which is to be cut for the centre, rows of the small brown, gold, and green feathers from the neck and back of the bird. Cut out a star in cardboard; edge it on each side with a small red feather, and cover the whole of the rest (by means of gum), one close over the other, with the bright-blue feathers from the peacock's breast. Cut out a small circle in cardboard, which edge with a row of canary-bird or any dyed yellow feathers, letting the centre be scarlet. On this a gold monogram in repousse work may be placed. A gilt handle, and knot of ribbon, complete so elegant a fan, that one made for a wedding-present was supposed to be the finest Brazilian work.

Fig. 87.- Feather Screen.

Fig. 88. - Feather Screen.
Mats made of cloth or straw are very pretty with a border of feathers. These may also be utilized for trimmings of hats, muffs, or jackets, particularly pheasant's and pea-fowl's. Trimmings are made by sewing the feathers on in rows of three and two, or three and four, one over the other, on a narrow ribbon of the same color.
Continue to:
My Books

