The Proper Way To Build A Stone Wall
Description
This section is from the book "The Scientific American Boy", by A. Russell Bond. Also available from Amazon: The Scientific American Boy.
The Proper Way To Build A Stone Wall
In making our chimney we could not rely on the red shale to hold the stones as firmly as good lime mortar would, so we had to be careful that each stone, as it was laid, had a firm bearing. The stones were embedded in a thick layer of mud, and if they showed any tendency to teeter we propped them up by wedging small stones under them until they lay solid. Another thing that we were very careful about was to "break joints"; that is, to keep the joints in each layer of the stones from coinciding with those in the next layer, above or below. To make sure of this we made it a point to lay a stone over each joint in the top of the wall and then to fill in the space between the stones with smaller stones. In this way the wall was made very substantial.
When the masonry had been carried up to the top of the chimney opening, a heavy timber about 12 inches wide was laid across the walls close against the wall of the building. This was to support the fourth wall of the chimney, and so we flattened its upper surface. To prevent it from catching fire it was covered with a thick plastering of mud, and then to keep the mud from cracking and flaking off we procured a piece of tin and tacked it over the log. The tin also extended over the top log of the opening. Then we went on with the building of the chimney walls, carrying them up about a foot above the ridge of the roof. Our chimney was completed by paving the bottom with stones, well packed in mud and nicely smoothed off to make the hearth. The hearth extended about 18 inches into the cabin, and was framed with logs, as shown in Fig. 275.
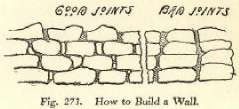
Fig. 273. How to Build a Wall.
Continue to:
My Books

