Braiding And Knotting
Description
This section is from the book "Everybody's Handicraft Handbook", by Progress Press. Also available from Amazon: Everybody's Handicraft Handbook.
Braiding And Knotting
Braiding and knotting arc closely related crafts which are easily mastered by the beginner. They have the great advantage of requiring no special equipment; all that is needed is the material used. This may be any kind of flexible strip such as string, yarn, raffia, paper, cloth, or leather. A coated gimp, prepared commercially for braiding, is now popular because of its high gloss and bright colors. It comes either round or flat in several sizes.
The techniques described below can be used to make a variety of useful and decorative articles such as lanyards, bracelets, necklaces, leashes, belts, etc. The text and illustrations show the basic procedures, but it should be emphasized that there are many variations which your own imagination and ingenuity can supply. Strips of different colors, for example, may be combined in a single project to provide a more interesting pattern. Similarly, different kinds of braiding or knotting can be used on the same article either for decoration or for functional purposes such as the square braid which acts as a slip knot on a round lanyard, or the round loop which sometimes forms the buckle on a flat belt.
Braiding
The first step in any kind of braiding is to secure the ends of the gimp so that they will not unravel. This can be done by tying them together or fastening them with a paper clip. If one end of the braid is to be attached to a buckle, snap, or similar fastener, the easiest method is to double tlje length of gimp required and pass each strand through the loop of the fastener so that the two ends hang down an equal distance. Thus, three strands of gimp, for example, will provide a six-strand braid.
The end of a braid should also be fastened to something solid before you start work. They can be held in a vise, closed into a drawer, or tied to a rail or other object. If they have been passed through a buckle, the latter can be slipped over a nail. This is important as it permits you to keep an even tension as you braid. Braiding can be done either tightly or loosely, but the pull should be uniform throughout. If you are doing a very long braid and the ends tend to tangle, roll each into a loose ball and secure with an elastic. These can be gradually unrolled as the braid progresses.
In estimating the length of strips needed for a given article, the following rule may help. An average braid is approximately 2/3 the length of the strips from which it is made. This can vary considerably, however, as it depends on the tension and the number of strands used.
Flat Braiding
The simplest type of breading is done with three strands (fig. 142). You start with the outer left strand and pass it over the center one. Then take the outer right strand and pass it over the first, which is now in the middle. This process is repeated until the braid is finished.

Figure 142.
Exactly the same principle is followed in braiding five, seven or any odd number of strands. Find your center one, then weave the outer left strand over and under the other strands at the left until it crosses the center one. Then take the outer right strand and weave it to the center in the same way (fig. 143). The braiding is always done with the outer strands, which are woven over and under their neighbors until they cross the strip in the center.
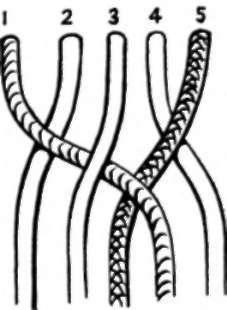
Figure 143.
To braid four strands, start with the one at the outer left and pass it over the one next to it. Then take the outer right strand and pass it under one and over one (fig. 144). The process is repeated

Figure 144, with the outer left strand going always over one. while the outer righ: goes under and over two.
The same principle applies to braiding all even numbers of strands. The outer left strand always starts by passing over its neighbor, while the outer right always goes under. The outer right is always woven through one more strand than the outer left.
The reason for this can be seen if you take six strands and weave each outer one through its two neighbors only, instead of weaving across three with the right hand one as directed above. The braid divides into two as there is no extra stitch to hold the two halves together (fig. 145). This is sometimes done purposely to vary the pattern. The braids can be rejoined by adding the extra stitch with the right hand braid.

Figure 145.
To finish a flat braid, the ends are generally reversed and woven back into the preceding stitches. In finishing belts, the loose ends are sometimes sewed between two strips of leather which are the same width as the braid and form a tongue for the belt.
Continue to:
My Books

