How To Cut Figured Boards From Pitch-Pine Logs
Description
This section is from the book "Cassell's Cyclopaedia Of Mechanics", by Paul N. Hasluck. Also available from Amazon: Cassell's Cyclopaedia Of Mechanics.
How To Cut Figured Boards From Pitch-Pine Logs
Some hints are given here on sawing up a pitch-pine log so as to get the best variety in the figuring of wood to be used for panels. It must be remembered that the amount of figure in a pitch-pine log depends on the amount of irregularity of growth in the tree. Curly figured pitch-pine cannot be got out of a plain pitch-pine log. But even the plainest log will afford a good amount of passable figure with judicious handling.
In the accompanying illustrations, which treat only of plain logs, the outer board A (Fig. 1) will have a large and open figure, approximating to the type shown in Fig. 4, and so also would the outer boards on the three other sides of the same log. From A to B the figure narrows down considerably until when the position B is reached the amount and proportion of the figure will be approximately as shown in Fig. 5. The figure in all the boards will be symmetrical - that is to say, its climax, or turning point, will be at the centre of every board. All will, therefore, be suitable for panels. The symmetry of figure is due to the position of each board, relatively to the annual rings of the log. Each board is tangentially situated, the point of contact being near the centre of its width. Thus, the board C (Fig. 1), while inclined at a different angle to the boards A and B, will still have the same kind of figure on its face - for the reason that it is situated tangentially to the rings. Boards cut on the radii of the tree, as D and E (Fig. 2), will have no flower figure, and except for the presence of an occasional knot or two, perhaps, will have little of an ornamental character on their surfaces, excepting, of course, the straight or wavy lines that represent the edges of the yearly layers of wood (see Fig. 6). Here again the board F (Fig. 2) is disposed diagonally to D and e, but the figures will be the same, for all are situated on radii of the tree. To secure the greatest amount of figure out of any given log, it is therefore necessary to cut as many boards as possible tangentially to the rings. In Fig. 3, for example, each board will be ornamentally figured, and the width of the figure will be proportionate to the width of the board throughout. It is unfortunate that in securing this result the boards will vary so greatly in width. The sketch is given here only as an extreme example of a means to au end. In Fig. 2 the boards G and II are practically halves of the board A (Fig. 1), and the figure in these will therefore be like the tipper and lower half respectively of the board shown in Fig. 4. From G and H, in towards E, the figure at the inner edges of the intermediate boards becomes less and less prominent, until when E is reached it is lost altogether, the board E being shown in Fig. 6. The reverses of figure shown at I, J, and K (Fig. 5) are due to slight bends that occurred in the growing tree - the saw, in its straight course, revealing outcrops of lower layers of wood. The figure on any given side of a log may also be varied within certain limits by first cutting a long wedge-shaped slab oil' the side and then making all subsequent boards parallel (in thickness) to the newly exposed surface. Closeness of ring will also affect the figure to some extent; but these circumstances do not interfere with the general principle just given.
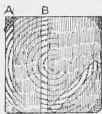
Fig. I.
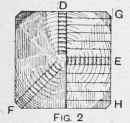
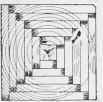
Fig. 3.

Fig. 4.

Fig. 5.

Fig. 6. Cutting Figured Boards from Pitch-pine Logs.
Continue to:
My Books

