A Plate-Rack
Description
This section is from the book "Amateur Work Magazine Vol1". Also available from Amazon: Amateur Work.
A Plate-Rack
James F. Rugg.
The plate-rack here described is an exceptionally useful kitchen utensil, and much prized by those who have used it. The labor of dish-wiping is avoided through the use of such a rack, and housekeepers will welcome anything that will dispense with this drudgery. The plates, having been washed, are put into quite hot rinsing water and thoroughly rinsed. They are then put into the rack and allowed to remain there until dry. This takes but a few minutes, the heat remaining in the dish when taken from the rinsing water affecting this. The top part should be filled first, to allow the dishes to drain before putting dishes under them. Dishes, and especially glassware, so dried, will have a fine polish, satisfactory to the most scrupulous housekeeper.
The materials required for a rack that will hold 36 dishes and an equal number of cups or tumblers are : 4 pieces clear birch or maple 24" long, 11/2" wide and 7/8" thick, and one piece 36" long; 5 round pieces, 36" long and 1" diameter, 36 pieces doweling 30" long and 1/4" diameter. The rack above illustrated was made in a hurry, and the X pieces were not halved to the crosspieces, nor the ends beveled. It is desirable to do this, as it makes a neater-looking rack.
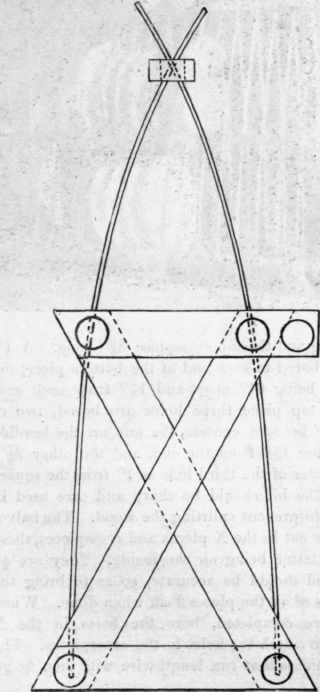
If one is not familiar with wood-working, it will be advisable, before cutting out the pieces, to make a full-sized drawing of the end section as here given on one-quarter scale. The joints can then be laid out accurately and the work proceed more rapidly.
The X pieces are 14 5/8" long, allowing 7/8" on each end for bevels. The bottom crosspiece is 91/4" long and the top crosspiece 83/8" long. A 1" hole is bored in each end of the bottom piece, the centers being 61/2" apart and l1/8" from each end. In the top piece three holes are bored, two of them 5" between centers, the one on the beveled end being 11/8" from the end, and the other 21/8". The center of the third hole is l" from the square end. The bit should be sharp and care used in boring to prevent splitting the wood. The halves are now cut in the X pieces and crosspieces, those on the latter being on the inside. They are 1/2" deep and should be accurate, so as to bring the surfaces of all the pieces flush when done. When these are completed, bore the holes in the X pieces to match the holes in the crosspieces. The round pieces that run lengthwise will then fit all right.

The round pieces are now bored with 1/4" holes to receive the dowel pieces. The holes in the two bottom ones are not bored through, about a 1/4" of wood being left. A pencil mark should be made along these pieces to insure getting the holes in line. Also care should be used to bore the holes in the same direction. A piece of dowel put in the first hole bored will serve as a guide for the rest. The holes are 17/8" between centers, and extra should be allowed on each end for fitting to the holes in the end pieces. No holes are bored in the upper outside round piece, this being used only when the rack is supported on a wall and rests on .screw-hooks in the wall. In the upper flat piece, through which the dowels cross, bore 3/4" holes, 17/8" between centers, the center of the end holes being 17/8 from the end.
The rack is now ready to be put together. The round and end pieces are put together and glued. Two dowels are put in the end holes at each end, the tops brought together, and the top piece slipped over them and pressed down to the proper place. The dowels for the other holes are then easily placed. Beneath the rack should be a drain board. This is 9" wide and 36" long, with a 1/4" square strip along the sides and one end, the other being over the sink or a dish, into which flows the water from the plates. This drain board is sometimes covered with zinc, but a hard enamel paint will answer nicely. The rack is shellacked. The capacity of the rack may be increased or diminished by varying the number of partitions.
Continue to:
My Books

