Electric Bell Fitting. I. A Residence
Description
This section is from the book "Amateur Work Magazine Vol1". Also available from Amazon: Amateur Work.
Electric Bell Fitting. I. A Residence
The use of electric bells is now so universal as to require no description of their adaptability to many household requirements. Simple in construction, easily fitted to new or old buildings, needing but little attention in operation, and serving so many useful purposes: any one of ordinary mechanical ability can, with but little expense, learn to make them or fit up a dwelling, office, factory or other place where they may be desired.
The essential parts are a battery for generating the current, the bell, a push button or buttons for closing the circuit and wire. The battery, of one or more cells, may be one of several different forms, depending upon the location and service for which it is intended. It is quite important that the battery used should be reliable and properly set up, as failure at this 'point affects the whole system, while a broken wire or bell may disable only a single point. The size of the battery is regulated by the amount of work required. Too small a battery would become quickly exhausted, the bells would ring faintly, or not at all, and disappointment follow, where, with a proper battery, very satisfactory service would be secured. Batteries that are overtaxed exhaust much sooner in proportion than do those of adequate size. One horse will fail to haul a load that two horses would have no difficulty in hauling for a long distance.
The Battery.
The Leclanche Battery is the form most generally used for electric bell work, although the Fuller or Edison-Lalande is used where the work is excessively heavy. For most places the Leclanche will be found adequate. The Leclanche cell consists of a glass jar, a zinc rod, the positive element; and a carbon plate packed in porous cup with a mixture of carbon and peroxide of manganese, which form the negative element. The porous cup, after being packed, is covered with a preparation of pitch. When these parts are assembled, the exciting fluid, a solution of sal ammoniac, is added. The solution should fill about two-thirds of the jar, and should be strong enough so that when the water has taken up all the sal ammoniac it will, there will be a little left in the bottom of the jar. So long as the wire circuit is open or broken no chemical action takes place; but when the button is pressed, and the circuit closed, an electric current flows from the positive pole to the negative, and a chemical reaction takes place. The solution of sal ammoniac (chloride of ammonia) is decomposed, the chloride unites with the zinc to form chloride of zinc, while the ammonia extracts oxygen from the manganese, forming a soluble compound on the surface of the carbon. While the cell is working, the zinc rod is being dissolved, the manganese gives up oxygen, and the carbon remains unaltered. In time the zinc rod would have to be replaced with a new one, and a fresh solution of sal ammoniac replace the old one, which contains an excess of chloride of zinc. The peroxide of manganese absorbs oxygen from the air when the cell is not at work, to replace that extracted by the ammonia. The top of the glass jar is covered, both inside and out, with a narrow coating of paraffin wax, to prevent the salts from creeping out of the jar and soiling the shelf upon which it rests. Where the paraffin has not been properly applied or rubbed off, the salts will at times gather on the outside of the jar. This can be corrected by cleaning off the salts, and recoating the jar with paraffin, obtained by melting a piece of wax candle in a cup placed in hot water. This description of a Leclanche cell is given to enable the reader to have a general idea of its parts and working. At another time a more complete description will be given, in connection with their manufacture out of such articles as may at times be discarded in the home.
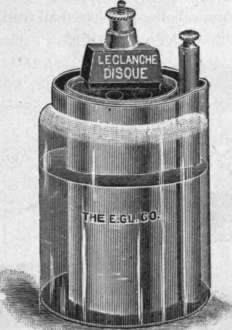
Several excellent forms of "dry batteries" are now much used for this work, and obviate all trouble with liquids, being purchased all ready for work when connected with the wires.

The Bells.
The form of bells generally used is that known as the vibrating or trembling bell (see Fig.). While the circuit is closed the bell will continuously sound, due to the rapid vibrations of the striker or hammer. The parts are: an electromagnet, A, a vibrating armature, B, upon one end of which is the hammer, a bell of wood or metal, C, and connecting wires, screws and terminals. Upon closing the circuit the current enters the terminal, P, flows around the coils of the electromagnet to D, continuing through the armature B and contact spring E to the screw F and the wire connection to the terminal N. In its flow around the electro-magnet the current has magnetized the cores, which now exert an attraction for the armature, causing it to approach the poles. This causes the hammer to strike the bell. This movement of the armature has brought the contact, spring away from the contact screw, breaking the circuit. The breaking of the circuit prevents the current from exciting the electro-magnet, and the cores cease to attract the armature, which, owing to the tension of the spring, moves back to its former position, again closing the circuit; the current again enters the electro-magnet and the movement of the [armature is repeated. These movements ' continue so long as 'the button is pressed, and are quite rapid.
Should a bell not work as here described, the cause of the trouble will probably be found either in the cores of the magnet or the adjustment of the contact screw or armature spring. The armature spring should be flexible, and yet keep in contact with the contact screw. If, after closing the circuit, the armature seems to cling to the poles of the magnet, the probability is, that the cores are not made of suitable iron, which should be, very soft; as only soft iron will quickly demagnetize, which is very necessary in electro-magnets. The proper adjustment of the contact screw can readily be secured by a little experimenting. If the armature is left too far away from the magnets, the ring will be a feeble one. A piece of watch-spring may be used to press lightly either side of the armature spring while the bell is ringing, and if the ringing improves, the necessary adjustment of screw or spring is at once evident.
Setting Up.
To illustrate the method of setting up an electric bell outfit, it is assumed* that the service to be secured consists of two bells, one for the front entrance of a dwelling and the other for the rear entrance, and that the bells are to be placed in the kitchen or rear hall, to ring where a servant may hear them.
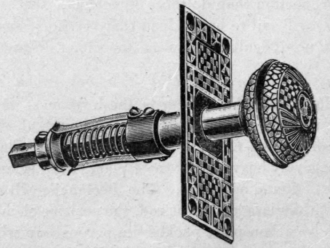
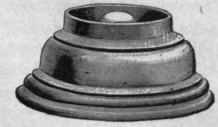
The location of the battery is first determined, one cell being large enough for this work. It should be in a place where it will not freeze or yet get too warm. The cellar usually is the most suitable, as the temperature does not vary greatly in the different seasons, and wires may be run to it handily from any part of the house. An empty wooden box, of suitable size to hold the battery, should be nailed to a post or to the timbers of the floor above. The carbon is then placed in the jar, which is then filled about two-thirds full of water. The sal ammoniac is then added and the zinc placed in position. Several hours are required before the cell is strong enough to properly ring the bell. The wire is now strung; and, to avoid confusion, two colors of covering are used, one color for the battery wire and one for the bell and push-buttons wires. To wire the front door, the place for the push-button is determined. If a pull-knob of a doorbell is to be found, this may be utilized, or it may be taken out and an electric pull-knob substituted. A push-button may also be used, and the wires run through the hole. If no hole is there, one will have to be bored with a small bit or bell-hanger's gimlet. A similar hole through the floor will enable enough of the two wires to be pushed up from the cellar to reach the push-button or knob, with a little wire to spare for connections. If a push-button is used, unscrew the cover, push one wire through one of the small holes beside the screw, remove about one inch of the insulating covering, twist the wire one turn around screw, then tighten screw. Push the other wire through the other hole, and attach in the same way. Pull the wires back until the pushbutton lays flat against the casing of the door. If the wires prevent this, with a knife or chisel cut grooves in the casing for the wires, and the button can then be screwed to the casing. The wire should be tacked at intervals to keep it in place, care being used not to set the tacks so hard as to break the wire. The route of the wire should be as inconspicuous as possible. Specially prepared hollow molding can be obtained to cover wires where this is* desirable. Returning to the cellar, the wire is strung along the timbers of the floor above in any way that may seem desirable, the battery wire being strung to the battery and the other wire to the point in the floor underneath the bells. Sufficient wire is measured to reach the bell before cutting.

Wiring Plan for Two The Heavy Line is Bells and One Battery, the Battery Wire.
The wiring for the rear door is done in a similar manner. The first battery wire may be tapped at any place, and a branch spliced on, if a saving of wire can be effected thereby. The return wire to the battery is strung to the bell, and this may likewise be spliced for a branch, the only requisite being a complete circuit of wire from the button to bell and battery; the button being the place where the circuit is open until closed by pressure. When splices are made, care must be used to fully insulate the point with tape prepared for that purpose. If such tape is not procurable, cotton twine may be used, and same covered with paraffin by melting a candle held over the joint and rubbed with hot table knife.
The bells are now secured to the wall, bell end down, the covers being removed to do this. The wires are then connected to the terminals, and all is complete. If the battery has been set up long enough in advance, and the work properly done, a pressure on the push-button should ring the bell. If the bell does not ring, inspect the work to see if all connections are made, and if all the parts are in working order. Where two or more bells are used, different tones should be used to enable them to be distinguished. A wooden shell can be used to replace a bell where a loud sound is not necessary.
Continue to:
My Books

