How To Make A Powerful Bichromate Battery
Description
This section is from the book "Amateur Work Magazine Vol1". Also available from Amazon: Amateur Work.
How To Make A Powerful Bichromate Battery
J. Pike, in the Model Engineer.
Although bichromate cells are easily made and put together, as a rule - however suitable they may be for lighting purposes - if there is heavy work to be done, as in driving a small motor, or running a model electric car, they quickly fall off in power. The following method of construction may be followed with considerable advantage: Briefly, the elements are made up of two zincs and three carbons for each cell, and I propose to describe two such cells, made to fit the well-known "Hartley " jam jars. These jars vary a little in capacity, and it will be well, therefore, to select them (referring to the 2-lb. size) of widest internal diameter.
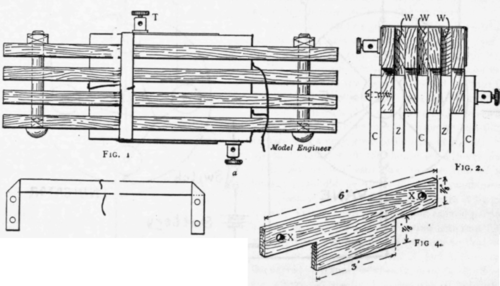
Fig. 3.
Procure from electrical stores six carbon plates, H" by 23/4"; this appears to be a stock size. I have tried to get larger plates, but without success. They should have two holes drilled in one end. Get from a dealer in iron and metal four pieces of stout zinc, 1/6" thick, and of size similar to the carbon plates - I find it easier and probably much cheaper to get these cut to order; they require to be drilled at one end, a hole 1/8" in each, centrally, and about \" from the end; and they must then be amalgamated.
To amalgamate the zinc plates effectively, provide an ounce or two each of strong sulphuric acid and quicksilver ; put a little water into an old soup plate, add sulphuric acid to make a strong acid solution (say about one part to two or three of water), and by the aid of an old toothbrush rub the zincs all over with this acid solution. Now pour the mercury into the dish, bring one edge of the zinc plate up to it, and with the brush sweep a little of the mercury on to the zinc plate. If the acid has been strong enough to really clean the surface of the zinc, the mercury will attach itself rapidly, and may be brushed all over, the amalgamation being completed very easily and effectively. Rinse the zincs in water, and set up to drain ; pour off the acid from the mercury (if any remains), wash this in water, and bottle for future use.
In order to insure that as large a surface as possible of zinc and carbon is available to the action of the bichromate solution, I provide pieces of wood (holders, in fact) of the shape in Fig. 4. Eight pieces are required of strong wood, that is to say, wood not easily split, and it should be at least 5/16" thick, but need not be more. Having cut the eight pieces, clamp four of them together, and carefully bore a hole at each end, as shown in Fig. 4 at X. This may be done with a brace and small bit, or by the primitive method of a red-hot iron rod. The hole should be just large enough to take a 21/2" small iron bolt, the thickness of which is rather under \". An attachment of wire to the top of each zinc must now be made, and to do this, clean about an inch of the top edge with a file, and solder thereto one end of a 6" length of No. 16 copper wire ; bring the wire out straight, as it is to be bent up afterwards. Provide next four terminals, those with a sharp-pointed screw; and also two strips of thin brass cut and bent over as in Fig. 3, the holes in the ends being drilled to coincide with the holes in the outside carbon plates.
We may now proceed to build up the battery. By means of short wood screws attach a zinc plate to the tongue of one of the wood holders; cut a piece of thin wood the thickness of the zinc, and 3" long by 1/2"', and attach it with a drop of secco-tine just above the zinc, bringing it up flush with the top. Now place another holder (adjust a carbon plate this time) and insert underneath the screws before making tight the end of a 6" length of wire. The end should be turned roughly around each screw, and the other end brought out in the opposite direction to the zinc wire. Fill up the space above the carbon with another piece of thin wood; adjust another holder and screw on a zinc plate; see that the attached wire comes out similarly to that on the other zinc, and fill up the apace above as before. Now another holder, and we may insert the bolt at each end and screw up. The small wood insertions at the top of each central zinc and carbon are, of course, to take up the pressure when the bolts are screwed tight - a reference to the Figs. 1 and 2 should make this quite plain. The two outside carbon plates are screwed on from the outside, the thin strip of brass being adjusted and bent over to make the connection. One of the terminals should be used in place of a brass round-head screw (see T in Fig. 1) ; the screw inserted into the zincs is central, and never near the screws used in the carbons, and of course must not be long enough to go right through the wood. The wire from the central carbon is brought up, turned around the brass strip, and soldered; and the two wires from the zincs also brought up, coiled around each other, soldered, and connected to a terminal, which may be screwed in on the opposite side to the carbon terminal,- a sectional view is shown in Fig. 2,- and looking down, the top of battery has the appearance of Fig. 1. Finally, soak the whole of the woodwork in shellac varnish,- perhaps hot paraffin wax would be better, - and when thoroughly dry and the battery dropped into chromic acid solution, they work admirably.
Continue to:
My Books

