How Wireless Telegraphy Apparatus is Made and Operated. I. The Spark Coil
Description
This section is from the book "Amateur Work Magazine Vol1". Also available from Amazon: Amateur Work.
How Wireless Telegraphy Apparatus is Made and Operated. I. The Spark Coil
R. C. Browne.
When robbed of technicalities, wireless telegraphy consists of simply creating a disturbance or vibration of the electric ether of the universe and detecting the same at some distant place by suitable instruments.
When vibrations or disturbances, commonly called waves, of electricity are caused by the passage of eleotricity through an insulating medium, such as air, the passage of the current must be in the form of an explosion spark, which can be produced by the instrument herein described ; namely, an induction coil. For this description, a 1" induction coil has been selected ; that is, a coil capable of giving an inch spark when operated by a battery of three or four bichromate or six or eight dry cells.
First make a pasteboard tube 10" long and 1" outside diameter by winding several layers of tough brown paper covered with glue or paste around a broom-handle. The broom-handle, before winding, should be freely covered with soap, so that the tube may be easily removed. When dry, give the tube a coating of shellac varnish. On this tube wind two layers of No. 14 double cotton-covered magnet wire, giving each layer a plentiful coating of shellac. A good grade of white shellac cut with alcohol will be found suitable. This winding forms the primary coil. Leave about 3" of free wire on each end for connections.
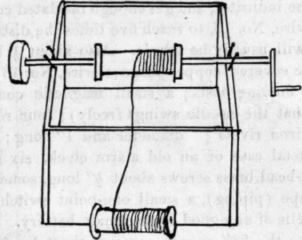
Make another paper tube by winding several layers of the paper over the primary winding. The outside layer should be smooth and even, so that the secondary coil may be easily wound. When dry, glue firmly on to each end a piece of mahogany or other suitable wood 51/2" square and 1/2" thick. Holes are bored in the center, of a , diameter to make a snug fit on the outside paper tube. This makes a spool 6" long between the ends. After this is done, commence to wind the fine wire coil, known as the secondary coil. This should be wound in the same direction as the primary coil. For this purpose 11/4 lbs. of No. 36 single cotton-covered magnet wire will be required. Make a small hole through one of the wooden ends close to the paper tube; put one end of the fine wire through it from the inside, and commence to wind on layer after layer, coating each layer with hot paraffin and putting between each layer of wire two thicknesses of paper which has been dipped in hot, melted paraffin. Select strong white paper free from printing and holes and not very thick. For those who are not fortunate in owning a lathe the following is a simple way to wind the coil. First wind the primary by hand, then put on the ends of the coil ready for the fine wire, and push the reel or spool so made over a piece of broom-handle. Then mount it across a wooden box, so that by pushing the ends of the coil lightly with the hand it may be made to revolve quite rapidly. A heavy wooden or metal wheel driven on the end of the broom-handle spindle will act as a balance wheel and cause it to revolve more evenly. To hold the broomstick in place cut two notches, and on the edges of the box drive two nails, one each side of the broom-handle.
In winding do not wind up to the wooden ends, but leave at least 1/2" of paper beyond each layer of wire. Also do not cut holes through the paper or bring the wire up over the end next to the wooden pieces, but put the edges of the paper under the wire when a layer of wire is completed; that is, put the paper between the wire, as it comes from the coil, and the coil itself, and wind both on so that the wire will come out on the top ready for another layer. The strips of paper should be large enough for a lap of about 3/8". The success of the coil depends to a great extent upon the evenness of the winding, so be careful to wind the wire as evenly as possible, never letting one turn of the wire lap over another. Also avoid all kinks ; if any are found, straighten out, using care not to break the wire. Examine the wire during the winding to locate breaks, and if any are found the covering should be removed, a connection made by soldering, and the joint carefully covered with waxed thread to thoroughly insulate it.
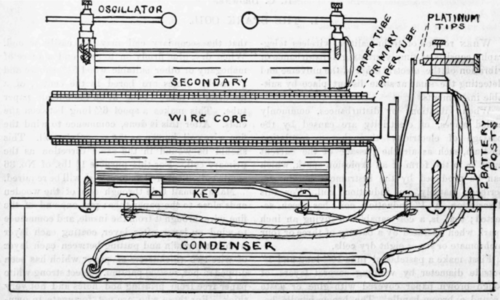
When all the wire has been wound, connect the two ends to two binding-posts, one being screwed to the top of each of the wooden ends of the coil The holes in the binding-posts should be opposite each other. After the coil is wound it may be covered with rubber, paper or velvet to give it a. neat appearance.
For the core, cut sufficient wire into pieces a trifle over 10" long (old rusty hay wire will answer), to fill the center of the primary coil. The ends of the wire should be trued up with a file. The coil is then attached with screws to a wooden base about 14" long, 8" wide and 2" high. A cigar or wooden candy box can be made over to the proper size. The interrupter or vibrator, which is simply an instrument very similar to an electric bell, for breaking the flow of the battery current in the primary coil, should next be made.
From a suitable piece of brass - a piece from an old alarm-clock case will answer - cut a spring 33/4" long and 1/2" wide. Drill a hole 3/16" in diameter, 1/4" from one end, and bend that end at right angles to the spring so as to make a foot 1/2" square for fastening to the base. On the other end of the spring solder a piece of iron weighing about 3/4 oz., to form a hammer which will work against the end of the wire core in the primary coil. A piece 1/4" thick cut from the end of a 3/4" round iron rod will be about the right size. Cut out another piece of brass spring, wedge-shaped, 4/' wide at one end and 1/4" wide at the other, and 21/4" long. Solder the wide end to the back of the spring, carrying the iron hammer about l"from the base, and rivet a small piece of No. 14 platinum wire or sheet platinum 1/4" from the narrow end. The best way to solder these pieces is to separately coat the parts to be joined with solder and then place them together and heat until the solder just melts. When completed, screw the foot of the hammer to the base so that the hammer will be opposite and §" from the end of the wire core.
Take a binding-post and have a thread cut through the hole for the wire so as to carry a brass thumbscrew having a small piece of No. 14 platinum wire about 1/8" long riveted to the end of it. This screw can easily be made by threading a piece of brass wire about 21/4" long. Bend one end to form a handle to turn it by, or solder on a brass nut.
Mount this binding-post on a block of wood and screw it to the base of the coil so that the platinum tip will press against the platinum on the spring of the hammer when the iron is away from the wire core.
We are now ready to make a key for regulating the signals. An ordinary telegraph key may be used, but a simple one can be made as follows : In a piece of brass spring 6" long and \" wide drill a hole in one end, and bend it slightly, so that when screwed to the base of the coil, the other end of the spring will be raised about 1/4". Put a brass screw through the base, directly under the end of the spring, so that when pressed down, the spring will come in contact with the head of the screw, which should be fastened with a file to give a good contact. A small piece of brass spring 1/2" wide, 141/2" long, should be bent and then screwed over the key spring, so that when the key is open or raised it will be held about 1/4" from the contact screw.
The condenser, which is used to intensify the power of the coil, is placed in the base and is made as follows: Cut out 60 sheets of tin-foil about 6" wide and 10" long, and 61 sheets of white paper 7" wide and 941/2" long. Thoroughly soak the paper with hot paraffin wax in a shallow pan, and commence to build the layers of the condenser.
Lay a sheet of prepared paper on a board, and on top of the paper place a piece of foil, allowing one end to project over the paper 141/2" on the right side. Put on another piece of paper and then another piece of foil, this time letting the end project on the left side, and so on, being sure to alternate the projecting end of each sheet of foil.
When finished, there should be thirty ends of foil at each end of the condenser. Fold all the foil projecting on each end into a roll so as to make a good electrical contact and fasten a connecting wire to each roll of foil. This may be done by soldering the bare end of the wire to a piece of thin lead and folding this into the roll. A piece of glass or thin wood is placed on the top and bottom of the condenser and wound with tape until firmly bound together, the end being sewed.
The remaining part is known as the oscillator. This consists of two brass balls 1/2" to 1" in diameter mounted on two brass wires held in the binding-posts on the ends of the coil. The balls and wires should be smoothly joined and have no rough places. The balls should be placed about 1/8" apart, and when signaling to any distance one ball should be connected by a wire to the earth (water pipe), and the other wire connecting with a kite or high pole, the higher the better. Two binding-posts should be placed on the base for connecting with the battery.
All the parts of the coil having been described, the connections will now be considered. For these connections, use covered No. 16 copper wire.
One battery binding-post is connected to the screw that holds the long key spring to the base, either by soldering or by twisting it under the spring. The screw that the key makes a contact with when pressed down, is connected with one end of the primary coil. The other end of the primary coil is connected to the spring of the vi
Continue to:
My Books

