A Cheap Nine-Inch Reflector. Construction of the Polisher. Continued
Description
This section is from the book "Amateur Work Magazine Vol4". Also available from Amazon: Amateur Work.
A Cheap Nine-Inch Reflector. Construction of the Polisher. Continued
We have now to mount these squares of pitch on tothe glass roof to make the polisher, and I may say at once that the position of the central square with regard to the center of the tool is a matter of the greatest importance. It might seem at first sight as though the most obvious way of securing uniformity of curve in the mirror would be to let the center of the tool coincide either with the center of a square or with the intersection of two grooves. This is not so. A glance at Fig. 2 will show that under these conditions a circle struck from the center of the tool would either fall almost entirely on the squares or between them. This would result in rings of unequal polish, and therefore of unequal figure, being produced in the mirror, and such rings are very hard to get rid of if once produced. They can be completely obviated, however, if care is taken to place the center of the tool in such a position with regard to the pitch that any circle struck from this center falls about equally on the squares and between them. For this purpose the center square of pitch is placed so that the center of the tool falls just within one corner of the square, as in Fig. 3.
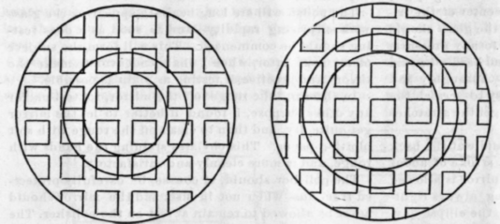
Fig. 2.

Fig. 3.
The first thing, therefore, is to mark the center of the tool accurately. Lines may then be drawn in two series at right angles to guide in placing the pitch squares. This is not absolutely necessary, as they can be placed with sufficient accuracy by eye after a little practice.
The central squares may now be placed in position as above, and I found that the easiest method was to smear the tool with a little turpentine and hold each square just above the chimney of an ordinary paraffine lamp until the under surface was melted, when it was rapidly placed in the proper position on the tool, and pressed down for a few seconds. The squares should be dried on blotting-paper as they are taken from the water, and it is very necessary that no water should be allowed to be set between the squares and the tool. The back of the tool should be examined from time to time to insure that each square has made good contact as if any of the squares are not thoroughly stuck to the glass they are sure to come loose in the polishing. The squares may be placed about 1/4 or 1/2 in. apart. This is to allow for a good deal of subsequent trimming. When the polisher is ready for work the intervals between the squares should be upwards of 1/2 in.
A slight difficulty arises with regard to the facets at the edge of the tool. I found it best to stick the square on without attempting to break them to shape, and cut them off afterwards. When the tool is completely covered with squares, the mirror should he covered with wet blotting-paper and placed on the polisher, the edges of the mirror and polisher coinciding accurately. A chisel, held vertically and lightly struck with a small mallet, is then used to cut off the portions projecting beyond the edge, and great care must be taken that the squares at the edge of the tool are properly stuck on.
The polisher should now be warmed, either by holding it in front of a fire or by means of hot water, to soften the pitch. The mirror, still covered with wet blotting-paper, may be allowed to rest on it for a few seconds to mould the surface of the pitch to the curve of the glass, and the squares should be neatly and accurately trimmed off by means of a sharp knife or a chisel held vertically. If both chisel and pitch are kept thoroughly wet all the time (indeed, it is a good plan to do the trimming of the squares under water) there is little danger of splintering the pitch.
The polisher is alternately pressed and trimmed until all the squares have made good contact, and until they are all exactly the same size and have neat, sharp edges. Too much care and patience cannot be brought to hear on this, as a neatly and accurately made polisher is half the battle; any want of accuracy in the size of the squares is sure to cause trouble.
When the polisher is satisfactory, we may begin to think about the rouge. The rouge as sold is liable to contain a few coarse particles, and I found it essential to mix it with plenty of water and allow it to stand for a few moments to let these coarse particles settle. The rouge and water are then poured into another vessel and allowed to stand for several hours; the water being poured away. A mud or paste of rouge is left which is free from grit and which will not cause scratches.
The polisher may now be warmed up for the last time; and the mirror, painted evenly and densely with rouge and a flat camel's-hair brush, is placed on it, the blotting-paper being omitted. It is moved slowly to and fro, without pressure, and in a few minutes the pitch will have assumed the exact curve of the mirror, and be fit for use. If any square does not make good contact, the warming and pressing should be continued for a bit longer: but this should not be necessary. It is a good plan to scratch each square diagonally, as shown in the figure, after the polisher is moulded to the curve. This lessens the friction, and makes it easier to control the stroke in polishing.
In my practice I invariably apply the rouge to the speculum, and not to the polisher; it is easier to get it even, and renders the motion much easier and more regular. The speculum is held in a triangle of hard wood, with pieces screwed on at the corners to grip the glass. A cotton-reel screwed to the center of the triangle forms a convenient handle, and the glass should be held just tight, and hot subjected to any pressure, which might distort the figure. It need hardly be said that every trace of emery must be thoroughly and completely got rid of; it is very easy to scratch the surface of the glass, and impossible to get the scratches out once they are there.
In the actual polishing I hold the handle at the back of the triangle in one hand and give, a stroke of about half the diameter of the mirror. The mirror is allowed to rotate quite freely, the motion being always right-handed; the stroke given is elliptical, the ellipse hav-having a breadth of about 2 in.; also the center of the ellipse is kept moving from side to side to the extent of an inch or two. This prevents rings appearing on the surface and tends to uniformity of curve. At first the friction of polishing will be considerable, but it lessens as the polish on the glass improves, and if the polisher is neatly and accurately made the motion will be easy and regular. The stroke should always be made (round the ellipse) in the same direction - right-handed or "clockwise, " in my case - as if it is attempted to move the mirror in the other direction over the polisher, the friction is enormously increased and sticking is the result. Why this should be I do not know, but it has been invariably the case in my experience.
The polish will ere long begin to appear on the glass with surprising rapidity - and as soon as it does testing should be commenced. This will form the subject of my next letter, when I shall endeavor to make the theory and practice of testing as plain as possible.
In cleaning the rouge off the mirror, to test or for any other purpose, I found it better to let the mirror get quite dry, and then to clean off the rouge with soft blotting-paper. This obviates staining the hands with rouge, and is more cleanly and satisfactory.
The polisher should, of course, be carefully protected from dust when not in use, and the mirror should never be allowed to remain at rest on the polisher. The quantity of water required is difficult to describe, but it should not be too much or sticking is the result.
Continue to:
My Books

