Decorative Enamelling. II Two Brooches in Cloisonne Enamel
Description
This section is from the book "Amateur Work Magazine Vol6". Also available from Amazon: Amateur Work.
Decorative Enamelling. II Two Brooches in Cloisonne Enamel
Both the jewellery worker and the silversmith find the use of enamel of great value in forming a suitable decoration for their work, and in this article are given two designs of easy construction, useful to enamellers for this purpose.
The design illustrated in Figs, 1 and 2 is a suggestion for a plain leaf arrangement springing from the outside border of the panel. The colors to be used will, of course, depend on the individual taste of the worker, but it would be as well to make the leaves a shade of green, and contrast them with a groundwork, say, of brown or purple-brown, or even another shade of green. Suitable combinations of greens and other colors may easily be seen by studying the foliage in the garden, and choosing some colors that harmonise in their natural forms. In this way it is possible to get some beautiful combinations of colors, which are much better than any haphazard selection from the stock of enamel in hand. As explained in the previous article, the word cloisonne is given to that form of enamelling where cloisons, or thin strips of wire, are soldered on to a base to make a cell which contains enamel. To fully illustrate this, the side view of Fig.
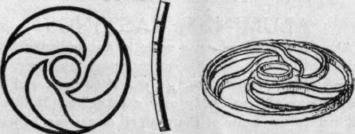
Fig. 1. Fig. 2. Fig. 3.
2 shows the cloisons fixed in their positions, and the section is taken through the diameter of the panel; in Fig. 3 is given a sketch showing the panel, with cloisons soldered down, quite ready for the reception of the enamel. In case the worker may think this design too dificult for a commencement, another is given in Fig. 4 and this is composed of a round panel, with a rim and containing four circles, each made of a strip of metal and soldered up and then soldered to the base.
To make a commencement with the work, we will take the design for Fig. 1, and fixing on a size, say, of 1 1/4 diameter of panel, as shown, we must take a piece of copper, or silver, about 22 S. W. G. and cut it to the shape. It must be domed to the shape shown in Fig. 2 and then placed in the hydrochloric acid pickling solution to be thoroughly cleansed, and next it should be planished on a stake and again pickled. The next step is to prepare the strips for the cloisons.
The silver may be bought in lengths, ready rolled to a ribbon and of a suitable size, but the strips may be made by either cutting them carefully from a thin sheet of silver or hammering out a length of wire on a fiat stake. With care the latter method is as good as any, although the metal rolls would ensure perfect evenness. Having provided sufficient, make an outside rim and solder it together, by tying a length of binding wire around it, touching the joint with borax and then placing a snippet of solder on and holding in the spirit flame. Next clean the rim in a sulphuric pickle and solder on to the base.
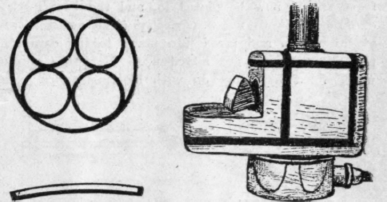
Fig. 4 & 5. Fig. 6.
The worker may have found some considerable difficulty in keeping the small bits of solder in place during the bubbling up of the borax on first heating, and it will be found very helpful if some borax is thoroughly fused and then ground down to a powder in petroleum. The borax solution thus obtained may be kept in a wide neck glass stoppered bottle and taken out with a dipper made from a bit of copper wire, melted at the end and flattened out as a kind of spoon. The borax may now be placed where required and will not bubble up at all and the petroleum will not affect the solder in the slightest degree.
We will now bend one of the leaf shapes, see that the ends fit neatly against the inner edge of the rim, and the lower edge flat on the base, and then cover the lower edge with borax and place in position, put a few small bits of solder in position and flush them, pressing down the cloison to ensure it being flat. It is not necessary to solder them completely to the base, just sufficient to keep them in position, for a good many workers do not solder their cloisons at all, but this is not a satisfactory method for the beginner, because of the risk of the cloisons moving while the enamel is being fused. When the three leaves and the center ring have been soldered down, we must prepare a bed for it, for, being domed, the work will twist under the great heat required unless supported. The best support to use is a mixture of plaster of Paris and pipeclay, mixed together to a paste with a little water. This paste is moulded to the shape of the underneath of the pearl and is placed on a small bit of iron, pierced with a few holes, also covered with the paste, to prevent any oxidation of the iron. The iron is to form a cradle to hold the article whilst in the furnace and may be domed to fit underneath the panel if desired.
The work should now be thoroughly well boiled in a sulphuric acid solution and any projections of solder along the edges of the cloisons or on the base must be scraped off. Before the spaces are filled with enamel, the back of the panel must be painted with enamel, Any suitable colour may be used and should be mixed with a little gum tragacanth. The gum is necessary to make the enamel adhere, or else being underneath, would fall off while being fired. The enamel for the front should now be placed in, and the best method of doing it is to use a perfectly clean penknife and pick some up and press into place, taking care that the colors do not get mixed up. Next the surplus water must be taken up with blotting paper, using

Fig. 7. Fig. 8.
the very best quality. Clean linen, or cambric rag may be used, but the greatest care must be taken to prevent fluff from getting on the enamel. The enamel should now be dried on top of the furnace and then is ready for firing. We now come to one of the difficulties of enamelling, for a question of expense comes to the front.. The only method of doing the best work is to use a muffle furnace (Fig. 6), a small one with gas burner costing about $10. The time necessary for successful fusing if the enamel depends on the kind used, and if a thoroughly permanent effect is required, then the hardest enamels should be used on a small piece of work, about 1 1/2 minutes in a well-heated muffle furnace will generally be sufficient. If, after the firing, it is found that the enamel has not filled up the spaces completely, the plate should be placed in a sulphuric acid pickle and any uneven parts rubbed down with a corundum file, and then the bare spots covered with enamel and retired, but it is advisable to anneal the plate before the second coat of enamel is applied. It is quite possible to place a different transparent enamel on another; for instance, a yellow on a deep blue, giving a shade of green, and if the plate is frequently annealed, it is surprising what may be done with it. The amateur may desire a quicker and cheaper method of enamelling, and if the work is small, say about 3/4 in. to 1 in., it may be treated in a spirit flame. The enamel should rest on a thin plate of iron, perforated with small holes and the underneath of the enamel place resting on a bed of clay and supported on an iron wire frame. A very suitable flame to use is that obtained from the lamp usually supplied to boil kettles.
Another way of firing small pieces of enamel is to get a crucible, place it on a firebrick on its side, place the enamel inside, properly supported, cover up the end of crucible and then build up a few pieces of firebrick around it to retain the heat. The heat should be directed on to the crucible with a large blowpipe, such as those used for brazing, and it is quite possible to do good work in this way. When the enamel is successfully fired, polish up the surface with putty powder, first filing down the projections, if any and then the work is ready to mount in a suitable frame.
A sketch is given in Fig. 7 of a very suitable form of mount for an enamel brooch. It is a thin band of silver about the same width as the outside thickness of the enamel, and of the same diameter, so that it is just the right size for the enamel to fit in. Next solder underneath a flat ring of silver, which should project inside and outside the band, sufficient inside to support the enamel and outside to hold a ring of twisted wire. Underneath this flat ring are soldered on the pin and catch, as will be seen in Fig. 8. Boil out the work, polish up with pumice and then with rouge and place in the panel, burnishing over the top to hold the enamel in place.
Continue to:
My Books

