Reversing-Switch For Electrical Experiments
Description
This section is from the book "The Boy Mechanic Vol. 1", by Popular Mechanics Co.. Also available from Amazon: 700 Things for Boys to Do.
Reversing-Switch For Electrical Experiments
A homemade reversing-switch, suitable for use by students of electrical and engineering courses in performing experiments, is shown in the diagram.
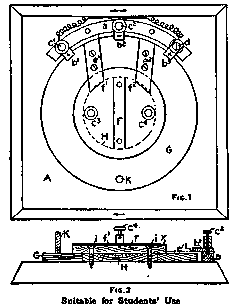
Fig. 2 Suitable for Students' Use
Referring to Fig. 1, A represents a pine board 4 in. by 4 in. and a is a circular piece of wood about 1/4 in. square, with three brass strips, b1, b2, b3, held down on it by two terminals, or binding posts, c1, c2, and a common screw, d. Post c1 is connected to d by means of an insulated wire, making carry the same kind of current (+ in the sketch).
About the center piece H moves a disk, held down by another disk F (Fig. 2), which is fastened through the center piece to the wooden base, A, by means of two wood screws. On the disk G are two brass strips, e1 and e2, so arranged that, when handle K is turned to one side, their one end just slips under the strips b1, b2, or b2, b3, respectively, making contact with , as shown in Fig. 2, at L, while their other ends slide in two half-circular brass plates f1, f2, held down on disk F by two other terminals, c3, c4, making contact with them as shown at y, Fig. 2.
The action of the switch is shown in Fig. 1. Connect terminal c1 to the carbon of a battery, and c2 to the zinc. Then, if you turn handle K to the right, so that the strips e1 and e2 touch b1 and b2, respectively, terminal c3 will show +, and c1 electricity; vice versa, if you turn the handle to the left so that e1 and e2 touch b2 and b3, respectively, terminal c3 will show - , and c4 + electricity.
The switch is easy to make and of very neat appearance.
Continue to:
More:
- A Home-Made Rabbit Trap
- How To Make A Small Single-Phase Induction Motor
- Grooved Pulley Made From Sheet Tin
- How To Make An Ammeter
- How To Make An Inexpensive Wooden Fan
- How To Make A Mission Library Table
My Books

