Refinishing An Automobile With Lacquer. Continued
Description
This section is from the book "Things To Make In Your Home Workshop", by Arthur Wakeling. Also available from Amazon: Things to Make in Your Home Workshop.
Refinishing An Automobile With Lacquer. Continued
Do not be startled by the appearance, as the correct color is bright orange. Allow the primer to dry one hour and inspect for "wet spots." If there are only a few small shiny places (½ in. in diameter or so), they may be overlooked be-cause they will disappear as more of the finish is applied. If there are many spots or streaks, or one or two large spots, wash off the whole coat of primer with the thinner and scrub again with benzole and thinner. When judgment of cleanliness has been developed, apply the primer over the entire body.
Between each filling of the paint jar, it should be half filled with thinner, shaken, and operated a few seconds to flush out the tubes and nozzle. If the gun does not discharge freely, partly clogged tubes are to blame; do not turn it against the car again until a full spray is delivered. It is well to have three or four extra mason jars on hand, one for clear thinner and the others for different colors.
Do not apply a heavy coat of primer, just enough to cover the metal thoroughly. Allow it to dry at least an hour and sandpaper lightly with the No. 280 paper or equivalent, using the paper dry.
The hood may now be given three coats of surfacer, each coat following the other at intervals of at least twenty minutes. The surfacer behaves somewhat differently and is harder to lay evenly on account of its quicker drying qualities. Special pains must be taken to dilute it sufficiently to prevent the formation of a rough "orange peel" surface. A little over fifty per cent of thinner will be required.
It is advisable not to stop the gun until the jar of material is completely sprayed, otherwise the tubes will clog slightly. If this happens, spray some thinner through the gun. After learning how on the hood, proceed with the body. Do not be disturbed if the coat looks somewhat rough in spots; the sanding operations will eliminate all traces of such unevenness. However, it saves labor to lay the coat on smoothly in the first place.
Now go over the surface for visible file marks or depressions and fill them with glazing putty. This should be allowed to set overnight and then scraped and sanded flush with the surface. The car should now be given a water sanding with waterproof sandpaper. Under the paper hold a piece of folded cloth, and keep it well soaked with water. Rub rather gently, making only three or four passes over any one spot. To check the smoothness of the surface, rub the fingers along the sanded parts as the work proceeds and resand all places that do not feel glass smooth. If any spots are rubbed through, the place should be re-sprayed after washing with gasoline and wiping with a cloth dampened (not wet) with thinner.
The whole car should now be washed with gasoline and wiped with a lintless cloth to prepare it for the lacquer finish coats (Fig. 4). Three coats are required, using a fifty per cent dilution.
If two colors are being used, spray the upper one first and then cover it with paper bound on with masking tape. Spray the other color in the same manner as the first. If a molding strip is to be still another color, cover the surface on each side with the tape before spraying. Do not attempt to peel the tape off for at least two hours after the last spraying, and then only after thoroughly soaking it with water applied with a paint brush. This will prevent any of the finish being lifted off with the tape.
The whole car is now to be sanded again with No. 280 paper soaked in gasoline and held over a cloth pad as before. Sand gently and make strokes "every which way" until a glasslike surface is obtained. Wash thoroughly with gasoline and give another sanding, using the No. 400 paper. Wash again with gasoline and wipe clean of all free color which has been sanded off. Spray on two coats of retarder thinner. This will smooth all traces of unevenness in tone and leave a natural gloss, which may be further heightened with any of the standard auto polishes compounded for lacquer finishes.
To refinish the wheels, sand with gasoline and with waterproof sandpaper, just enough to smooth the old finish unless the coating is badly flaked off, in which case the entire finish should be removed.
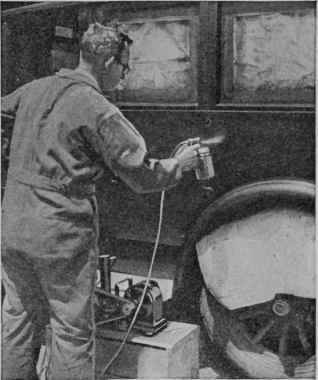
Fig. 4. - The sprayer should be held at about 8 in. from the work and kept in motion at all times.
Spray on three coats of finishing enamel, several varieties of which are available in quart sizes.
To complete the work, spray the un-derparts of the fenders with two coats of black lacquer; an inexpensive enamel will do if diluted with turpentine. The top should be painted with a brush in the regular way; that is, brushing lengthwise and using the dressing just as it comes from the can. If any work is required on the inside of the car, use a brushing lacquer on the instrument board and spar varnish for the molding around the windows. If any striping is required, the car should be taken to a professional striper, as a steady, experienced hand is necessary for this finishing touch.
As a precaution against the chipping of the finish, run a safety razor blade along the edge of all metal moldings before the finish has thoroughly set. Cutting down to the metal in this way will prevent any slight movement of the parts from breaking the glass-hard lacquer surface. Save any small portions of material left over as it will come in handy for the purpose of retouching scratches or scraped fenders.
Continue to:
My Books

