Definitions Of Terms Used In The Cold-Pack Method
Description
This section is from the book "Mrs. Fryer's Loose-Leaf Cook Book", by Jane Eayre Fryer. Also available from Amazon: Mrs. Fryer's Loose-Leaf Cook Book.
Definitions Of Terms Used In The Cold-Pack Method
The most important steps in the cold-pack method are: (1) blanching; (2) cold-dipping; (3) packing in clean containers, adding hot water or syrup at once, then immediately half sealing; and (4) processing in the sterilizer. Spoilage of food is nearly always due to carelessness in one of these steps.
1. Blanching consists in plunging the fruits or vegetables into boiling water, or exposing them to steam for a short time. This is necessary with all vegetables and some fruits. It insures thorough cleansing, and removes objectionable odors and flavors and excess acids. It starts the flow of coloring matter; it reduces the bulk of greens, and causes shrinkage of fruits, increasing the quantity which may be packed in a container.
For blanching in boiling water, place the food in a wire basket or piece of cheesecloth. The blanching time varies from one to fifteen minutes, as shown in the time-table on page 323, and the products should be kept under water the whole period.
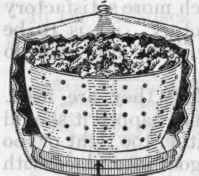
Water Line. Blanching Greens in Steam.
Spinach and other greens should not be blanched in hot water, but in steam to prevent the loss of the mineral salts, volatile oils, and other valuable substances. Place such vegetables in a colander and set this in a vessel which has a tightly fitting cover. In this vessel there should be an inch or two of water, but it should not touch the greens. In canning berries and all soft fruits, blanching is dispensed with.
2. Cold-dipping. - When the blanching is complete remove the vegetables or fruits and plunge them once or twice into cold water - the colder the better. The cold dip hardens the pulp under the skin so that the products are not injured by peeling. It also sets the coloring matter. Do not allow the products to stand in cold water.
Always blanch and cold-dip only enough material to fill one or two jars at a time.
3. Packing into jars should immediately follow. Cover contents with boiling water or syrup (see page 321). As soon as the jar is filled, put the rubber and cap in place. With glass-top jars place the wire that clamps on the cover just up to the first glass elevation - not between the two glass elevations, as this might make too great pressure, causing the lid to break.
With Mason jars, screw top on with thumb and little finger which will not be strong enough to make it too tight.
4. Processing is the sterilization treatment. In using the hot-water-bath canner, count from the time the water begins to boil. The water should be hot when the jars are put in. With the water-seal canner, count when the thermometer reaches 214° F. There is a clever little device substituted for a thermometer on some water-seal outfits. It is a whistle which blows when the water is hot enough for beginning to count time. Special directions are supplied with steam pressure canners and aluminum pressure cookers.
A reliable alarm clock, set to ring at the end of the sterilization period, is a great convenience.
Continue to:
My Books

