Scroll-Saw Problems. Part 3
Description
This section is from the book "Carpentry And Mechanics For Boys", by A. Neely Hall. Also available from Amazon: Carpentry and Mechanics for Boys.
Scroll-Saw Problems. Part 3
The block should be free from knots and cracks. White

Fig. 30. - Do not Cut the Prism Block to the Right Length until after the Other Cutting has been done. Additional Length is Needed to Hold the Separate Parts Together.
pine is best, but other clear wood will do. Cut the block to the dimensions shown in Fig. 33, planing its surfaces
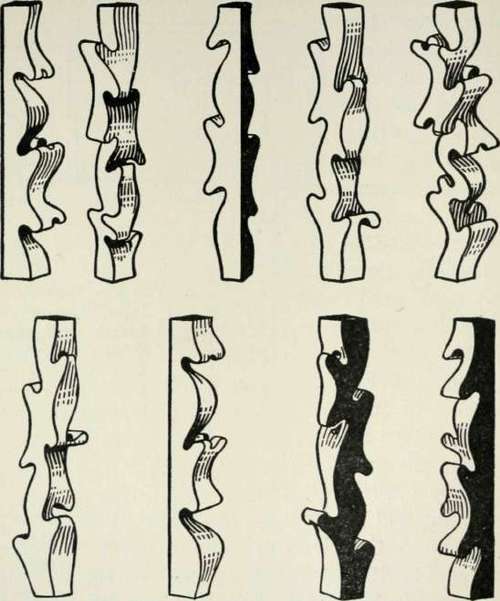
Fig. 31. - The Nine Blocks into which the Prism is to be Cut straight and smooth. Then upon the two faces and the two sides mark off the lines on which to cut. Draw these lines exactly as indicated. The corners of the cuts are shown rounded, because it is necessary to round them in turning the corners with the saw blade. The first piece to cut out is the table (Fig. 37). Figure 34 shows how this is removed from the block.
The next step is to separate the remainder of the block into two equal parts by sawing along the heavy line indicated in Fig. 34, which will give you the two blocks shown in Fig. 35. By now cutting from each of these blocks first the block C (Fig. 36), then the block D, you will have produced the two chairs B (Figs. 38 and 41), the two stools C (Figs. 39 and 42), and the two tabourets D (Figs. 40 and 43). In Figs. 34 and 35, only one cut is indicated on each, the lines of the other cuts being omitted to save confusion of lines.
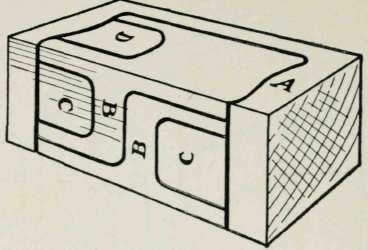
Fig. 32. - Saw the Block along the Heavy Lines; and you will have the Seven-Piece Set of Doll Furniture Shown in Figs. 37-43
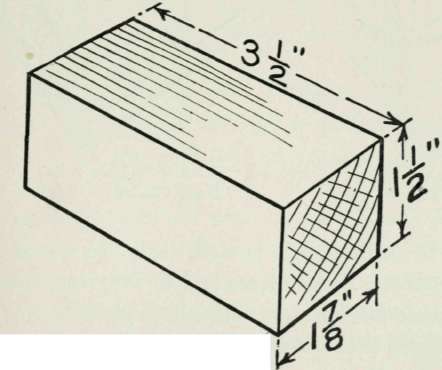
Fig. 33. - Dimensions for Block
Unless you do the marking and sawing very accurately, you will find it impossible to interlock the pieces except when they are turned in the direction of the positions


Fig. 34. - The First Cut. Block A is the Table
FiG. 35. - The Second Cut. Blocks B are Chairs originally occupied. Although it is well to do the cutting as accurately as possible, if the pieces will fit only one way you will have a puzzle all the more difficult to assemble. A fad for one's room is to have brightly colored
Bird and Animal Cut-Outs perched upon embroidery-hoop swings. Figure 44 shows a monkey-in-swing cut-out and Fig. 45 a parrot-in-swing cut-out, both of which are easily prepared.
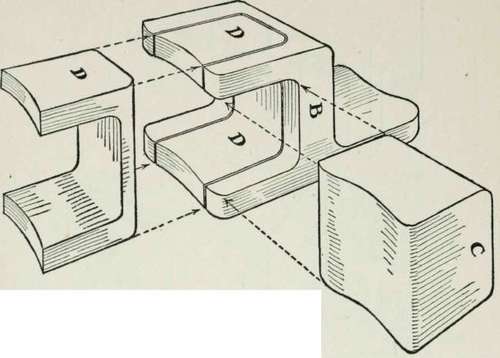
Fig. 36. - Each Chair Base has the Stool C and Tabouret D Cut Out of it
To simplify the work of drawing the parrot and monkey, patterns are shown in Figs. 46 and 47, that can be reproduced easily to the size desired by the process of enlarging by squares. Take a piece of wrapping-paper, and cut it exactly 7 1/2 inches wide by 11 inches long, being careful to get the corners square. Then with a ruler mark off 1/2-inch divisions along each edge, and connect opposite division points with straight lines. Your sheet of paper will now be filled with squares similar to the diagram of Figs. 46 and
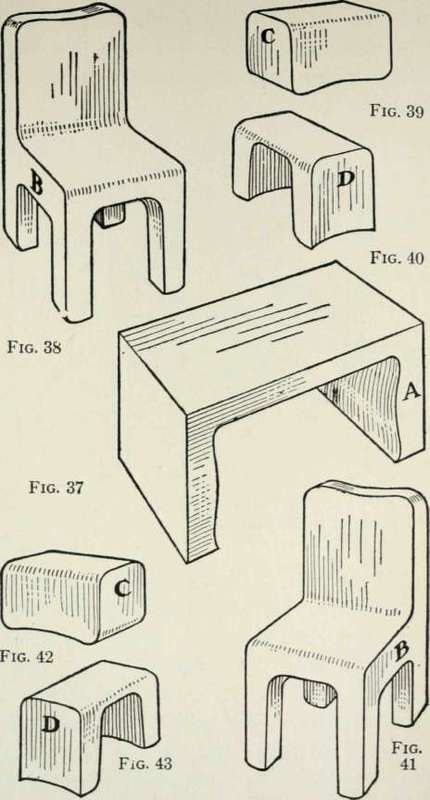
Figs. 37-43. - The Seven-Piece Set of Doll Furniture Completed

Fig. 44. - The Monkey-in-the-Swing Cut-Out
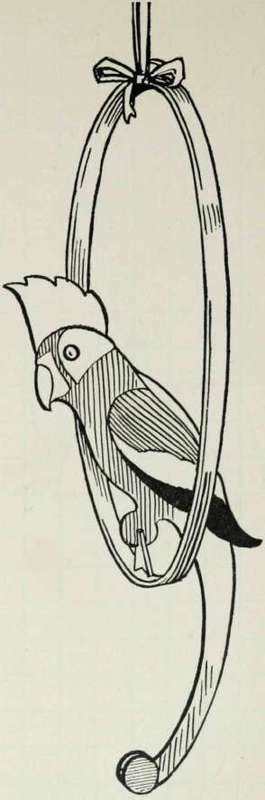
Fig. 45. - The Parrot-in-the-Swing Cut-Out
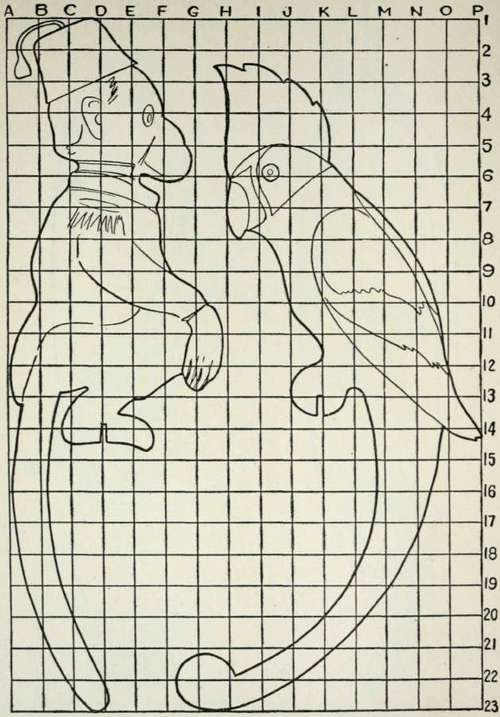
Fig. 46. - One-Half-Size Pattern Fig. 47. - One-Half-Size Pattern for Monkey Cut-Out for Parrot Cut-Out
47. There will be exactly the same number of squares, but they will be twice the size of those in the diagram. Letter the vertical lines across the top edge, and number the horizontal lines along one side, as shown. With the sheet thus prepared, it will only be necessary to locate within
Fig. 48 Fig. 49

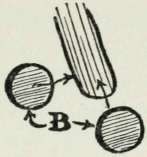
Fig. 51
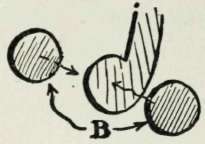
Fig. 52
Figs. 48 and 49. - How the Monkey's Feet and the Parrot's Claws are
Supported in the Swing Fig. 50. - Pattern for Balancing Points Figs. 51 and 52. - How the Tails are Weighted the squares what is indicated within corresponding squares on the diagram.
When the large patterns have been drawn, cut them out, and trace them off upon the wood they are to be cut out of.
In sawing out the pieces, care must be taken not to split off small projections. After cutting, sandpaper the edges.
Buy 12-inch oval embroidery-hoops for swings, and use ribbon to suspend them by. The monkey's feet do not stand upon the hoop. The balancing block A (Figs. 48 and 50) is inserted in a notch cut in the feet, and the points of this piece of wood rest upon the hoop. To make the monkey balance upon the perch, the tail must be weighted, and the best way of weighting it is by gluing a No. 3 skirt-weight to each side (B, Fig. 51). The parrot's claws grasp a balancing block (A, Fig. 49), which rests upon the hoop, and the tail is weighted like the monkey's (Fig. 52).
Paint the monkey and parrot in bright colors, also the hoops. Enamel paint in colors, prepared for this sort of painting, can be purchased at paint stores, and this is preferable to flat paint.
Continue to:
My Books

