


Finishing With The Skew Chisel
Description
This section is from the book "A Laboratory Course In Wood-Turning", by Michael Joseph Golden. Also available from Amazon: A Laboratory Course In Wood-Turning.
Finishing With The Skew Chisel
In using the skew chisel, the rest is set higher than when using the gouge - the height is determined by the stature of the operator, the rest being so set that it can be most conveniently used.
The manner of grasping the chisel is nearly the same as with the gouge; it is applied to the work, however, in an entirely different manner.
In using the skew chisel for straight outline work three conditions relative to the position of the chisel must be borne in mind: first, the chisel must have contact of its bevel with the surface being cut, as in Fig. 29; second, the acute angle of the edge must be kept clear of the work, and the cutting done between the corners, as in Fig. 29 and Fig. 30; and, third, the chisel must have contact with the rest, as in Fig. 29 and Fig. 31.

Fig. 29.
That the bevel of the chisel may be brought into position without danger of the edge catching in the revolving wood, first lay it on the work in the position shown in Fig. 32 and Fig. 33, and then draw it back, swinging the handle to the right, until it arrives at the position shown in Fig. 29 and Fig. 30. In these sketches the left hand is not shown, that the position of the tool may be shown more clearly; the hand, however, grasps the tool as in Fig. 34, the right hand holding the end of the handle, as when using the gouge.
The bevel of the chisel should now rest on the revolving work in the direction shown from [x] to [y] in Fig. 35. Raise the handle slightly until the edge cuts into the surface about 1/64 of an inch. By Side advancing the chisel for a short distance a smooth surface is produced where the chisel cuts, and this smooth surface may be used as a guide in regulating the depth of the cut as the cutting edge is advanced to the end of the wood. Start the cut about 2 inches from the tail-stock end and produce it to the other end.

Fig. 30.

Fig. 31.

Fig. 32. End

Fig. 33.
Now turn the chisel over and bring the other bevel into con. tact with the surface, as the first one was, except that the handle must be swung to the left, and finish the cut to the tail-stock end of the wood. The position of the hands when cutting to the tail-stock end is shown in Fig. 36.

Fig. 34.

Fig. 35.
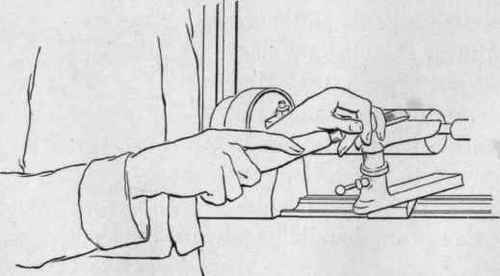
Fig. 36.
Repeat these cuts until the work is reduced to 2$ inches in diameter from end to end and the surface is smooth, and then mark the surface of the work, with the dividers, to the divisions shown in Fig. 37.

Fig. 37.
Set the dividers to 1 inch between points, and placing one point at the end of the wood, and just, clear of it, advance the other point until it scratches the surface lightly, holding the dividers in the position shown by the solid lines in Fig. 38. If held in the position shown by the dotted lines, they may catch into the wood and be thrown from the hand. Next, set the dividers to 2 inches, and mark that dimension; and increase the opening of the dividers by 1 inch for each of the remaining dimensions. To finish the exercise, remove the "burr" raised by the dividers. Do this with the acute corner of the skew chisel, as shown in Fig. 39, first placing the chisel in the position shown by the dotted lines, and then raising the handle until the corner cuts off the burr. The burr on one side is removed by holding the chisel in the position shown by the dotted lines in Fig. 40, and, on the other side, in that shown by the solid ones.

Fig. 38.

Fig. 39.

Fig. 40.
Continue to:


My Books

