


Chapter V. Picture-Frame-Clamp
Description
This section is from the book "Design and Construction in Wood", by William Noyes. Also available from Amazon: Design And Construction In Wood.
Chapter V. Picture-Frame-Clamp
Design. A picture-frame-clamp is of good design when it serves its purpose well. As shown in Fig. 53, this clamp meets this requirement. In Fig. 54, the details of its construction are made plain. The two long arms, A, A, by pivoting on a hinge, and by means of a series of holes in them, make it possible to adjust the clamp to frames varying in proportions and sizes, while the two small pieces, C, C, into the 90° angles of which the frame fits, are made adjustable by pivoting at these holes. A pair of these clamps is necessary for gluing up one frame. When set up as shown in Fig. 53, the joints of the frame are pulled tight into place by means of a handscrew. As here designed, this clamp will serve for frames from 6"x9" to 18"x24". To be of use it must be accurate, but there is no necessity for making it over-nice.
The woods selected are yellow poplar (medium strength and easy to work) and maple (very strong). But if the clamp is to be used often, maple should be used thruout.
Finish. To prevent the glue in the picture-frame from sticking to the clamp, a coat of boiled linseed oil is applied all over the clamp.
The following materials are required:
Yellow poplar, or other medium strong wood, ⅞"x 6½"x 17", Maple or oak, ⅞"xI½"x26", 8 round-head screws, 1½" No. 12, And a little boiled linseed oil.
I. Making the arms. First see that your plane is sharp and otherwise in good order (See Handwork in Wood, pp. 76 and 58). The long pieces (arms) are to be of yellow poplar and each is
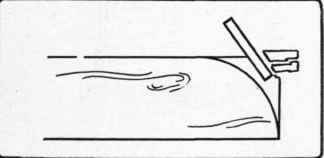
Fig. 55 Method of perpendicular chiseling.
⅞" x 1 ½" x 16" in size. To get them out, first smooth one broad surface, if it needs it, then plane one edge of the board straight and square. Gage a line 1½" from this edge, rip-saw it off, dress up the edge again, and repeat, until you have the four required pieces. Plane these pieces to 1½" wide. With the back-saw saw off one end of each piece square in the miter-box. With the dividers, lay out a quarter-circle on the broad side of the other end of each piece, Fig. 55. Next trim off the waste by sawing off the corner and then by means of "perpendicular chiseling" (Handwork in Wood, pp. 56-58). Or chiseling alone may be employed. Proceed as follows: Lay one of the pieces flat on a piece of waste wood or a cutting board. Grasp the handle of the 1" chisel, in the right hand, thumb up, Fig. 56, (Handwork in Wood, Fig. 72) and let the blade of the chisel pass between the thumb and the first finger of the left hand, which rests, back down, on the work, and holds it in place. The right hand pushes the chisel downward, and the left hand controls its position. Trim off the waste outside the quarter circle, a little at a time. If more force is required push with your chest against the end of the chisel handle. If still more force is needed, use the mallet in your right hand, grasping the blade of the chisel in your left hand (Handwork in Wood, Fig. 76). Always work around from the side to the end (Fig. 75, Handwork in Wood); otherwise you are likely to split the piece. When you have cut nearly to the line, set the piece up diagonally in the vise so that the quarter circle is up, and pare off shavings with the chisel, flat side down (as in Fig. 74, Handwork in Wood). The right hand pushes the chisel forward while the left thumb pushes it sidewise, thus giving a diagonal cut. Trim all the pieces in this way. Another method of trimming a curve is by means of the spokeshave. This is in reality a plane with a short sole, so made in order that the cutter can follow curves. It is held in both hands as in Fig. 57, and it may be either pushed or pulled. Before beginning to use it, see that the cutter is sharp and properly set. In the kind recommended above (p. 30) the width of the throat may be adjusted by means of the thumb-screw. This also alters the depth of the cut. With this too] trim off the quarter circle. By turning the blade diagonally to the direction of the cut, it will be found to work more easily and reliably.
Continue to:


My Books

