Mallet. Continued
Description
This section is from the book "Design and Construction in Wood", by William Noyes. Also available from Amazon: Design And Construction In Wood.
Mallet. Continued
Fig. 158. Lay-out of sides of mallet-head.
Next lay out, according to the dimensions given in Fig. 154, the shape of the head on the broad side. The curve for the outer edge can be obtained by making a templet of cardboard or thin wood, thus: The curve is the 4½" arc of a circle whose radius is 22". Set this templet exactly in place, as at A B C, Fig. 158, and scribe the curve. Or let one person bend and hold a thin spline of wood at the proper place, and another scribe with a pencil along it. To lay out the bevel of the ends (faces) of the head, set the T-bevel at the angle of the inner edge with the faces, and by means of this and of the try-square, score lines all around with a sharp knife. Make a groove for sawing on the outside of the bevel lines B D and C E, Fig. 158. (See Handwork in Wood, p. 66, Fig. 91), and saw off the waste.
To guide the saw, another block of wood with true square edges may be set along the scored line and clamped down with a handscrew on the bench, Fig. 159. Take the precaution, however, to protect the bench by a piece of a waste board underneath the block to be sawn. Saw with a crosscut-saw, just outside the scored lines. Repeat at the other end.

Fig. 159. Sawing the bevel on the mallet-head by means of a block clamped on as a guide.
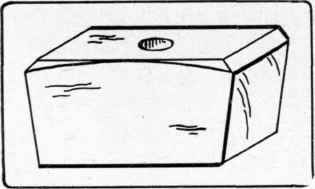
Fig 160. Block chamfered to avoid splintering when end planing.
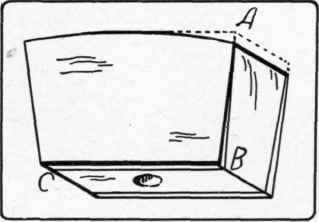
Fig. 161. Lay-out for beveled sides. (Seen from below.)
To plane these ends, fasten the piece upright in the vise. Avoid splintering by cutting chamfers at the outer arris, as in Fig. 160, and plane the ends flat and smooth. For this purpose the jack-plane is best, well sharpened and set fine. The block-plane is too light.
Next plane the waste off the curved outer edge. To rough off, plane across the grain. Finish with the grain for smoothness, using a circular plane if handy.
Next lay out on these planed ends and on the inner lower edge the bevels of the sides, as A B C, in Fig. 161, and plane off the waste.
With a pencil lay out the chamfers, which are ¼" on the arrises of the curved surface and 1/16" on the rest, and plane them off.
The Handle. True up the piece to a ¾"xl1½"xll", full. Draw, with a pencil, a fine center line on both broad sides and on the ends. On both broad sides lay out the plan of the handle, working from the center line. Bore a ⅜" hole, 1" from the hand end thru the short axis, for convenience in hanging up the mallet.
Rip-saw off the waste, working from both ends. In order to start the saw on the tapering cut, clamp a piece of waste wood to the handle, as A, in Fig. 162, and start the saw at B. Save one of the pieces thus sawn off to be used later to wedge the handle into the head. Spokeshave to the lines drawn, keeping the piece rectangular. Draw center lines on both edges and on the ends.
Lay out with a sharp pencil the chamfers which are to make the piece eight-sided, and on the large end draw as exact an ellipse as possible. Spokeshave these chamfers and then round the small end till it fits closely the hole in the mallet head. Be careful in using the spokeshave to keep the piece of even diameter thruout. In cutting the very end the spokeshave is likely to taper it. To avoid this, hold the spokeshave, not at right angles to the axis of the piece, but diagonally.
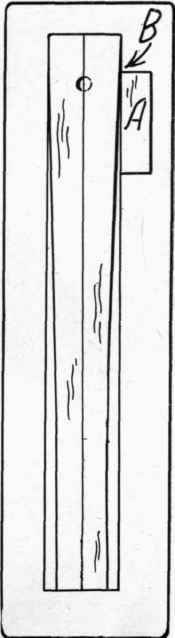
Fig. 162. Method of starting saw on a tapering cut.
Spokeshave the large end to an elliptical section. The shape should change smoothly into the rounded small end. Scrape smooth and sandpaper.
In the small end cut with the back-saw, a kerf 1" deep, Fig. 154.
Be careful to cut this parallel with the short axis of the ellipse at the other end. This is to receive a wedge, which may be made from one of the pieces sawn off in making the handle. The wedge should be ¾" wide, ⅛" at one end and tapering to an edge, and 1" long, Fig. 163. Place one end of this piece on the bench-hook against the cross-cleat, and chisel this end to an edge.
See Fig. 164. Drive the handle in the head, letting the small end project ⅛". Dip the wedge in glue and drive it in place. Saw off the projecting part of the wedge, clean up, and sandpaper.
Give the head a couple of coats of shellac and rub down with steel wool.
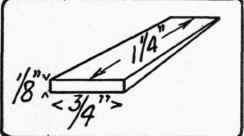
Fig. 163. Wedge for handle.
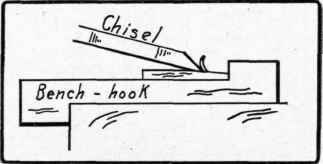
Fig. 164. Method of cutting a wedge.

Fig. 165. Trays.
1 2
5 6
7 7
8 9
10 11 12
Continue to:
My Books

