56. Lap Joint
Description
This section is from the book "Elements Of Construction", by Charles A. King. Also available from Amazon: Elements of construction.
56. Lap Joint
Lap Joint. Fig. 102. Material: 2 pieces 6" X 1 1/2" X J".
1. Fitting the joint : Plane the two sides which are to be glued together, and sandpaper them; do the same to the end of each piece which is adjacent to the joint, as at a a.
2. Fasten the pieces together with glue or brads, or both; if the glue is used, apply sparingly, or it will squeeze out at the ends, and make unnecessary work in cleaning it off. Hold the joint closely together with a hand screw until the glue sets; see Fig. 63 and Topic 33 B.
3. After the glue is set, work the model to the desired dimensions ; smooth and sandpaper.
The form of the joint shown is one of the simplest and most common in use. It may be seen wherever two pieces lap over one another. Upon heavy work, the joint is often keyed with one or more keys and bound round with strap iron, or bolted through plates, as shown in Fig. 103.
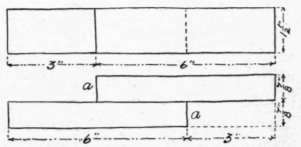
Fig. 102. - Lap Joint.
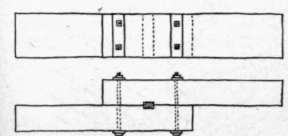
Fig. 103. - Lap Joint, Keyed and Bolted.
Continue to:
My Books

