58. Mitered Joint
Description
This section is from the book "Elements Of Construction", by Charles A. King. Also available from Amazon: Elements of construction.
58. Mitered Joint
Mitered Joint. Fig. 105.
Material: 2 pieces, 6" X 1 1/2" X 7/8".
A. Uses of the mitered joint: The term miter is usually applied to the angle of 45°, by which a right angle is joined together, but any angle may have its miter. It is one of the most common joints, and is used in making picture frames, and in fitting door and window casings, base moldings, etc. It takes the place of the square butt joint upon plain wood in many places where it would be objectionable for the end wood to show. The intersection joint is an adaptation of this joint.
B. The miter box: In cutting a miter, it is customary to use a miter box. The form of miter box shown in Fig. 106 is one of a number of patented, adjustable, iron miter boxes upon the market, one of which is usually owned by every carpenter who works upon the bench or inside finishing. (In purchasing a tool of this sort, the longest saw possible should be selected.)
1. Place the molding in the box, as indicated.
2. After the ends of the pieces which form the joint are sawed, fit them together with a block plane. If the pieces are for outside work, an accurate saw cut is generally sufficient, but if the saw has not made the miter a good fit, or if the mitered angle is not exactly true, the block plane must be used.
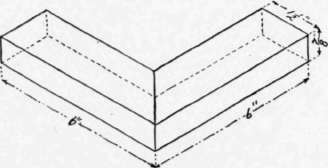
Fig. 105. - Mitered Joint.

Fig. 106. - Iron Miter Box with Piece in Place Ready for Sawing.
C. Nailing a mitered joint: In nailing a mitered joint (as in a picture frame), bore holes for the nails in pieces c, and place b in the vise as indicated. The pieces should be held as shown in Fig. 107, A, piece c projecting beyond piece d about 1/8"', as at e, so that when the nails are driven home they will force the members of the moldings to coincide, as at e in Fig. 107 B.
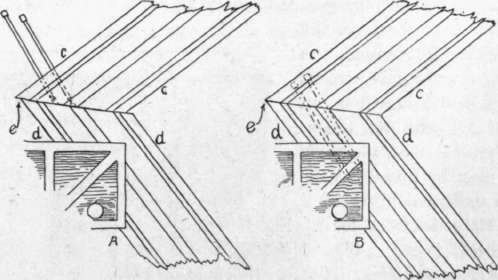
Fig. 107. - A. Method of Holding Mitered Joint for Nailing. B. Mitered Joint Nailed, Members Intersecting.
Glue should always be used if the best results are desired.
After the nails have been driven as indicated, piece c may be placed in the vise, and holes bored and nails driven through d, if the greatest strength is desired; this is not advisable upon ordinary work, however, and should be done only upon large moldings, on account of the danger of splitting the wood, and of nailing the joint open unless the nails are driven very skillfully, since they pull against each other.
Notice that the nails are pointed a very little outside of square with the edge of piece c. A little practice will convince the workman that driving nails at about this angle will give better results than if the nails are driven square, or at a greater angle, as the tendency to slide, or drive open, is thereby lessened.
A wooden miter box is preferred by many workmen in finishing down the outside of a house. (See Topic 71.)
D. Marking a miter with the bevel: If it is desired, the student may, in this exercise, lay out the angle of the miter by using a bevel for the face, and the try-square to mark across the edge; or, in place of the bevel, he may use the miter square, a tool made the same as a try-square, except that the blade is set at an angle of 45° with the beam. If the bevel is used, the angle of 45° may be found by the method indicated in Fig. 9.
Continue to:
My Books

