78. Plain Dovetailed Joint
Description
This section is from the book "Elements Of Construction", by Charles A. King. Also available from Amazon: Elements of construction.
78. Plain Dovetailed Joint
Plain Dovetailed Joint. Fig. 145.
Material: 2 pieces, 4 1/2" X 3" X J".
This joint is rarely used upon anything but the most expensive work, as it requires a high degree of skill to make it economically. It forms the strongest possible unreen-forced joint for the corners of boxes, chests, etc.
A. Laying out and cutting the dovetails: In making a dovetailed joint, some workmen lay out and cut the pin, a, first, which necessitates that the tails, b, should be marked and cut one at a time. Good results may be obtained by this method, but it is slow, and is rarely used upon practical work. The common method used by workmen is to saw the tails, 6, first, and mark the pins by the tails. If two or more joints are to be dovetailed alike, the sides may be made into a bunch, and all sawed at once, as shown in Fig. 146.
The pieces for this exercise should be prepared about 2" longer than actually needed, as it is possible that the first attempt will be a failure.
1. Make the ends to be dovetailed perfectly square and true.
2. Gauge upon each side from these ends, the distance, c, or the thickness of the piece to be dovetailed.
3. Place e, or the tailpiece, in the vise, end up, and face side toward the workman. Beginning at an equal distance from each edge, say 5/8", mark the distance, h, of the two outside tails. These should be rather small, not more than 3/16'. Lay out an equal distance halfway between these two for another tail.

Fig. 145. - Plain Dovetailed Joint.
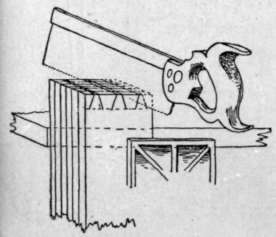
Fig. 146. - Sawing Dovetails.

Fig. 147. - Cutting Dovetails.
4. Mark the bevel of the pin; this may vary, but the bottom, g, of the tail, should not be more than 9/16" for £" stock. If the angle of the tail is too sharp, it is apt to be broken off when the pieces are driven together.
5. Saw with a backsaw, in every case leaving the line of the piece which is wanted.
6. Lay the pieces face down upon the bench, and with a chisel narrower than the bottom of the cut, make one cut, as at a, Fig. 147. This will minimize the tendency of the chisel to push back, so that when the next cut is made upon the line d, the wood will break into cut a, as at b, instead of pushing the chisel back of line d, as at c, which will probably happen if cut a is omitted.
7. The gauge mark, d, at the bottom of the pin cut upon both sides should be kept perfectly straight, and the cut be made exactly to this line, as a straight piece of wood is to fit against it. The section of the cut should be similar to d, Fig. 148, and half of it cut from each side, holding the chisel, as shown by the try-square at a, so as to cut under, which will allow the edges b, c to fit closely against the pin. The novice is more than likely to make a cut that will be full in the middle of the thickness of the board, shown by the dotted line at d, which will prevent the pin from making a good joint at b and c. Grasp the chisel as shown in Fig. 121.

Fig. 148. - Section of Dovetail.
8. Turn the piece over, face up, and make the cut from that side; clean out the chips, or core.
B. Marking and cutting the pins.
1. Place /, of Fig. 149, in the vise in a vertical position.
2. Place piece e upon the end of piece /, as indicated. It is important that the mark d, which is the same as d of Fig. 147, should exactly coincide with the corner, or the back side, of piece /. The relation of the ends of the tails of e, with the face of /, at h, is of no importance, providing they are long enough to come flush, or project by the face of /. If piece e cannot be held firmly enough to allow of accurate marking, it may be held by small brads driven through the tails, as at k. Avoid doing this if possible, as the holes will show in the finished model.
3. Remove piece e, and with try-square and sharp pencil, or knife, mark lines, n, upon the face and back side of f, as in Fig. 150.
4. With backsaw, cut down to lines g, as shown by double lines, being careful that in every case the cut is made outside of m and n, or that these lines are left on the pin.
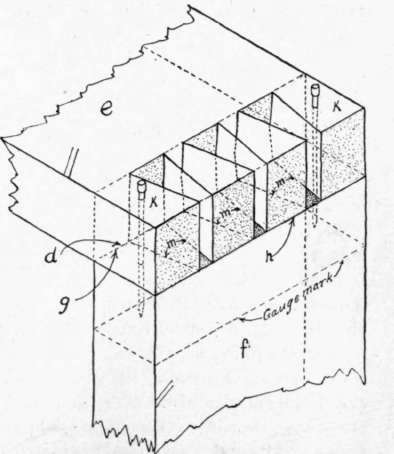
Fig. 149. - Dovetailing; Marking Pins.

Fig. 150. - Dovetailing; Sawing Pins.
5. Turn the piece over in the vise so that the cuts p, g may be made in each edge. These should be made exactly to the line upon each surface of the cut, with a backsaw. This will cut out the corner, t. If the work has been accurately done, these corners should not be touched again.
6. Clean out the spaces, r, with a chisel by the same method used in cutting the tails. See A 6, of this topic.
7. If this work has been done with sufficient accuracy, there will be no need of trimming either the pin or the tail to allow the two pieces to come together and make a perfect joint. To attain this accuracy should be the ambition of each student, as the skillful workman must be able to make dovetails rapidly, surely, and without trimming. In cutting the pins, the amateur is quite as likely to cut inside as outside of the lines, thus making the pins too small; this tendency should be guarded against, and the pins, s, s, s, left the exact size desired. In every case, the saw cut should be made with such care that chiseling or fitting will be unnecessary, as it is quite as likely to injure as to improve the joint.
8. The inside of both pieces should be smoothed and sandpapered before being put together permanently; and care should be taken not to plane any off of the back side of the pins, or they may be too small. If the pins fit too closely, with a hammer bruise the corners of their ends a little, where they enter the space between the tails; this makes them a little smaller, but when they are glued together, the moisture of the glue will swell the pins to their normal size. Glue the pieces together, being sure that the angle of the joint is square ; apply the glue sparingly.
If the work has been done accurately, the joint should be so tight that when it is set away for the glue to harden, it will hold itself together without the aid of hand screws; though if necessary, these may be used judiciously.
9. Smooth and sandpaper.
Continue to:
My Books

