Exercise 11 . - Construction Of A Mortise-Joint
Description
This section is from the book "Exercises In Wood-Working", by Ivin Sickels. Also available from Amazon: Exercises in Wood Working.
Exercise 11 . - Construction Of A Mortise-Joint
Materials. - The sticks of Exercise 9, after cutting off the half-joint. Work. - To unite the pieces with a through mortise-joint.
Hold the pieces in the position shown in Fig. 1, with the faces toward you. The upper is to have a tenon formed on its end, and the lower a mortise cut into it.
Adjust the upper piece 2" from the end of the lower; mark with a sharp pencil the width of the upper piece on the face-edge of the lower (a, a, Fig. 1). With these points as guides, mark with the try-square and pencil on three sides of the mortise-piece, as shown at a, a, Fig. 2; and with the try-square and knife, mark all around the tenon-piece 3 1/4" from its end, as at b, b.
Set the gauge at 7/8", and mark on the end and sides of the tenon-piece, and on the top and bottom of the mortise-piece, as at a, a, Fig. 3. Then set the gauge at 1 7/8" and mark between the same limits as before, producing the lines b, b, Fig. 4. Now place the tenon-piece on the mortise-piece, and note that the marks correspond exactly.
Saw the tenon, observing the instructions in Exercise 9, in regard to the saw-kerf and waste wood. In order to enter the mortise, the tenon (a, Fig. 5) must have its edges removed by chamfering, as at b; the measures, shown at c, Fig. 5, are marked with the pencil and rule, and the chamfer cut with the chisel.
To cut out the mortise, bore with the brace and 7/8" center-bit two holes in the mortise-piece, as at a, a, Fig. 6, about one half way through; then turn the piece over and bore down to meet the first holes. With the chisel and mallet, remove the part b between the holes, cutting first one side then the other with the edge of the chisel, parallel to the grain, c, and with the bevel side down, so as to throw out the chips. Next turn the chisel, and cut down the ends of the mortise as at d, leaving a margin of wood for finishing.
The mortise is now fitted for the tenon by cutting away the margin (a, a, Fig. 7) and paring the sides until the tenon passes snugly through. Test the sides of the mortise for flatness with the blade of the try-square.
•
Ex. ii.

Fig. 1
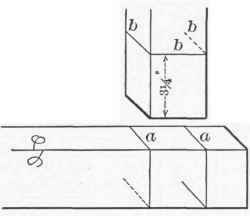
Fig. 2

Fig. 3

Fig. 4

Fig. 5

Fig. 6
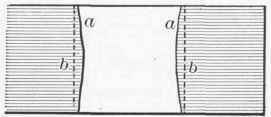
Fig. 7
Continue to:
My Books

