Lesson VI. Working Sketches
Description
This section is from the book "Manual Training: First Lessons In Wood-Working", by Alfred G. Compton. Also available from Amazon: First Lessons In Wood-Working.
Lesson VI. Working Sketches
IT is proposed to make a box from the piece of board used in your seventh exercise. The box is to be made, not of any size and shape that you may happen to give it, but exactly according to given dimensions. This is extremely important, for, when an object is wanted for a given purpose, it is often worthless if not of just the right size and shape.
The shape and dimensions of this box, as of any other piece of work, can be shown in a working drawing or a working sketch. The former name is given to a drawing carefully made "to scale," and the latter to a drawing made with, less care, and which may be drawn freehand, and only approximately to scale. In the latter case the dimensions are marked on the corresponding parts of the drawing, and can be read off; in the former they are ascertained by measuring carefully the dimensions of the drawing, and making the proper allowance for the "scale," as will be understood presently.
Here is a block of wood, of which we will make a sketch first and a drawing afterwards. Measuring the block with the rule, we find it is 9 inches long, 5 inches wide, and 3 1/2 inches thick, or as we have agreed to represent it, 5" x 3 1/2" - 9". If we look directly at the front of the block, we see a rectangle 9" x 3 1/2", which we indicate by drawing, freehand, a rectangle whose long side is nearly three times as great as its short side, and writing on these sides their dimensions, as in Fig. 9. This figure we call the Elevation, or the Front Elevation. If we look straight down on the block, we see a rectangle 9" x 5". This we represent in a similar way, Fig. 10, and call the representation the Plan.
From these two, even if we had never seen the block, we should be able to form a correct picture in the mind of its size and shape, and a workman would be able to make one just like it. Sometimes, however, there are details in the figure of the object which these two drawings fail to show. Thus, if there were a round hole in the right-hand end, neither of these would show it. In such case a third figure is added, called the End Elevation. This is the view that we get if we look directly at the end of the object: in the case of this block it would be another rectangle, 3 1/2" x 5", Fig. 11. If we wish to show the hole, we must ascertain exactly its size and position, and show them properly in the drawing. If the hole is 1" in diameter, and placed 3" from one of the narrow faces and 1" from one of the wide faces, we indicate this as in Fig. 12, making the drawing perhaps a little larger than before, so as to be able to write all the necessary dimensions. This, however, does not show how deep the hole is. Suppose we find it to be 2" deep. Looking at the front of the block again, you will understand that, if we could look into the block, the hole would appear as at a b, Fig. 13. As the lines at a b are, however, hidden by the material of the block, we will indicate them by dotted lines. In the same manner the hole may be shown in the plan. The three figures being now brought together as in Fig. 14, they give complete information as to the size and shape of the block. This group of drawings thus marked, with the dimensions of all the parts, we will call a "Figured Sketch" or "Working Sketch." It is not necessary that the lines be ruled, provided they are drawn tolerably straight, and it is not necessary that they be exactly in true proportion to each other, though it is best to have them nearly so. Every dimension must be given in at least one of the drawings. If, for instance, the figure 3" in the plan were left out, the workman who should try to make the block from this sketch would not know where to bore the hole, unless this figure were given in the End Elevation. A dimension, however, which is given in one drawing need not be repeated in another. Thus the figure 9" in the Elevation need not be repeated in the Plan, though the repetition does no harm, unless the figures are too crowded.

Fig. 9.

Fig 10.
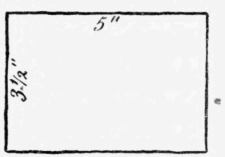
Fig.11.
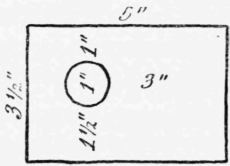
Fig.12.

Fig. 13.

Fig.14.
Having made figured sketches of the block, you may now, for exercise, make similar sketches of a large nail or spike, a bolt with a nut, a six-sided lead-pencil, a try-square, or other simple object. In our next lesson we will undertake a working drawing.
Continue to:
My Books

