Lesson XXIV. Chamfering. - Sand-Paper. - Shellac
Description
This section is from the book "Manual Training: First Lessons In Wood-Working", by Alfred G. Compton. Also available from Amazon: First Lessons In Wood-Working.
Lesson XXIV. Chamfering. - Sand-Paper. - Shellac
The door may now be glued together and afterwards finished up with the smooth-ing-plane, or the front inner edges of the frame may be chamfered first. Fig. 82 shows how the chamfer is to be laid out. The line A B is drawn with a sharp pencil on the front of each piece, at a distance of 3/16 from the inner edge, and the line C D on this inner edge at the same distance from the front. The pencil is used in preference to the gauge, because, unless the latter is used very lightly and skillfully, its mark is apt to show on the finished work.
The chamfer may be terminated at each end by a simple inclined cut, as at A and (7, Fig. 82, or by an ogee, as at B and D. For the former, mark the point a 3/4" from 0 the inner corner of the frame, A and C one inch from 0, and corresponding points at the other end of the piece. For the latter, mark a as before, and B and D 1 1/2" from 0.
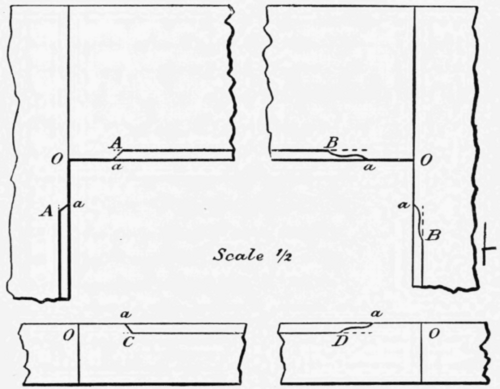
Fig. 82.
To cut the chamfer. First with the beveled end. Hold the piece in your vice; set the chisel near a, the flat side towards 0, and make an inclined cut extending nearly down to the ruled line, and throwing up a chip. Turning the chisel round, set it about 1/8" beyond A or C, and cut out the chip, leaving a notch. Cut again, with the chisel close to a, making as clean a cut as you can, and being very careful not to let the chisel go even a little beyond the ruled line A B, because, if it does so, a mark will be left on the chamfered surface which you cannot remove. Having made such a notch at each end of the chamfer, you may score the edge not quite down to the two marks, and pare it down, making a plane surface inclined to the face. You will find that it is not easy to make this surface perfectly true. The points to be attended to in order to secure good results are:
Exercise 40. Chamfering A Frame
1. To keep the chisel very sharp, and in particular, not to let it get in the least degree round on the back.
2. To give it constantly the sliding movement which prevents it from following the grain of the wood.
3. As you get nearly down to the required depth of the chamfer, to keep the back of the chisel lying quite flat on the surface, so that it shall act as a plane, removing all irregularities.
4. To take care, while cutting either the inclined end of the chamfer, or the long plane surface, to make no mark on the other surface, but to make the two surfaces meet in a perfectly sharp and smooth line, perpendicular to the edge.
You see that it is impossible from the nature of the chamfer, to finish it up with the plane, and that it requires, therefore, excellent work with the chisel. If the chamfer is several feet long, the smoothing-plane can be used in the middle of it, but even then the ends have to be finished with the chisel. Fine sand-paper is sometimes used in finishing up such a surface, a piece of it being held on a block of wood and rubbed to and fro, taking great care not to allow any rocking motion of the block, as this would give a rounded surface instead of a plane one, nor to leave the paper loose on the block, in which case it will wrap round the corner of the work and produce the same result. Even with the utmost care that can be taken, the sand-paper is almost certain to take off the sharp corners that characterize good work, and should not be used, unless, as in this case, a very fine shaving can afterwards be taken off with the smoothing-plane from the adjacent face, to restore the sharpness of the edge.
Exercise 41. Sand-Papering
The ogee end of the chamfer is more difficult than the plane end. The curved surface to be formed is concave at a, Fig. 83, and convex at b. The part a should be cut first. The chisel is set with the handle towards the left in the Figure, and the bevel side towards the wood, a little to the left of a, and a small cut made. Then it is turned with the handle towards the right, the bevel still towards the wood, and the chip cut, out. These operations are repeated, gradually widening the cut, till the hollow has the proper size. As the cut is most inclined at the beginning of the hollow and level at the bottom, the handle of the chisel must be depressed as you approach the bottorn, and care must be taken to prevent the tool from making a mark on the opposite side of the hollow. The convex surface b is cut with the back of the chisel towards the wood, as in cutting the plane surface, and is comparatively easy to form. The entire curved surface, like the plane surface of the chamfer, ought to be formed with the chisel alone. If you fail to get it smooth with the chisel, you may use a piece of very fine sand-paper (No. 0) in the following way: Prepare a stick, 1/2" x 1/4" - 5". Cut one of the flat faces with your knife or your chisel, to such a curvature that it will nearly fit the hollow, touching at the bottom, but not at the sides. Glue a piece of sand-paper on this, and use it as a file to smooth the hollow. Even with this there is danger of your rounding the surface, and particularly of spoiling the sharp point of junction at c, between the ogee and the straight edge of your piece. You will do best, therefore, to endeavor to avoid the use of sand-paper in such cases as this, regarding it as the resource of an unskillful workman. This, however, is not to be understood as condemning the proper use of it on broad surfaces to give a smooth finish, when there are no corners that are likely to be injured by it.

Fig. 83.
The chamfered edges being now finished, you may pass the smoothing-plane, set very fine, once over the inner edge of the pieces of the frame, and over the surfaces of the panel, before gluing them together. The other surfaces can be finished afterwards.
The panel is not to be glued into its groove, but left free, so that it can shrink without splitting. It will even be best to rub some soap or wax on the corners, to prevent its being accidentally stuck by the glue which will squeeze out of the joints.
If you have no hand-screws large enough to span the width of the frame, you may proceed, in this and similar cases, as follows: Provide two strips of board, A and B, Fig. 84, three or four inches wide, and as long as the inside of your frame. Fasten them down on your bench parallel to each other with hand-screws, so that the door will lie between them, with about an inch to spare.
Lay two pairs of wedges in the open space, as at c and d. By driving the inner wedges outward you can force the stiles up close against the shoulders of the tenons. In putting the frame together, insert first two tenons into one stile and drive them home; then put in the panel, and lastly put on the other stile and drive it up tight. Put no glue on the inner edge of the tenon, as whatever is put on here will be driven out into the grooves and will tend to fasten the panel. Test the frame for squareness, and correct any error, before allowing the glue to set, by gentle strokes of the hammer on the proper corners, protecting the edge with a block of wood when you strike it.
Exercise 42. Gluing Up A Panel Frame

When all is dry, cut off the projecting ends with the back-saw, being careful not to cut too close, or you will deface the outer edge of the frame. Finish up with the smoothing-plane, observing the precautions indicated in Lesson XIX (Finishing A Dove-Tailed Box)., page 138, to avoid splintering.
The surfaces of the door may be finished with shellac varnish, which consists of white shellac dissolved in alcohol. This will protect it in part from the effects of moisture, and will allow it to be cleaned from time to time. Sand-paper all broad surfaces and wipe them clear of dust with a clean rag. Then, in a warm room, free from dust, apply with a flat brush, one coat of varnish, and let it dry. Do not pass the brush over the varnish oftener than is necessary to spread it smooth. Passing the brush over it when it is begining to "set," or dry, breaks up the smooth surface that it would form if left to itself. Do not put on too much at a time; it will flow down the sides and form "runs," which it is hard to remove. When the first coat is thoroughly dry, which should be in a quarter of an hour, it may be rubbed down with fine sand-paper, on a block, taking great care to do no injury to the corners, and a second coat applied.
Exercise 43. Finishing With Shellac
If you have determined in advance to finish the work with shellac, it will be best to finish the panel and the inner edges of the frame before gluing. In this case, however, you must be careful to clean off with warm water any glue that may get on the finished surfaces, before it hardens, as, after it is hard it will take off the* varnish with it. All the other surfaces should be finished after gluing.
Continue to:
My Books

