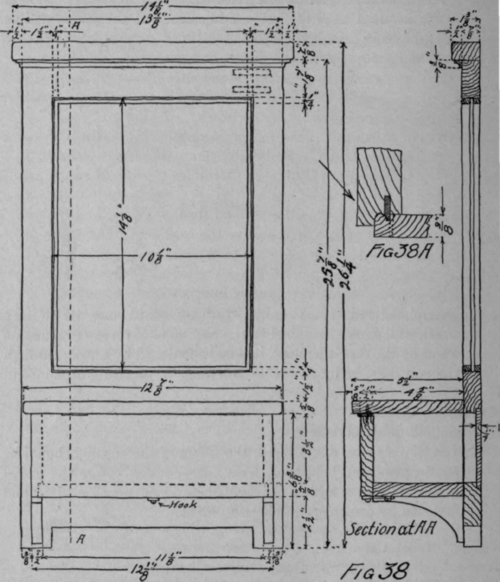
Fig. 38. Toilet Case
Description
This section is from the "Handbook In Woodwork And Carpentry" book, by Charles A. King. Also available from Amazon: Handbook in woodwork and carpentry.
Fig. 38. Toilet Case
New subjects: Moldings. Bead plane. Clamps. Wood: Poplar, elm, or butternut.
Preparatory: Same as in Fig. 1, applied to cutting each piece as it is wanted.
Exercises. 1. A. Mark face side, and plane one edge of the stiles square with it. Leave ends longer than required.
B. Mark face side and plane one edge of the top rail, and one edge each of the middle and bottom rails.
C. Mark with knife, cut, and block-plane one end of each rail to make a square joint against one of the stiles.
D. Mark with a knife, cut, and block-plane the three rails to exact length required, so that the other end of them will make a square joint against the other stile.
E. Plane the other edge of the middle and bottom rails.
F. Make the joints of the frame with two 3/8" dowels. See C, Topic
69 A. Allow the stiles to project indefinitely beyond the top and bottom rails, being sure that enough is allowed at the bottom for the piece that projects below.
2. Glue frame together. Keep faces of rails and stiles flush by using hand screws. Hold together by clamps until the glue has set.
3. A. Plane the face and the back of frame roughly, to remove glue.
B. Plane the edges.
C. Cut the top ends of the stile off flush with the top of the top rail, and square it to receive the cap.
D. Cut bottom of the stiles off to the required length and block plane.
E. Cut the rabbet in the middle and bottom rails, and the stiles to receive the back of the brush case.
F. Smooth the face of the frame. Sandpaper. See W, Topic 68 D.
4. A. Make the top shelf of given dimensions. Plane and sandpaper. B. Fasten it to the back with screws. Be sure that it is square with the face of the back.
5. A. Make the bottom shelf of the given dimensions. B. Plane and sandpaper it.
6. A. Make the brackets of the given dimensions, and from original design. B. Fit them to the back and top shelf. The top of the brackets should be grooved into the under side of the top shelf, if the best job is desired, but it will be satisfactory to some if the shelf rests squarely upon the top of the brackets, and is nailed with 1 1/2" brads. However, if the brackets are fitted squarely against the top shelf, the workmanlike way to fasten them is to make a doweled joint, by one of the methods explained in C, Topic 69 C.
C. Cut the grooves in the brackets for the bottom shelves.
D. Fasten the brackets and the lower shelf together with glue and a hand screw, and to the frame with screws through the back. The joint with the top shelf should be made at the same time.
7. A. With a \" bead plane, make the glass beads, and plane them all to a uniform width and thickness. Cut the beads with a bead plane, as shown in Fig. 38 A. Saw them, as indicated, plane, and sandpaper. (Drill upon a scrap in the use of the bead plane. The pressure should be exerted lightly in the direction indicated by the arrow.) B. Miter glass beads in the frame, flush with the face, and nail it with 3/4" brads.
8. A. Make the cap of the desired dimensions.
B. Plane and sandpaper.
C. Nail it in place, or fasten it by dowels if preferred.
9. Miter a small molding under it. (May be secured at any mill.)
10. Cut the back to the required size, and nail it in its place.
11. Make the flap of suitable size to fit its opening closely.
12. Cut in the hinges. Use the gauge to obtain the depth of the cu1 for the thickness of the hinge, which should all be cut out of the flap.
13. Smooth and sandpaper the flap.
14. Put the hinges in the flap so that a little more than half of the round of the hinge will project beyond its face.
15. A. By careful measurement with the dividers or compasses, find the centers of the screw in the underside of the top. B. By manipulating the screw holes to one side or the other of the center line, the hinge may be pushed in or out or end-ways, to make the flap hang just as it should.
16. Cut strips to hold the mirror in from the back, or cut a backboard of \" material to cover the entire back. This latter is prefer able, though not shown on the sketch.
17. Inspect carefully, and remedy defects.
18. Stain and finish as desired.
19. Secure a suitable flat hook, and place on the under edge of the flap.
Continue to:
My Books

