Stair Building. Part 2
Description
This section is from the book "Inside Finishing", by Charles A. King. Also available from Amazon: Inside Finishing (1912).
Stair Building. Part 2
48. Stringers. - (A.) Stringers or carriages (e, Fig. 54) are the timbers or joists upon which the treads and risers are fastened, and as they support and give strength to the stairs, they should be made of lumber which is free from weakening defects.
Figure 56 shows one method of laying out a stringer. The full rise in inches is taken upon the tongue of a steel or framing square, and the run or tread upon the blade, spacing off one tread at a time. If done with reasonable accuracy, this method is satisfactory for ordinary stairs, and where the head or foot of the stringer can be moved a little to compensate for any slight inaccuracy; but if intended for a place where a greater degree of exactness is necessary, another method should be used. The entire length of the stair stringer should be laid out upon the piece, as between f and g of Fig. 54, which is the length of the stringer, regardless of the projection at h, which furnishes a nailing for the laths of the ceiling, at the same time making a stronger fastening possible. The angles and distances of x and y should be calculated carefully, and accurately laid off upon the stringer to be cut, the positions of the points y being averaged so as to make all the steps of the same size. This is the method in most common use. The length between the points f and g of Fig. 54, may be found mathematically by using the following formula: -

Fig. 56. - Laying out a Stringer.
R = run of stringer, to g. A = rise of stringer, to /. H = hypotenuse or bridge measure.
The pitch board, shown in Fig. 57, is preferred to the framing square by many workmen; it consists of a right-angled triangle of thin wood of the same dimensions as one of the steps, fastened to the side of another piece as shown. It is apparent that if the pitch board is used for the same purpose as the steel square in Fig. 56, it will be a convenience.
After the points of the stringer have been accurately laid out as described in the second paragraph of this topic, the exercise of a little judgment will make it possible to locate the intervening points y, of Fig. 56, so that any slight inaccuracies will not be apparent.
The pieces which are cut out of the side stringers may be spiked upon the crowning edge of a piece of scantling, and used for the center stririg, instead of cutting another timber; in doing this, care should be used that the tread and riser lines are exactly in line with each other, which may be best assured by marking all by the first one made, working from points y of Fig. 54 and Fig. 56. The rough stringers are usually put in place as soon as possible for the convenience of the workmen.
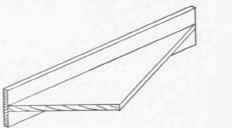
Fig. 57. - The Pitch Board.
If the face or outside string is to be of the same wood as the finish of the house, and is intended to take the place of the face casing or skirting board, the risers should be mitered into it, as shown at a and b, Fig. 58. Stairs built of this form of finish, that is, the ends of the steps open except at the balusters, are called an open string flight. The style is in common use, as it may be built as simply or as elaborately as desired. Upon ordinary work, the face stringer above described is the form in most common use, but upon better work it is the custom to put the face casing on after the house is plastered, as it is apt to become discolored and marred before the stairs are ready for finishing.
(B.) The skirting board is sometimes fitted against the treads and risers, making a square joint, as shown at a, Fig. 59. The nosing is cut off, as at b, so that the skirting board may be more easily fitted. This method is used to some extent upon common work; the worst thing about it is, that the seasoning of the building and of the skirting board will cause the joints to open eventually. It is a nice piece of work to fit the wall skirting board to the steps, but if done ever so carefully by the above method, the work will, on account of the shrinking of the material, in a few months look like a botch job.
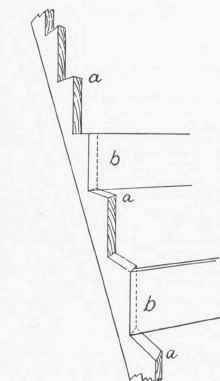
Fig. 58. - Intersection of Risers and Face Stringer.
Another method is to cut the skirting board into the treads and risers as shown in Fig. 60; the section a, a shows the groove which is continuous across both risers and treads, the nosing being cut out to allow the skirting board to fit between the end of the tread and the wall. This makes a very good job, and is a more economical method than that shown in Fig. 61, where the wall skirting board (a) is wide enough to receive the treads and risers, which are grooved, or housed in. A place is cut in the back of the vertical groove, as at b, and in the bottom of the horizontal groove, as at c, to receive the wedges (d), by means of which the tread and riser may be pressed firmly into their places. This is the method commonly used upon the best work, and if the work is well done and of seasoned stock, there never will be any trouble from the opening of the joints, against which it is the first thought of the finished workman to guard. In this method, the nosing (e) and the scotia (/) both should be cut into the skirting board; however, the latter is sometimes butted against it.
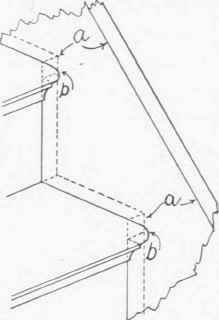
Fig. 59. - Fitting a Skirting Board; Method 1.

Continue to:
My Books

