How To Make A Bedside Stand
Description
This section is from the book "Carpentry For Beginners - Things To Make", by John D. Adams. Also available from Amazon: Make Magazine.
How To Make A Bedside Stand
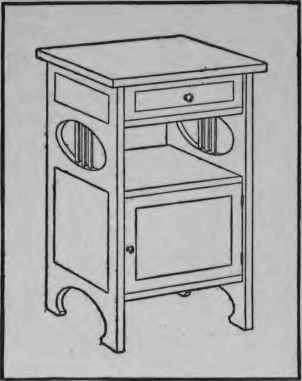
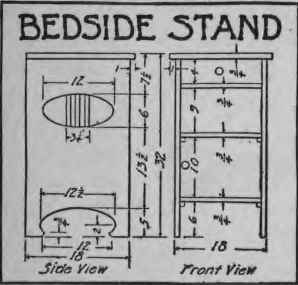
The construction of the bedside stand begins with the legs. Square off the tops, shape the feet and then mark off the various mortises; those for the cross-boards, which form the ends of the drawer spaces, should be let in about a half inch, and those for the lower crosspieces cut clear through. The two cross-boards and two cross pieces, tenoned to match the legs, the proper grooves cut in them to receive the ends of the end panels, are next prepared. These panels, preferably of hard wood, must be carefully cut with a scroll-saw. The two complete ends can now be assembled, using fresh glue and leaving clamped firmly overnight. The two horizontal boards for the drawer spaces and the foot-shelf are now to be gotten out with their ends squarely trimmed. As the two upper boards are wider than the lower one, their corners will have to be notched out so as to pass around the legs. The assembled sides may now be set up and connected by these three boards, using glue and finishing-nails, or screws set in at an angle from the inside. The top, smoothly and accurately finished, may then be attached with glue and screws set in invisibly. Fit a half-inch board at the back to fill in the drawer space and stiffen the table laterally. It will not be found difficult to make and fit the three drawers which complete the table.

Mill Bill | |||||
PCS. | |||||
4 | 2 | X | 2 | I | 30 |
2 | 1 | X | 9 | X | 11 |
2 | 1 | X | 2 | X | 15 1/2 |
2 | 3/4 | X | 14 | X | 20 |
1 | 3/4 | X | 11 | X | 20 |
1 | 1 | X | 16 1/2 | X | 25 |
1 | 3/4 | X | 3 1/2 | X | 14 |
1 | 1/2 | X | 9 | X | 19 |
2 | 1/4 | X | 6 1/2 | X | 15 |
Also drawers. | |||||
How To Make A Bedside-Stand #2
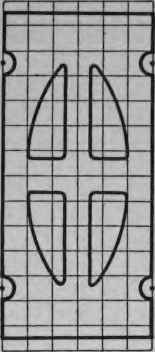
Accurately draw out the shape of the two sides directly upon the wood, and then saw them, all as previously described. Squarely trim up the three cross boards, mark their positions on the sides, and then secure them in position, using glue and screws or nails according to whether the piece is to be stained or enameled. The top is now in order, and after finishing the end wood flat and smooth, secure it in place. Neatly fill in the back of the drawer-space and the lower compartment, which is then ready to have its door fitted.
If the wood shows any tendency to warp, or is not thoroughly dry, fasten two cross cleats to the back.
The making and fitting of the drawers in the usual manner will now require attention, after which the three small slats in the elliptical opening of each side are to be placed. As mortises are here impractical, see that these slats fit tightly, and then apply at each end some glue and a strong wire nail driven in from the inside at the proper angle.
Mill Bill | |||||
PCS. | DIMENSIONS | ||||
1 | 3/4 | X | 19 1/4 | X | 20 1/2 |
3 | 3/4 | X | 17 | X | 18 |
2 | 7/8 | X | I8 1/2 | X | 32 |
1 | 3/4 | X | 4 1/4 | X | 17 |
1 | 3/4 | X | 10 1/4 | X | 17 |
Continue to:
My Books

