How To Make A Candle Holder And Candle-Sticks
Description
This section is from the book "Carpentry For Beginners - Things To Make", by John D. Adams. Also available from Amazon: Make Magazine.
How To Make A Candle Holder And Candle-Sticks
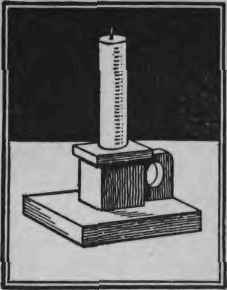
Our little problems thus far have largely been a matter of getting ready. We must now get right down to business and make something just as neatly as we can, so that when it is stained and rubbed it will look good enough to stand on the sideboard. Let us try the little candle holder.
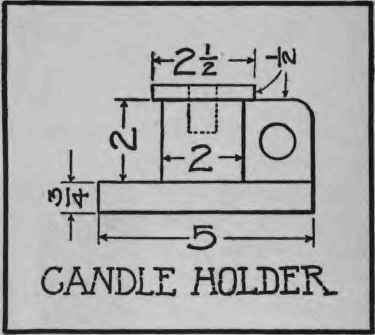
First get a hard lead pen-cil and make it quite sharp. Carefully mark out the base board on a smooth piece of wood, making the corners exactly true by means of the square. Saw this out and then make the edges smooth by means of a piece of sandpaper wrapped on a small flat block. (Never use the sandpaper without the block if you want the edges to be flat and the corners sharp.) Hold it flat and rub back and forth without rocking from side to side, otherwise you will spoil the outline. If you have no vise to hold the wood in place, brace it against some projection to aid you in holding it steady. The square center block is next in order and in sawing this out be sure to get it perfectly square and flat on the ends or there will be seams at the top and bottom when the other pieces are put on. Bore a hole in the center the size of a candle and three-quarters of an inch deep and then fasten the block in the exact center of the base board and square with the sides by nailing up through the bottom. The top piece is now to be marked out and the exact center found by drawing diagonal lines from corner to corner. Before cutting this piece out it would be best to bore the central hole for the candle, because the larger the piece of wood the less apt is it to split. This also applies to the hole in the small piece that forms the handle. The top and handle may be fastened on with some small brads, but a neater job will result if we use a little glue instead of the nails. Paint the top of the center block with glue and let this thoroughly dry. Then apply another coat and also coat the under side of the top block, which should then be put in place and some heavy weights placed on it overnight. The handle may then be fitted in and fastened in the same way.
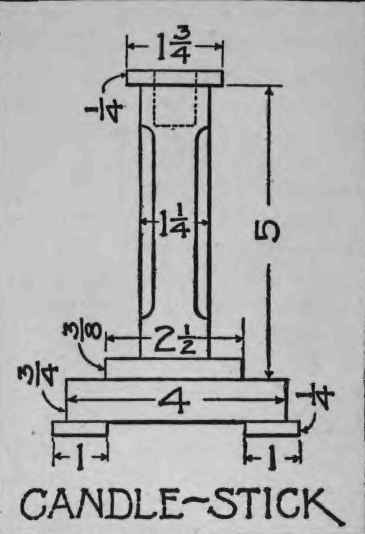
The candle-stick is made in a similar manner. The base consists of a small block on top of a larger one with a very small block on the bottom at each corner.
The long center piece should first be smoothed up perfectly square, after which the corners should be cut away as indicated in the drawing, and a hole the size of a candle bored in the center of the top to depth of about three-quarters of an inch. These pieces may all be nailed together without any of the nails showing, but the small top block should be glued on as we did before. As you sand-paper the edges of the different pieces smooth, test them often with the square to make sure that you are not rubbing one side down more than another. This applies particularly to the bottom end of the long center piece, which must stand perfectly straight.
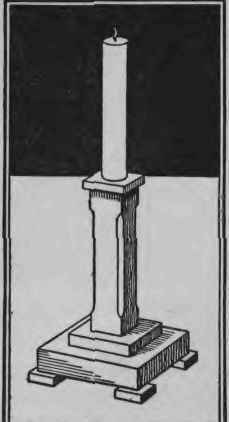
The pieces should be stained to match the furniture of the room where they are to be used and rubbed with wax, as previously described.
We now present a pair of candlesticks of more elaborate construction and intended to be provided with ornamental shades, which may be had in many attractive forms at the department stores at a very reasonable cost. Those who wish to make their own shades from cardboard and colored papers will find instructions for laying them out at the conclusion of this subject.

The construction of the candlestick at the left should start with the base, which, after having been trimmed up perfectly square and sharp on the edges, is to receive a square mortise in the center to hold the lower end of the post. Then cut the post to length and tenon it to match the base, after which accurately mark off the fluting in the sides with a sharp pencil. A sharp gouge will be necessary in working on these half-round grooves. Work from both ends toward the middle, and slowly. Now build out the top by the addition of four small pieces, which are fitted together at the corners with miter joints. Attach with glue, and clamp firmly until dry. The four small foot blocks, and the block on top of the base are now in order. In making the latter be careful not to split it while mortising. Now attach these five pieces with glue and small wire nails. The hole in the top of the post for the candle is now in order, after which the post may be fitted into the base and made secure with glue and a couple of nails driven in from below.
In constructing the base of the candlestick at the right some little care will be necessary in working the base block into the pyramid form. First square it up accurately and then draw all the necessary guide lines, after which take a fine saw and remove two sides opposite to one another. Finish these down to line before starting the other two sides.
Mortise a square hole in the center and finish with sandpaper. Prepare the center post as in the previous case except that the sides are left plain. Make ready the four curved brackets, and in finishing their edges work up all four together so as to avoid rounding. Now fit together the whole, and after marking off the position of the brackets on the post and base, set up permanently with glue. Clamp tightly until the glue sets.

To lay out conical shade: Given the top and bottom diameters and the height, make a paper pattern: on a large sheet of paper draw out the shade and then continue the slanting side lines up to an intersection; with this point as a center draw a large and a small circle as shown, after which it only remains to step off a distance along the larger arc equal to the circumference of the bottom of the shade. This may be done mathematically, graphically, or simply by rolling up the pattern until the proper diameter is secured. In the construction of the square tapering shade use a cardboard frame and fill in the four panels with either plain or figured tissue. To make a cardboard frame first lay out a pattern of one of the sides, and cut it out so that it can be marked off on the cardboard. Repeat this operation four times, using rather thin, tough cardboard. The first and last sections may be joined by passe-partout tape, after which the top is filled in with a square piece having a round hole in the center just large enough to fit over the shade holder.

Continue to:
My Books

