How To Make A Putting Up A Shelf
Description
This section is from the book "Carpentry For Beginners - Things To Make", by John D. Adams. Also available from Amazon: Make Magazine.
How To Make A Putting Up A Shelf
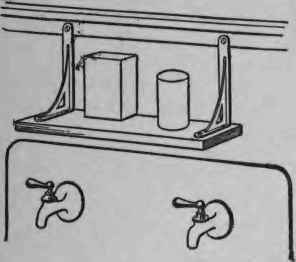
Almost every one knows how to put up the ordinary shelf - simply screw two brackets to the wall and a board on top, and the job is done- But supposing there is no room for brackets, as, for example, is usually the case over the kitchen sink, - what then? Just turn the brackets upside down and "hang" the shelf in place. If the place where the top screws are to be put, stands out from the wall, set the brackets a little forward on the shelf board so that the back edge will naturally hang against the wall and you will find this sort of a shelf very safe and steady.
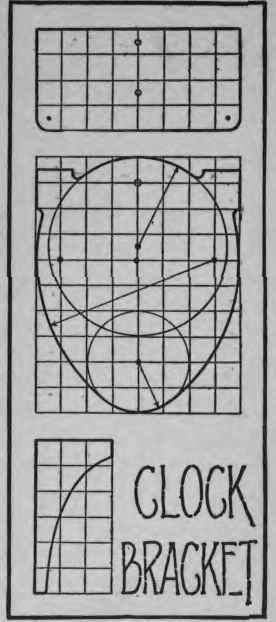
A much more interesting task, however, is to make the small clock bracket illustrated. The laying out of the sides is in itself an interesting lesson in curves. By examining the working drawing we find the back is eight by ten inches. Get a smooth flat board not less than one-half inch thick and lightly mark out the one-inch squares with a sharp pencil. Examine the drawing again and you will notice that there are two side curves, a top curve and one for the bottom. Each curve has its own center, the position of which is clearly indicated in the drawing by a black dot. Place the sharp point of the compasses on each of these dots and spread the pencil point until it touches the outside line at the top, bottom or side of the board, as the case may be. With these curves drawn, the rest of the outline may be finished in a few minutes.
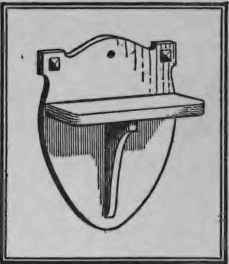
The curve of the small piece under the shelf board is not part of a circle and must be sketched in freehand after the small squares are drawn as a guide. The shelf board requires no special attention after the ends are made perfectly smooth and square, except to have its corners rounded. Fasten this to the back board by means of nails driven in from behind, and then attach the bracket piece in the same manner, after which drive in two nails down through the shelf.
The bracket may be hung upon the wall by a nail in the center, or better still, by one at each corner. In this case the holes should be about a quarter of an inch in diameter, and in order to hide the heads of the two nails set in the wall, shape up two three-quarter inch squares of wood about one-quarter of an inch thick, and then whittle them to a dull point, as illustrated. By gluing one of these on at each of the upper corners, the supporting nails will be completely hidden.
Continue to:
My Books

