How To Make A Soap Holder
Description
This section is from the book "Carpentry For Beginners - Things To Make", by John D. Adams. Also available from Amazon: Make Magazine.
How To Make A Soap Holder
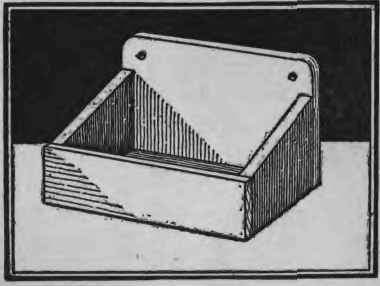
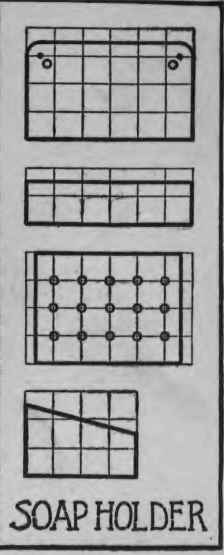
We must now try our skill at making something consisting of more than one piece, and see how closely the different parts may be fitted together. A good example to begin with is the soap holder illustrated. From the working drawing may be learned all the necessary sizes when it is remembered that each of the small squares represents exactly one inch. The wood should be about three-eighths of an inch thick. First saw out the back, neatly rounding the two upper corners and boring two quarter-inch holes for hanging. Next prepare the front piece, and see that it is exactly the same length as the back. Both pieces should be sandpapered smooth and flat on the ends. Do not hold the sandpaper in the hand, but wrap it on a small flat block, or you will surely rub off too much on one side and so spoil the outline. The two ends are now to be marked out, using a sharp pencil and the square, and finished accurately to line, after which the four pieces may be nailed together, using two or three small wire nails for each connection. The bottom is now to be sawn out just large enough to fit inside- Bore a number of quarter-inch holes in this, as shown in the working drawing, and then nail in place.
Before using the holder it should be well oiled, and may also be painted with white oil paint to good advantage.
Continue to:
My Books

