Curved Mitres
Description
This section is from the book "Woodwork Joints", by William Fairham. Also available from Amazon: Woodwork joints.
Curved Mitres
We now come to what are probably the most difficult of all mitres, viz., curved mitres, and the writer well remembers in his apprenticeship days his first experience of attempting to fit the mouldings around the door shown at Fig. 331 by using straight mitres at A. This, of course, is impossible if the mouldings are of the same section and it is desired to make all the members correctly intersect. If straight mitres are used the section of the curved moulding will have to be of a different shape from the section of the straight moulding, and in these days of machine-made mouldings this method is seldom resorted to. It is better, cheaper, and easier to make curved mitres when the necessary machinery is at hand.
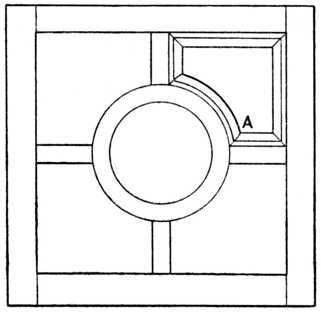 Fig. 331. - Door with Curved Mitres.
 Fig. 332. - Method of Setting out for a Curved Mitre.
To Set out a Curved Mitre (see Fig. 332 ). - Draw a section of the moulding full size, A, as shown at the left hand of the illustration, and project lines round the framing, as shown V, W, X, Y and Z. Where the lines V, W, X, Y and Z intersect at the corner D, it clearly shows that a straight mitre will not cut all the points of intersection. A curved line will cut all the intersections, and a template made of cardboard, sheet zinc, or veneer, should be made to this shape. At theleft-hand side the geometrical setting out is shown for obtaining the curve without having to resort to drawing it freehand.
Take half the width of the moulding, as shown by dotted line A, and where it cuts the approximation of the curved mitre place the point of the compasses and strike out a circle as shown; with the same radius place the compass point on B - that is, the inside point of the mitre, and cut the circle on the right and left with the small arcs shown ataa. With the same radius put the compass point at the junction of the circle and mitre line, C V, and cut the circle at right and left, viz.,ee.
Now rule a line throughaa, and another line throughee, and where these lines cut each other it will give thecorrect radius of the curved mitre. The advantage of knowing the correct radius of a curved mitre is of great benefit to the skilled machinist, as it enables him to set up his machine so as to give a definite result.
Continue to:
My Books

