Loose Tongues
Description
This section is from the book "Woodwork Joints", by William Fairham. Also available from Amazon: Woodwork joints.
Loose Tongues
There are two methods of jointing with loose tongues, viz., the use of the cross tongue, Fig. 103 A, and the use of the feather tongue, Fig. 103 B. Cross tongues are the stronger when glued in their position and can be used very much thinner than feather tongues. Feather tongues are cut diagonally across the grain as illustrated.

Fig. 103. - (A) Cross Tongue. (B) Feather Tongue.
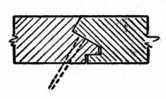
Fig. 104. - Method of Secret-nailing Hardwood Flooring Boards.
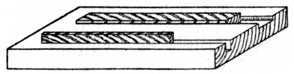 Fig. 105. - Cradle for Planing.
Fig. 105 is a cradle for planing up loose tongues to the required width (generally 7⁄8 in.). Two grooves are made in a piece of 11⁄4 in. hardwood; one groove is used for planing the width way of the tongue and the other for planing the edge way. These tongues can be cut to accurate size on a circular saw bench if power and machinery are at hand.
Applications Of The Joint
Fig. 106 is a sketch of a portion of a sideboard top, showing the plough groove ready worked out to receive the tongue; the other half of the top is treated in a similar manner. It will be noticed that the groove is not worked through the full length of the board, but stopped about 11⁄4 in. from each end; this leaves a square joint at each end of the top on which the moulding is worked. If the groove be run through the board it looks very unsightly when the mould is finished.
Fig. 107 is a shaped spandrel, such as is fixed in therecess of a sideboard or cupboard or shop window fitment. It is of such a width that, were it cut from a wide board, the shaped portion would be apt to break off owing to the short grain at C. The shaping is therefore built up out of three separate pieces, the grain running as indicated. The loose tongue is represented by the dotted line and a section is shown of the joint at the line A B. At the opposite corner the tongue is left blind,i.e., not run through the edge. This is the method that should be used when the shaping is above the level of the eye.
 Fig. 106. - Part of Sideboard Top; grooved with ends left blind. (The boards are shown upright.)
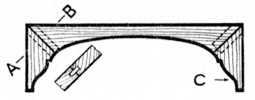 Fig. 107. - Shaped Spandrel for Recess.
Fig. 108 shows part of a carcase of a dressing table. The drawer runner A is shown grooved across the end to receive a cross tongue; this cross tongue engages asimilar groove in the front bearer. This method of fastening the runner to the bearer is in everyday use.
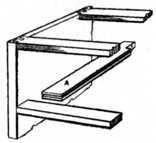 Fig. 108. - Part Carcase of Dressing Table.
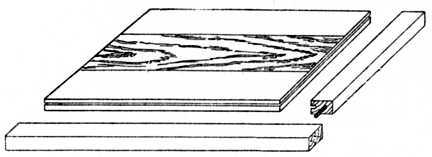 Fig. 109. - Framed Writing Table Top.
Fig. 109 is a writing table top. The centre boards are first jointed and glued up, after which the ends and sides are grooved ready to receive the cross tongues. The hardwood margins are shown at one end and at the front, and the grooves are arranged so that, on completion, the marginal frame stands above the top just the amount of the thickness of the leather which will cover the table. In some cases the margin at the end runs the same way of the grain as the top, thus allowing for slight shrinkage. Cross tongues would of course be used in this case.
Fig. 110 is a sketch showing one-quarter of a barred or tracery cabinet door. An enlarged section of the astragal mould which is grooved to fit on the bar which forms the rebate is also shown.
Fig. 111 is a "Combing or corner locking" joint, a method of making boxes by means of a continuous use of tongues and grooves instead of dovetails. This type of joint is generally machine made. The amateur, however, who is not proficient to undertake a dovetailed box frequently uses this method.

Fig. 110. - Corner of Barred Door.
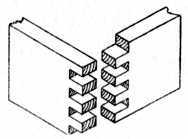
Fig. 111. - Combing or Locking Joint.
Continue to:
My Books

