Mortising Puzzle
Description
This section is from the book "Woodwork Joints", by William Fairham. Also available from Amazon: Woodwork joints.
Mortising Puzzle
The ordinary mortising exercise is, after the first two or three attempts, generally voted as uninteresting, but, although the simple puzzle shown in Fig. 389 is practically an exercise in mortising, yet, forming as it does a puzzle, it becomes a fascinating piece of work.
 Fig. 389. - Mortising Puzzle, showing how the Parts Fit.
The puzzle is composed of three pieces of wood, each 4 ins. long, 11⁄2 ins. wide, and 1⁄2 in. thick. In each piece a mortise 11⁄2 ins. by 1⁄2 in. should be cut as shown at 1, Fig. 390 . In one piece, marked 2, a groove is cut onone side, 3⁄8 in. wide, and in another piece (3) a similar slot, but 1⁄2 in. wide, is cut, and this is continued on the other side of the groove to a depth of 1⁄8 in. The three pieces should be set out on a 13-ins. by 11⁄2-ins. by 1⁄2-in. length of wood, as shown at Fig. 391 , and when ready sawn apart.
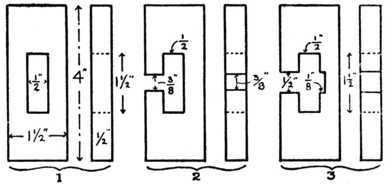 Fig. 390. - The Three Parts, with Sizes marked.
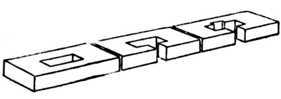 Fig. 391. - How to Cut the Parts.
The puzzle is put together as shown at Fig. 389 . In the first place, hold No. 1 piece upright as shown at A, then take No. 2 piece with slot uppermost and push it through the opening in No. 1 piece until the nearest side of the slot projects 1⁄8 in. as indicated at B. Next place No. 3 piece on with the slot at the back as shown at C, and push it down until it touches the bottom of the opening in No. 2 piece as illustrated at D. The onlything to do now is to push No. 2 piece as far as it will go to make the figure as shown at E.
In this puzzle the parts should fit together fairly tight, but should not be too stiff.
Continue to:
My Books

