Removing Haunching
Description
This section is from the book "Woodwork Joints", by William Fairham. Also available from Amazon: Woodwork joints.
Removing Haunching
After removing the mortise hole, the small portion which is called the haunching will require to be removed with a chisel. This calls for no special remark, as it is clearly shown in Figs. 187 and 188. Fig. 186 shows an everyday type of mortise and tenon joint separated; it is used in cases where a straight joint is required on the upper or lower edge of the work, whereas the upper rail of Fig. 176 shows the full haunch on the top edge. In cases such as Figs 187 and 188, where the edges of the frames are grooved to receive panels, etc., the width of the tenon is reduced by the width of the groove.
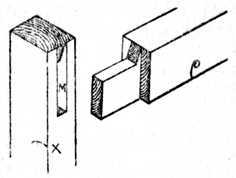
Fig. 186. - The Joint Separated.

Fig. 187. - Removal of Haunching.

Fig. 188. - Haunching with Groove above.
This must be remembered by the worker when marking out his stiles with the marking knife. Fig. 187 (right-hand sketch) shows the haunch, tenon, and groove G at the bottom. Fig. 188 (left-hand illustration) shows G (groove) at top, and HH (the haunch) at the bottom. Tenons may be glued together andwedged as shown at Fig. 176 if for inside work; but if for outside work they are generally smeared with thick paint and wedged up. For light-class cabinet work it is usual to cut the mortise about seven-eighths of the distance through the stile and make the tenon to match it; the edge of the finished work does not then show any indication of the joint, and it leaves a nice clean surface at the edge of the work for polishing or varnishing.
Continue to:
My Books

