Squaring
Description
This section is from the book "Woodwork Joints", by William Fairham. Also available from Amazon: Woodwork joints.
Squaring
Another important point to remember is that the drawer sides must be true and squared to an exact length and planed up to thickness; otherwise the finished drawer will be in winding and out of truth.
To true and square the ends of drawer sides, drawer backs and drawer front, a most useful little machine is the mitre trimmer; failing this, excellent results can be obtained by using the shooting board.
Gauging
After squaring up the timber accurate gauging of the ends is another important point. The gauge used should be a cutting gauge, so that the line is incised about 1⁄32 in. in depth, thus effectually cutting the cross fibres of the timber.
Fig. 273 shows the method of using the cutting gauge. The stock of the gauge must be held well up to the end of the timber. The gauge is a most difficult tool for the novice to use, and his trouble is generally caused by holding it too flat. Tilt the gauge a little so that thethumbscrew shown in the illustration goes nearer to the floor; the blade will then not bite so keenly, and better results will be obtained. The dotted lines indicate the positions which the dovetails will occupy when marked out.
 Fig. 273. - - Method of Marking with Cutting Gauge.
The gauge is set a trifle less than the thickness of the drawer sides to allow for the thickness of the steel cutter, and a gauge line is marked on the inside of the front and all round the drawer back. The gauge is now readjusted so as to leave a 1⁄4-in. lap on the front, and a line marked on the ends of the front and all round the ends of the sides which will engage the drawer front. A glance at Figs. 270 and 273 will make this clear.
 Fig. 274. - - Removing the Waste Wood.
The dovetail pins on drawer part and back are spaced out and marked on the end with the aid of the joiners' bevel, the lines being then squared down to the gaugeline by the method shown at Fig. 272 - that is, by using the try-square and marking awl.
The drawer front is now put into the bench vice, and the pins are cut as indicated in Fig. 274 . The drawer back is treated in a similar manner, but of course in this case it is not "lap" but "through" dovetailing, and the saw kerf goes through the timber and down to the gauge line.
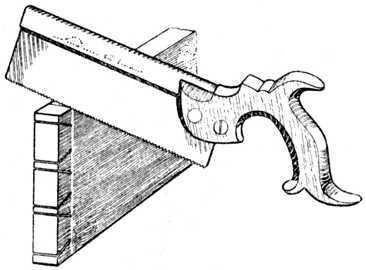 Fig. 275. - - Cutting away the Half Dovetails.
We now come to the point where it is necessary to remove the superfluous material. Fig. 274 shows a method commonly adopted and known as sawing out the waste; the saw is held at an angle and part of the inside portion of the dovetail is cut away as shown. This is a good plan for the amateur, because it shows him at the commencement of his chopping out which will be the pin and which the tail.
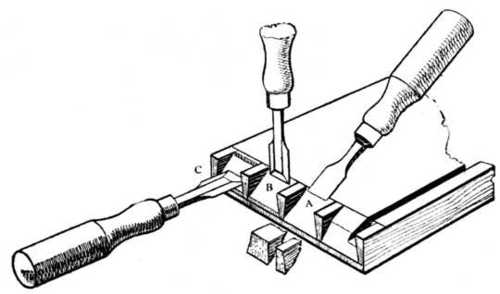 Fig. 276. - Showing the Vertical and Horizontal Chisel Operations in Lap-dovetailing. A: The Preliminary Roughing-out. B: Vertical Chiselling; note that the first stab should be just outside the Gauge Line. C: Marking the Horizontal Cut.
Fig. 276 (A)shows another method that answers well for soft woods such as pine, American whitewood andsatin walnut. The drawer front is laid flat on the bench after it has been sawn, and with a mallet and sharp chisel the corner of the dovetail is knocked off as shown. This takes the bulk of the material away and the dovetail is then pared out square in the usual way. The illustration ( Fig. 276 ) also shows how the chisel is held for vertical paring (B) and for horizontal paring (C).

Fig. 277. - Roughing-out by Boring.

Fig. 278. - Marking Pins on Drawer Side.
A third method is shown at Fig. 277 . With hard,curly timbers, such as tobacco mahogany and satinwood, it is a laborious process to carefully chop away the timber in small pieces, and to overcome this difficulty we occasionally see the workman take a twist-bit and bore a series of holes as shown. A great portion of the timber may then be split away by inserting the chisel end-way into the grain, after which it is pared to a finish.
As dovetailing is chiefly used for drawer making, it will be of interest to give several illustrations of variations of the joint and its uses.
Fig. 278 indicates the method of marking the positionof the holes in the drawer side. When the paring out of the dovetails is completed the drawer front is turned over on to the side as shown, and the position of the recesses which will engage the pin portions are marked with the marking awl as illustrated.

Fig. 279. - Marking by means of Saw Blade.
The completed drawer back is marked on the sides in an exactly similar manner.
Another method of marking through dovetails is shown at Fig 279. The side is held in position on the end, and the dovetail saw is inserted and drawn out of the saw kerf, thus leaving the exact mark on the drawer-back.
Other workers prefer a pounce-bag instead of a saw. A pounce-bag consists of a piece of fairly open woven muslin filled with a mixture of French chalk and finely-powdered whiting; the muslin is tied up with a piece of thin twine like the mouth of a flour sack. All that is necessary is to place the timber in position and bang the bag on the top of the saw-cuts, when sufficient powder will pass through the bag and down the saw kerf to mark the exact positions of the lines.
Continue to:
My Books

