Supporting The Joint
Description
This section is from the book "Woodwork Joints", by William Fairham. Also available from Amazon: Woodwork joints.
Supporting The Joint
The jointed boards should not be reared up against a "bench leg" or wall without having any support in the centre, as dotted line at Fig. 5 , because in all probability they will fracture before the glue has time to set; and, when we go to take them up to renew working operations, we shall beannoyed to find that they have assumed a position similar to that at Fig. 5 (shown exaggerated), and this will, of course, necessitate re-jointing.
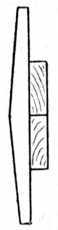
Fig. 3. - Correct Jointing.
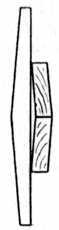
Fig. 4. - Faulty Jointing.
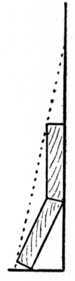
Fig. 5. - Boards unsupported.
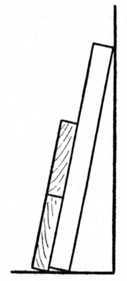
Fig. 6. - Boards supported.
Fig. 8. - Grain alternating.
A correct method to adopt is seen at Fig. 6 . Here we have supported the joint by rearing up against the walla couple of pieces of batten, one at each end of the board, thus supporting it throughout its entire width until the glue is thoroughly set. The two or more pieces of timber in a butt joint adhere by crystallisation of the glue and atmospheric pressure. A well-fitted joint made with good quality glue is so strong that, when boards of 3 feet and upwards are jointed together by this method, the timber in most cases will break with the grain sooner than part at the joint.
Butt joints may be cramped up, if desired, and it is customary to warm them as previously stated. In the absence of the usual iron cramp, the amateur may make an excellent wooden arrangement out of any odd pieces of timber that happen to be handy. Two blocks of hardwood are screwed on the base board at a suitable distance for the work in hand; the boards to be jointed are glued and placed in position between the blocks; and the two hardwood wedges are inserted and hammered in opposite directions to each other, thus exerting the desired pressure. An example of this method of cramping is shown in Fig. 25 , which also indicates the use of iron "dogs."
When jointing, care should be taken to first plane up the boards true on one side -i.e., take them out of winding. The method of testing for this is shown at Fig. 9 , and it may with advantage be used when jointing the edges of the boards. Two laths or strips of wood are planed up to exactly the same width, having their edges straight and parallel. One edge of each lath may, if desired, be bevelled a little. The method of using these "twist sticks" or "winding laths" is to put them on the board as indicated, and sight along their top edges. The winding laths, being much longer than the width of the board, show up the irregularity greatly pronounced.
The Toolsgenerally used for making the butt joints are: -
The jack plane, for roughing the edges, etc.
The wooden trying plane (or iron jointing plane) for trueing up the work.
The try square for testing purposes.
The winding laths and straight edge.
The Method of Workis as follows: Each board is in turn put in the vice and planed straight lengthwise; it is then tested with winding laths and a try square (the latter method is shown at Fig. 22 ).
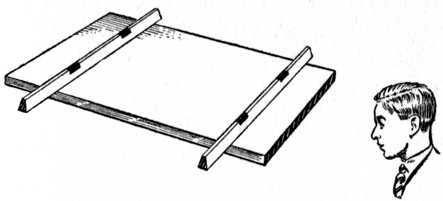 Fig. 9. - Testing Surface with Winding Laths.
The boards are then put on the top of one another as at Fig. 1 and tested with a straight edge; they should appear true as shown at Fig. 3 ; if they show faulty as at Fig. 4 the joints must be again fitted until the required degree of accuracy is obtained. Difficulties may be avoided by care in selecting timber suitable for jointing, and it must be remembered that timber shrinks circumferentially (the heart side becoming curved) as dotted lines in Fig. 10 . If the timber be jointed with all the heart side one way as at Fig. 10 , the tendency will be for it to cast as shown by thedotted line. If the timber be alternated as at Fig. 11 , the tendency will be to cast wavy, whereas if quartered timber can be obtained it will stand practically straight as the tendency to shrink is in thickness only. The grain of quartered timber is shown in Fig. 12 .
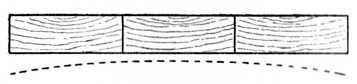 Fig. 10. - Showing Heart side of Timber one way.

Fig. 11. - Heart side of Timber shown alternated.
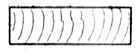
Fig. 12. - Grain of Quartered Timber.
 Fig. 13. - Boards showing uniformity of Grain.
Judgment should also be exercised to avoid jointing in which one piece of timber is wild and large in the grain, and the adjoining piece of a mild-grained nature. Jointed boards should always be glued up with thegrain running in the same direction if possible; this we show at Fig. 13 , and nothing looks worse than a dressing chest end or similar piece of work in which the grain runs haphazard. When jointing thin timber (say, 1⁄4-in., 3⁄8-in., 1⁄2-in. and 5⁄8-in. boards) the best method is to use a shooting board ( Fig. 26 ). It must be noted, however, that a shooting board and plane practically never give a true right angle, owing to wear and the grinding of the blade. Therefore, the boardsshould notall be laid with the "face mark" on the shooting board whilst the edges are shot, because any inequality would be multiplied by the number of pieces jointed. A better method is to alternate the boards, face side up, then face side down, whilst shooting the edges; this will prevent convexity or concavity on the face of the jointed board, because any slight error in the angle is neutralised (see Fig. 8 ).
Continue to:
My Books

