The Key Piece
Description
This section is from the book "Woodwork Joints", by William Fairham. Also available from Amazon: Woodwork joints.
The Key Piece
When the writer fits up the puzzle he finds that three of the arms may straight away be fitted complete with their three cross parts. These are the ones where the longer cross piece ( Fig. 370 )lies flush with the back of the central bar (see Fig. 377 ). This is easily found out when at work on the puzzle. In the case of the other three arms there is, of course, a gap caused by the long slots of the central bars. Adjust the parts on the first-named three arms, and then deal with the fourth arm, putting in all three cross parts. For the little one here, use the "key."
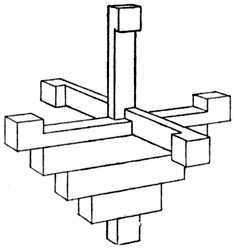
Fig. 377. - Beginning to place on the Cross Pieces.

Fig. 378. - Placing the Key Piece to overlap end projection of Central Bar.
By placing the "key" so that itoverlaps the end projectionof the arm (see Fig. 378 ) a space is left at the centre, and means is thus afforded for getting in the three cross parts on the remaining two arms.
This practically ends the puzzle. While the "key" is in its overlapping position the parts may be separated, but if it isturned round on its narrow neck, so that it is in exactly the same position as the other five small cross parts, it locks the whole thing so tightly that nothing but sheer force could loosen the twenty-one pieces.
So far as the order of putting together is concerned, there are many equally satisfactory ways, these being determined by the ease or difficulty that one experiences in holding the half-finished puzzle. It all comes to the same in the end, and the "key" must be placed on one bar before the last three arms can be completed. The "key," moreover, must be on one of the bars where a gap is left at the centre, and not on one where Fig. 370 lies flush against the central arm as in Fig. 377 .
Continue to:
My Books

