Practical Lessons In Using The Pen. Part 2
Description
This section is from the book "The Home Cyclopedia Of Business", by Charles Morris. Also available from Amazon: Home Cyclopedia of Necessary Knowledge.
Practical Lessons In Using The Pen. Part 2
How to Begin
You may now take the position of the hand and arm as shown in the illustration "2," without the use of the pen. By holding the hand in the correct position before taking the pen an easy movement of the arm may be secured, as well as the foundation for proper penholding. Rest the hand on the nails of the two last fingers, and make the same motion that will produce the first exercise in Plate II.

CUT 2. POSITION OF HAND AND ARM.
Practice rapidly, making not less than 150 pulls toward the body per minute. Next practice sliding the hand from left to right and from right to left across part of the page as shown in Plate I. being sure to maintain the same position throughout. The arm-rest near the elbow should remain in the same place; the arm at the elbow should act as a sort of a hinge. Remember, all of this preliminary practice should be done without pen and ink. This kind of calisthenic practice should be taken until the arm will move readily in any direction. It is better if you take up one thing at a time, and learn to do that in the very best way possible ; hence we desire to have you learn to move your arm before using the pen. Do not be in any hurry to take up more advanced work, as your progress will not be satisfactory unless the fundamental exercises have been thoroughly mastered.
How to Proceed
Penholding will not seem very difficult if you have practiced in the manner suggested, and with the hand held in the same position as illustrated in Cut 2. Do not use ink at first, but practice with a dry pen. Make the oblique exercise as given in Plate II. This is one of the most essential motions used in writing, and a great deal of time should be spent in practicing it. The exercise is made by keeping the sleeve stationary on the table, and forcing the arm to move in and out of the sleeve, using no finger action whatever. Arm down. Study Cut 1, as the dotted lines show the vibration of the arm. Make this exercise fill two large spaces; we call the distance between the two blue lines one large space. Make the oblique exercise just twice that size. After the movement has become established, then you may use ink, but if you find the movement degenerating, commence at the beginning and repeat the same practice as before. Next run the exercise across the page, and try to make it black. This should not be done by pressing heavily on the pen, but by making a series of light lines before moving toward the right.
The Lateral Exercises
The ability to write a long word without lifting the pen is an accomplishment that will promote rapid writing. To accomplish this the lateral exercises and wide spacing between the letters and words should receive a good share of your time for several months.
Practice on the first lateral exercise given in Plate I. Place the arm about in the center of the exercise, lengthwise, and make the exercise extend about half way across the entire page. Do not allow the hand to turn toward the right, but keep it in the same position as illustrated in Cut 1. Force the hand to slide on the last two finger nails. Make a slight pause at the end of each exercise, and use a steady, swinging motion of the arm. Keep the fleshy part of the forearm down on the table and in about the same place. The tendency at first will be to use the wrist movement; be careful to avoid this, and see that the larger muscles are used.
How to Practice
Do not practice longer than one hour at a time. The first part of the hour should be devoted to the practice of movement exercises, even after you are capable of making them well. This will insure freedom of motion and smooth lines. This movement practice is excellent as long as the arm is used as the propelling power. If the fingers are used to any extent, the value of the practice is practically lost. If your movement at this time takes in a wide scope, although difficult to govern, your efforts have been directed in the right channel.
Do not be easily satisfied with your work. Criticise your position, your movement, and your writing at all times. Do not omit any of the work. Although some of the exercises may seem distasteful to you, it is just the kind of work that you need, and you should master them if you wish to make the most of your possibilities. Improvement is only promised to those who faithfully follow every detail of the instruction as it is given in each lesson.

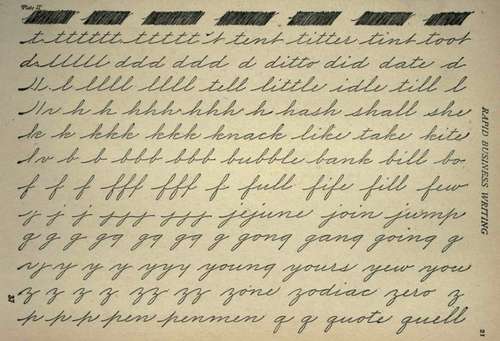

MODEL COPIES FOR THE PENMAN
This plate and otLers of the series have been prepared especially for this work by Professor E. C. Mills, the expert penman and acknowledged authority on Penmanship. They give the necessary assistance for acquiring a beautiful style of penmanship. Full and complete instructions will be found in the text.

CORRECT POSITION FOR THE PENMAN
The importance of a good position while writing cannot be overestimated, as it is the foundation upon which we build a substantial business style of writing.
Continue to:
My Books

