Raffia Work Basket
Description
This section is from the book "Busy Hands: Construction Work For Children", by Isabelle F. Bowker. Also available from Amazon: Busy Hands: Construction Work for Children.
Raffia Work Basket
Material: A piece of board 1/2 in. x 9 in. x 12 in.; one pound of white raffia; four packages of rattan reeds No. 4; two packages of rattan reeds No. 6; darning needle; scissors; nail and hammer (or a gimlet); five yards of light blue ribbon one inch wide, and one yard of light blue satin.
Make a hole (with the hammer and nail or the gimlet) in each corner of the board.
Make a row of holes 1/2 inch apart around the board 3/8 inch from the edge. (Fig. 1.)
It is important to get the holes exactly the same distance apart, as they determine the rows of chain-stitches which show across each side of the basket.

Fig.l.

Fig 2.
Each reed before being used should be soaked in water twenty-four hours. This makes it pliable.
Take a reed and a needleful of raffia.
Fasten the end of the reed to one corner of the board by sewing through the hole with the raffia. (Fig. 2.)
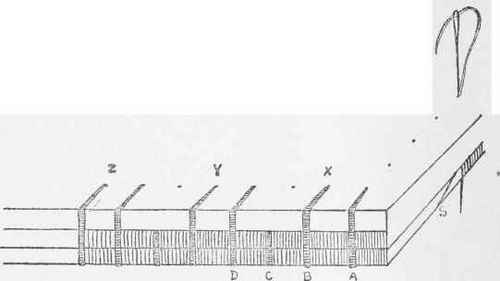
Fig 3
Wind the raffia around the reed by sewing between the reed and the board.
Pass the needle through every fourth hole.
When the end of the reed is reached, slant it off. Take another reed, slant its end also. Hold the two ends firmly together and sew over them. (S, Fig. 3.)
Keep the reed in the first row shoved down close to the lower edge of the board. (Fig. 2.)
While working the second row, sew over the outside of the first row every half inch. It does not make any difference whether the raffia passes through a hole at every half inch or not; the stitch over the first row must be put there every half-inch. While working this second row pass the needle through the holes which come next to the holes used while working the first row. (X-Y-Z, Fig. 3.)
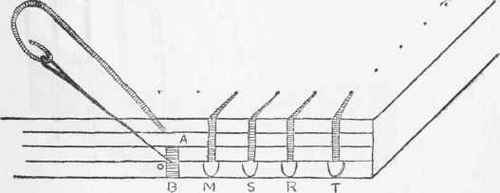
Fig 4
The third row begins the chain stitch. (Fig. 4.)
Every half-inch there is a long stitch going over the outside of the first and second rows. (A-B, Fig. 4.)
While making the long stitch over the second and third rows, put the needle through the middle of the long stitch going over the first and second rows. (0, Fig. 4.)
The needle not only passes through the middle of the stitch (A-B, Fig. 4), but between the first and second rows. This splits the long stitches over the first and second rows and gives a chain-like appearance. (M, S, R, and T, Fig. 4.)
Simply wind the raffia around the reed between the chain-stitches.
Sew the needle through the remaining holes in the board while making the third row.
Continue to make rows around the board until the work is one inch (seven rows) high.
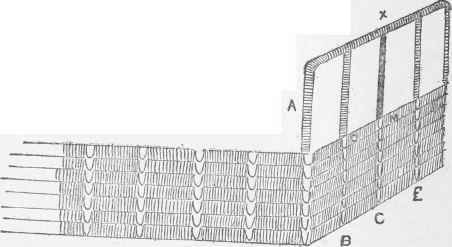
Fig.5
Cut four dozen pieces of reed one inch long.
Work the seventh row around to the corner from which the basket was started.
Bend the reed upward.
One inch from this bend make another turn in the reed so that it will be in the right position for the eighth row.
Wind the raffia up around this one-inch bend in the reed. (A, Fig. 5)
Wind the raffia around the reed X, Fig. 5 until over the line of chain-stitches B.
Take a long stitch from reed X, through the center of stitch O, in the seventh row.
Put one of the inch pieces behind this stitch, and wind the raffia around it from O to X.
The work should be held firmly, and this little piece of rattan should be bound firmly into position.
Wind the raffia around reed X until over the line of chain-stitches C, Fig. 5.
Take a long stitch from the reed X through the middle of stitch M.
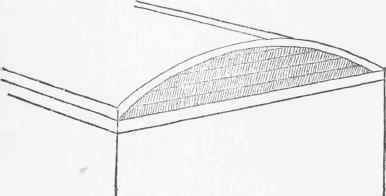
Fig 6
Simply wind the raffia back over this long stitch.
Wind the raffia again along reed X, until over the line of chain-stitches E, Fig. 5.
Put another one-inch reed into position at this point.
Continue around the basket in this way - an inch reed alternating with an inch stitch.
The work should be arranged so that a raffia stitch (not an inch reed) will come on each of the four corners.
This open space is for the ribbon.
Above this ribbon space make five inches of solid work like the work below.
Above this five inches of solid work make another ribbon space, one inch wide.
Above this second ribbon space make seven more rows of solid work.
The basket should be nine inches high.
At the beginning of the seventh row above the second ribbon space, bend the reed into an arc 1 7/8 inch high. (Fig. 6.)
Put short pieces of reeds lengthwise of the arc.
Work back and forth over these pieces of reeds until the arc is filled with solid work like the rest of the basket.
Continue the seventh row around to the other narrow side of the basket and make another arc like Fig. 6.
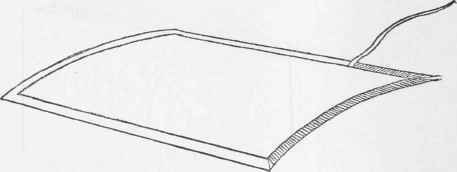
Fig 7
Cover
Bend a wire the shape of the top of the basket.
Let the wire outline a space one inch wider on all sides than the top of the basket.
Sew a reed to this wire by binding raffia over both. (Fig. 7.) This reed should be No. 8.
With this as a frame, make a cover for the basket. Work inside of the frame.
Make seven rows of solid work; then a ribbon space one inch wide.
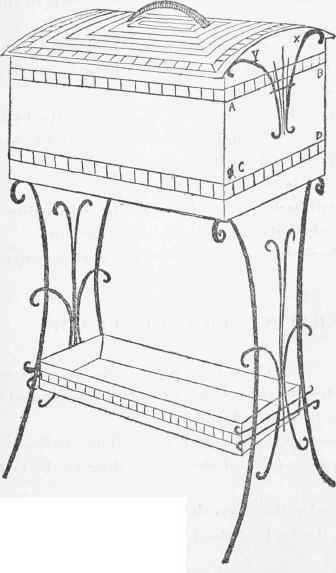
Fig 8
Fill the remaining space with solid work, being sure to preserve the curved shape.
Put a handle in the middle of the cover.
Find the middle of each narrow side of the basket, viz., the middle of the rectangle A-B-C-D, Fig. 8.
Fasten a small block of wood one inch thick to this central point.
Of No. 8 reed make curved pieces long enough to extend from the corners of the narrow side of the cover to this little block of wood. (Fig. 8.)
Do the same with the other narrow side of the basket.
Fasten the reeds X and Y to the small block so that the cover will slip off and on the basket easily.
Use No. 8 reeds to make legs.
Make a small basket to put between the legs, using the same method of work that was used for the large one.
Line both baskets, and run ribbon in the ribbon spaces.
Continue to:
My Books

