Flexible Fabric Clown
Description
This section is from the book "Handcrafts For The Homebound Handicapped", by Mildred Kroll Rich. Also available from Amazon: Handcrafts For The Homebound Handicapped.
Flexible Fabric Clown
Materials And Supplies
1/2 yard plain cotton material 1/2 yard printed cotton material sewing thread size 24 embroidery thread, red and black
5 small jingle bells 4 yards heavy string old nylon stocking wrapping paper
4" x 4" white cotton jersey (can be taken from an old sock)
Tools
pair sharp scissors sewing needle number 5 yarn darning needle number 14 straight pins pencil ruler compass
The instructions are for making a clown doll using a half yard each of two contrasting materials. Smaller odd remnants of material may be used and the costume then will be of several fabrics and colors. The bells are the ones popular around Christmas time.
Procedure
1. ;For patterns measure and cut three circles of wrapping paper with the following diameters: 21/4, 31/4, 31/2, and 41/2 inches. On the 21/4" circle, write "Arms12 plain, 12 printed". On the 3V4 " circle write "Legs14 plain, 14 printed". On the 31/2 " circle write "Facecut one of jersey." On the 41/2" circle write "Body6 plain, 6 printed."
2. ;Fold the fabric so that you can cut two or four thicknesses at a time depending on your scissors and the weight of the fabric. Pin the patterns on and cut the required number of circles as you have written on each piece. Take two 21/4", two 31/4", and one 41/2 " circles of the plain fabric, and the jersey circle for the face, pin them together and set them aside temporarily.
3. ;Prepare the remaining circles as follows: On the right side of the material, with double thread knotted at the end, sew a small running stitch around each circle an eighth of an inch in from the edge. See the diagram of the running stitch below. Pull up the thread to gather the material and fasten with three knots. Flatten out the doubled circle. It should now resemble a small shower cap.
4. ;Prepare the five circles that you set aside by first turning in the edge a quarter of an inch, then sewing a small running stitch on the turned-in part, and gathering each circle the same way. Keep these five circles pinned together to separate them from the others.
5. ;Prepare the cotton jersey for the face the same as the first circles. Stuff tightly with the balled-up stocking before gathering the circle and knotting the thread. Use the entire stocking to make the head firm. With pencil draw a face on the head and embroider it.

Figure 34. Running Stitch Detail for Flexible Fabric Clown.
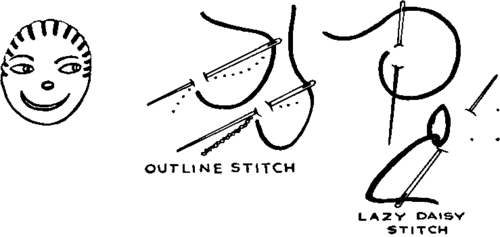
Figure 35. Outline and Lazy Daisy Stitch Detail for Flexible Fabric Clown.
Use uneven lazy daisy stitches for the hair in black, the outline stitch for the eyes in black, and the nose and mouth in red. See the detail for the face and stitches above.
6. ;According to the measurements shown below, cut a hat pattern from wrapping paper first and then from the printed fabric. Make a seam on the wrong side of the material with small running stitches one quarter of an inch from the edge. Turn hat right side out. Turn under the lower edge of the hat a quarter of an inch and pin to the head bringing the edge of the hat to the end of the hair line so that the loops of the hair peak out. Sew the hat to the head.
7. ;Thread two yards of string double into the darning needle. Make a knot at the end (there should be four lengths of string) and take a few stitches through the bottom of the head. This forms the neck. Go through the center of the twelve largest circles (the body) commencing with the smaller one of that size that you set aside, and alternating plain and print material. Place the circles smooth side up, gathered side down. Push the circles together and tie two knots at the end of the body. The body should be about 2Vi 1/2 inches long from the neck to the crotch. Do not cut the strings because they are to be used for the legs.
HAT PATTERN
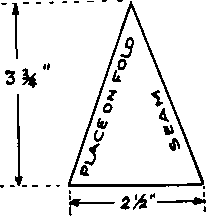
Figure 36. Hat Pattern for Flexible Fabric Clown.
8. ;On to two of the leg strings thread fourteen medium sized circles as before, smooth side up, gathered side down, beginning with the printed fabric circle, alternating with plain and ending with the smaller plain circle of that size that you set aside. Push the circles together closely. Tie three knots at the end of the leg. Repeat for the other leg. Be sure they are the same length. Do not cut the remaining string which is to be used for the bells.
9. ;For the arms tie a double string a yard long to the body string below the second circle from the neck. The ends on each side of the body should be approximately the same length. For each arm thread twelve circles as before beginning with a print circle and ending with the smaller plain circle that was set aside. Tie three knots at the end of each arm and check that the arms are the same length. Do not cut off the remaining string.
10. ;Catch each top leg circle to the last body circle at the outside with small stitches for an inch. This forms the hips. Catch each first arm circle to the second and third body circles in the same way. This forms the shoulders and under arms. At the back of the head, sew the second body circle to the lower edge of the hat. This will cover any seam of the head circle which may show.
11. ;Tie bells to the ends of the arms and legs using the string which was left dangling. Go through the bell three times with the string and knot on to the arm and leg strings each time. Cut off any remaining string. Sew a bell to the tip of the hat and catch the point of the hat to the side of the head.
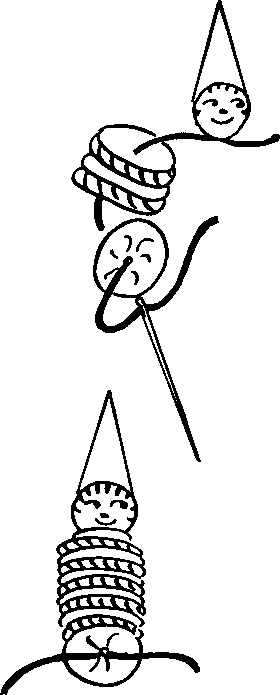
Figure 37. Assembling Detail of Flexible Fabric Clown.
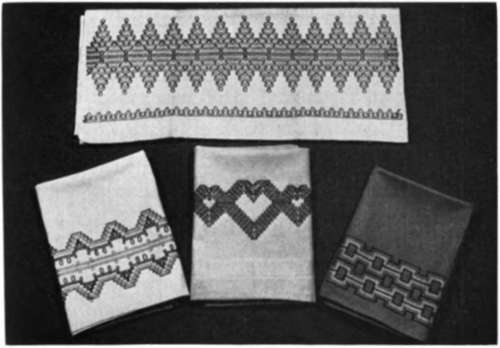
Figure 38. Huck Weaving Towels.
Continue to:
My Books

