Hexagonal Pop Stick Basket
Description
This section is from the book "Handcrafts For The Homebound Handicapped", by Mildred Kroll Rich. Also available from Amazon: Handcrafts For The Homebound Handicapped.
Hexagonal Pop Stick Basket
Materials And Supplies
92 wooden pop sticks,3/8" x 41/2" Elmer's Glue-All shellac denatured alcohol
Tools
1/2" paint brush woodburning tool (optional)
This basket is constructed the same as the octagonal basket described in the preceding pages using the hexagonal pattern instead. When finished the basket may be used for bread, rolls, nuts, or fruit.
Procedure
1. Using the pattern on page 23 as a guide, place three sticks in the indicated positions 1, 2, and 3. (If you wish, draw one inch squares on a sheet of wrapping paper 9" x 10", outline the pop sticks for the first row in the correct positions, and you will have a permanent full scale pattern on which to build other hexagonal pop stick baskets.) Daub or squeeze a blob of glue about the size of a small pea on the ends of the three sticks at a point one half inch from each end. Smooth the glue with the paint brush stroking toward the ends of the sticks. Place the second three sticks in positions 4, 5, and 6 as indicated, allowing them to overlap the first three slightly. Hold them for about a minute for the glue to set. This completes the first layer of the basket.
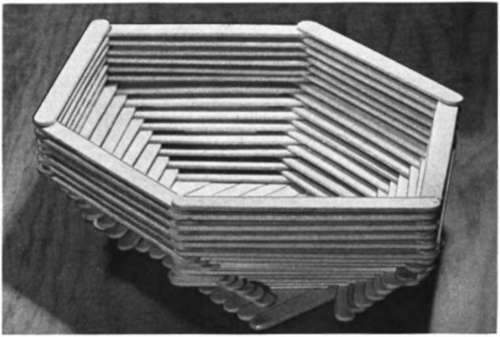
Figure 13. Hexagonal Pop Stick Basket.
2. ;Add five more layers the same as the first making sure the sticks are exactly above the lower ones as you add them. Always place the glue on the lower sticks and add the new ones in the same order, 1-2-3, and 4-5-6 alternately. Place a large heavy book or other flat object on the work thus far completed and wait ten minutes for the glue to set partially before proceeding. See the first small photograph under the octagonal pop stick basket.
3. ;For the next eight layers, set each stick inward toward the center an eighth of an inch. Be sure to place them parallel to the lower ones in all instances. See the second small photograph under the octagonal pop stick basket.
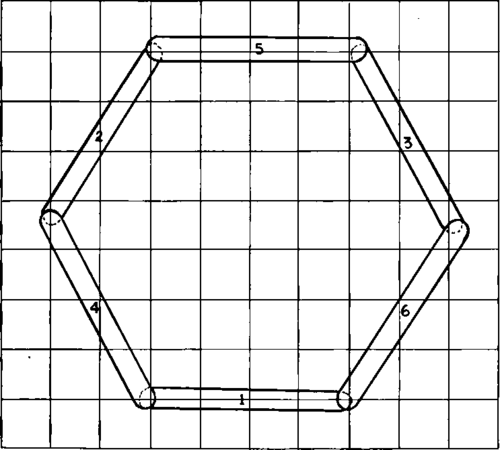
Figure 14. Pattern for First Row of Hexagonal Pop Stick Basket.
4. ;Bridge across the hole at the top with eight sticks gluing them with sides touching. This forms the base of the basket. See the third small photograph under the octagonal pop stick basket. Turn the basket over so that the base rests on the table. Place a weight on it and wait a half hour for the glue to set before decorating or applying shellac. Wash the brush from Elmer's Glue-All with hot water and soap.
5. ;Use a woodburning tool to decorate the first layer of sticks, if desired. Also use it to write your name and date of completion on the bottom of the basket.
6. ;Apply shellac to the inside and the outside of the basket. Use it sparingly to prevent dripping. Do not apply shellac to the under part of the base that rests on the table until the shellac already applied is completely dry. A second application of shellac twenty-four hours later may be desirable to give a firmer finish to the surface. Use the alcohol to clean the brush after the shellac has been applied.

Figure 15. Square Pop Stick Box with Cover.
Continue to:
My Books

