Square Pop Stick Box With Cover
Description
This section is from the book "Handcrafts For The Homebound Handicapped", by Mildred Kroll Rich. Also available from Amazon: Handcrafts For The Homebound Handicapped.
Square Pop Stick Box With Cover
Materials And Supplies
85 wooden pop sticks, 3/8 " x 41/2 " shellac
Elmer's Glue-All ; denatured alcohol
5 wooden 1/2 " beads
This square box with a cover using ice cream pop sticks is simple to make. It is an attractive container for beads, earrings, and pins. Another easy project is the envelope holder photographed which may also be used as a holder for paper napkins.
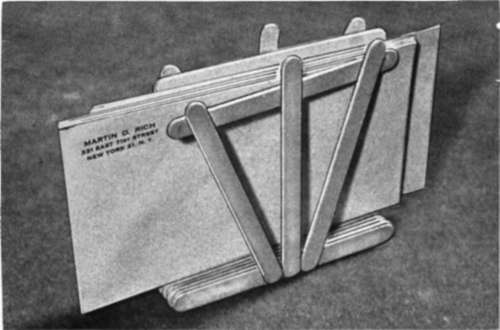
Figure 16. Pop Stick Envelope Holder.
Procedure
1. ;Using the pattern on the following page as a guide, place two sticks in the indicated positions 1 and 2. (If you wish, draw one inch squares on a sheet of wrapping paper 8" x 8", outline the pop sticks for the first row in the correct positions, and you will have a permanent full scale pattern on which to build other square boxes.) Daub or squeeze a blob of glue about the size of a small pea on the ends of the two sticks at a point one half inch from the end. Smooth the glue with the paint brush stroking toward the ends of the sticks. Place the second two sticks in positions 3 and 4 as indicated, allowing them to come to the ends of the first two sticks, forming accurate right angles. Hold them for about a minute for the glue to set. This completes the first layer.
2. ;Add thirteen more layers the same as the first making sure all the sticks are exactly above the lower ones as you add them. Always place the glue on the lower sticks and add the new ones in the same order, 1-2, and 3-4 alternately. Place a heavy book on the work thus far completed and wait ten minutes for the glue to set before proceeding.
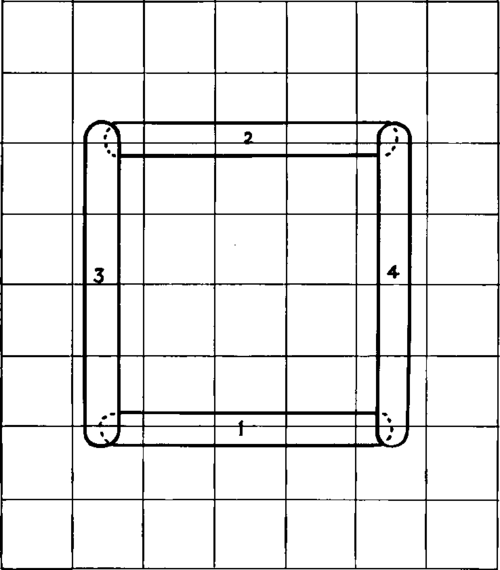
Figure 17. Pattern for First Row of Square Pop Stick Box.
3. ;For the base of the box bridge across the last layer made with nine sticks. First apply the glue in a straight line on the two lower sticks. Then fit the nine sticks in. While the glue is still moist you may have to shift the nine sticks slightly so that no wide space appears between any two sticks. Turn the box over and have the base rest on the table. Place a weight on it while you make the lid.
4. ;Place eleven sticks on a flat surface with sides touching. Take another stick and spread glue sparingly along the length of it.
Glue this stick in the middle of the eleven sticks at right angles to them. As soon as this stick holds its position, glue four more sticks on each side of it with their sides touching. These nine sticks which comprise the under side of the lid slide into position on top of the box. Clean the brush with hot water and soap and allow it to dry thoroughly.
5. ;Glue a wooden bead to each corner of the base of the box and one bead centered on the top side of the lid. Use a woodburning tool to decorate the lid, if desired. Also use it to write your name and date of completion on the bottom of the box.
6. ;Apply shellac to the outside of the box and the upper side of the lid. Use the shellac sparingly to prevent dripping. Do not apply shellac to the base or the under side of the lid until the shellac is dry. A second application of shellac twenty-four hours later may be desirable. Use alcohol to remove the shellac from the brush.
Continue to:
My Books

