Crepe Paper Woven Plate
Description
This section is from the book "Handcrafts For The Homebound Handicapped", by Mildred Kroll Rich. Also available from Amazon: Handcrafts For The Homebound Handicapped.
Crepe Paper Woven Plate
Materials And Supplies
7" shallow paper plate
2 Dennison's "Very best Crepe"
1 Dennison's Crepe Paper Twister, or a large flat button with sewing holes white library paste shellac denatured alcohol
Tools
pair of sharp scissors 1/2" paint brush 2 clip clothespins pencil metal edged ruler
Weaving with crepe raffia paper is an enjoyable and inexpensive craft. It allows for originality in color and design. The sample in the photograph was made using a seven inch paper plate and blue and orange crepe paper. Be sure to buy Dennison's "Very best Crepe" paper because it was found that other qualities tore easily in working.
Procedure
1. Turn the paper plate over and on the under side locate its exact center. Make a dot there with your pencil. Draw a straight line through the center dot across the plate and another at right angles to it through the same dot. See the first diagram on the following page. Find the middle of one section. Draw a straight line through the middle and center dot across the plate. Repeat for the remaining two sections. Measure and mark off 3/4 inch from the center dot on each of the eight lines. See the second diagram on the next page. With the pair of scissors cut on each side of the lines up to the 3/4 inch mark. The space between the segments should be no larger than 1/8 inch. Clip each 1/8 inch strip off at the 3/4 inch mark. You should now have eight accurate segments all held together at the center by a solid circle. On the front of the plate number the segments from 1 to 8 as in the third diagram.
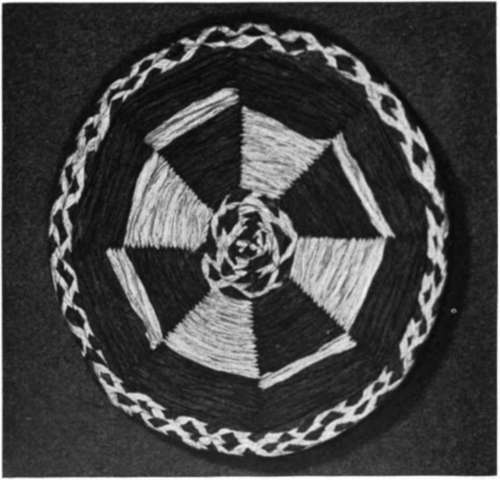
Figure 18. Crepe Paper Woven Plate.
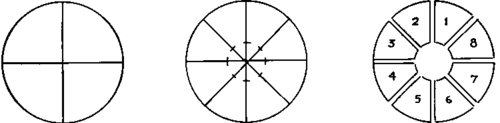
Figure 19. Working Detail of Crepe Paper Woven Plate.
2. ;To prepare the crepe paper for weaving, cut half inch widths of crepe paper across the grain. Use the entire package of folded crepe paper. Do not take it out of the band but slip out about two inches at a time. With ruler and pencil draw lines across the short end half inches apart. To keep the paper from slipping as you cut it, hold the several thicknesses with two clip clothespins, one on each side. Cut the paper on the pencil lines. Cut one end of a narrow strip at a slant. Roll this end between the fingers into a fine point and draw the point through the twister or hole of the button. Twist the strand slightly between the thumb and forefinger as it is being pulled out. Be careful and avoid tearing the paper. However, if it should break, cut a new edge for a point and continue drawing through.
3. ;Weaving is done using two strands of contrasting colors crepe raffia paper at the same time.
Using library paste sparingly, glue one strand to the back of segment 8 and the other strand to the back of segment 1. With the right side of the plate facing you, and working from right to left, bring the first strand which was pasted to segment 8 to the front, go over segment 1, behind segment 2, in front of segment 3, behind segment 4, and so on until one round is completed. Take the second strand which was pasted to the back of segment 1, bring it to the front between segments 1 and 2, weave in front of segment 2, behind segment
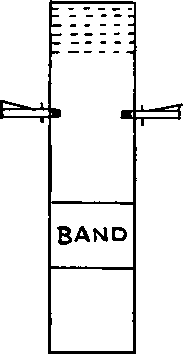
Figure 20. Crepe Paper Prepared for Cutting.
3, in front of segment 4, and so on until the round is completed. Pick up the first strand and weave it around again. Alternate the strands and there will be four segments of one color and four segments of the contrasting color. Draw the strands firmly enough so that they lie in closely parallel but never overlap-ing rows.
After an inch of weaving the colors may be reversed for a different effect as in the photograph. When it is necessary to piece a strand, cut off the one in use and paste it to the back of the plate just where it would be if continued. Paste a new strand right on top of it, bring it to the front, and continue weaving. When you are within a half inch of the edge of the plate, cut off the weaving strands and paste them to the back of the plate.
4. ;Braid three strands of paper, using either all one color or two strands of one color and one of the other, for a length of two yards. When it is necessary to piece a strand, apply a dab of paste to the old strand and hold the old strand together with the new one until dry. Then continue braiding.
The section in the center which was left uncut and was not covered by the weaving, is finished by pasting the braid to it. Begin by pasting the braid on the outside of the circle and work toward the center. Cut off the braid to within a half inch. Apply paste to the end, and with the point of the scissors, tuck it under and in the same direction as the braid which was just pasted.
Apply paste to the edge of the plate not covered. It should take two rows of braid to complete it. The first row should be pasted close to the completed weaving, and the second row close to the first. If a tiny edge of the paper plate shows, trim it away with the scissors as soon as the paste is dry.
5. ;At least two coats of shellac should be applied to the finished plate. Wait until the first coat is dry before applying the second or third. Shellac will change the color of crepe paper slightly and give a yellowish cast to white and light colors. As is true with all applications of shellac, the best results are obtained when it is used on a clear dry day. Clean the brush with denatured alcohol.
Continue to:
My Books

