Chapter III. Projects For Two Hands Involvement. Raffia Table Mat
Description
This section is from the book "Handcrafts For The Homebound Handicapped", by Mildred Kroll Rich. Also available from Amazon: Handcrafts For The Homebound Handicapped.
Chapter III. Projects For Two Hands Involvement. Raffia Table Mat
Materials And Supplies
2 ounces raffia main color 1 ounce raffia contrasting color (substitution yarn, crepe paper raffia, or cord)
8" x 11" firm cardboard shellac denatured alcohol
Tools
pair of sharp scissors or razor blade darning needle with large eye ruler with metal edge pencil
1/2" paint brush
THIS table mat may be made by shading the colors or contrasting them as shown in the photograph. It may also be made by using a solid color for wrapping the entire length of one strip, then sewing strips wrapped with different colors together. A larger mat can be made by cutting the strips wider and longer.
Procedure
1. ;On a cardboard 8" x 11", with pencil and ruler, measure and draw lines one inch apart on the eleven inch length. Draw lines 11/2 inches and 3 inches in from each short side as a guide for the border. Cut the cardboard into one inch by eleven inch strips using sharp scissors or a razor blade.
2. ;Commencing with the main color raffia, and working from right to left, wrap each piece of cardboard. It is not necessary to paste the raffia to the cardboard. Simply work over the end length of about one inch. This also applies to ending and changing colors. Leave a length of the old raffia and about the same length of the new raffia and wind over both ends at the same time.

Figure 21. Raffia Table Mat.
After wrapping to the first pencil line with the main color, change to the second color and wrap until you reach the second or three inch line. Change back to the main color until you reach the first pencil line on the left side. Then wind with the contrasting color and at the last pencil line, change to the main color again.
For finishing off at the end of a strip, thread the needle with the raffia from the winding and make a few in and out stitches on the wrong side. Be certain that the spaces where the colors change are exactly the same on all eight strips so that the border will be even when sewn together.
3. ;Arrange the strips with the wrong sides facing you. Sew them together about two strands of one strip and two strands of the next strip to the end of the row and end off securely. Sew all strips together in this manner.
4. ;Apply at least two coats of clear shellac to the right side of the mat. The first coat must be completely dry before applying the second coat. Also apply shellac to the edges and the beginning and the ends of the winding on the wrong side in order to prevent any raffia from slipping off the cardboard strips. Each time clean the paint brush with denatured alcohol after using shellac.
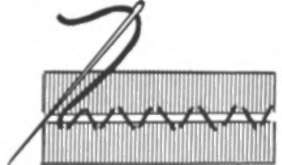
Figure 22. Joining Detail of Raffia Table Mat.
Continue to:
My Books

