Plaster Of Paris Plaque
Description
This section is from the book "Handcrafts For The Homebound Handicapped", by Mildred Kroll Rich. Also available from Amazon: Handcrafts For The Homebound Handicapped.
Plaster Of Paris Plaque
Materials And Supplies
paper party plate plaster of Paris tempera paint fine sandpaper adhesive tape magazine picture water mixing container hair pin Duco cement shellac denatured alcohol rick rack braid
Tools
pair of scissors compass
1/2" paint brush pencil ruler wooden stick or old spoon
Here are step-by-step instructions showing how to frame a picture from a magazine or greeting card. When completed it makes a novel gift, and best of all, it costs only a few pennies.
Procedure
1. Select an attractive colored picture from a magazine or greeting card. Be sure that the picture is on light weight paper otherwise the edges will loosen when set in the plaster. Cut out the picture so that it fits, with or without a margin, in the flat inside bottom portion of the paper plate chosen. If the bottom of the paper plate is a circle, the picture should be cut out in the form of a circle to make it easier for you. For this use your compass. In the photograph of the plaque you will notice that this was not done because the picture itself was not wide enough to allow for a complete circle. If the bottom of the paper plate is square, the picture should be cut square. Determine the exact top and center of the picture and mark it on the back with pencil. Cut a one eighth inch piece of adhesive tape and place it over one edge of the paper plate. If the plate is square be sure the tape is centered. Place the picture face down in the paper plate matching the top center of the picture with the adhesive tape.
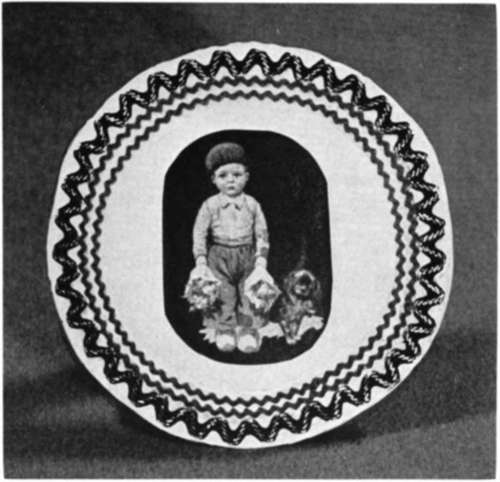
Figure 23. Plaster of Paris Plaque.
2. ;Bend the hairpin in the general shape of a W with the two side prongs slightly lower than the curved center section. Pour a few drops of tempera paint into the water of the color you desire the final frame to be. It will dry lighter than the colored water because of the white plaster of Paris you will add to it.
3. ;Pour a half cup of colored water into the mixing container. Add about three quarters of a cup of plaster of Paris slowly to the water until the water no longer absorbs the plaster. Stir the mixture with a stick or old spoon to the consistency of soft whipped cream. The longer the mixture is stirred, the thicker it becomes as it commences to set immediately. Be careful not to stir more air bubbles than necessary into the mixture. While it is still runny, fill the paper plate with the mixture. Do not move the picture. Insert the prongs of the hairpin in line with the adhesive tape into the still soft plaster. The curved section of the hairpin remains above the plaster and forms the hanger from which the plaque is later hung. The shape of the bent hairpin set in the plaster prevents it from pulling out when the plaster is dry.
4. ;Allow the plaster to set for about twenty minutes. It will go through a chemical change in which the mold will become warm. Loosen the edge of the plate and tear it away from the solid form. Although the plaster has set, allow it to dry for at least twenty-four hours before decorating it.
5. ;Smooth any rough edges with fine sandpaper. Coat the picture and the plaster frame with shellac. Clean the paint brush with alcohol after using shellac. Allow the shellac to dry before adding any fancy touches.
6. ;For a dash of color, glue metallic or baby rick rack braid around the edge of the plaque and about one fourth inch from the picture. For a daintier touch, if it is in keeping with the picture, paste gathered lace to the back of the plaque and have the lace extend evenly beyond the frame.
Continue to:
My Books

