Cupboard And Work Table
Description
This section is from the book "How To Build Games And Toys", by B. W. Pelton. Also available from Amazon: How To Build Games And Toys.
Cupboard And Work Table
Once equipped with a reliable cooking stove, it naturally follows that the Junior Cook must be provided with some sort of working surface for rolling out pie crusts and cookies, and for mixing the various tasty dishes so dear to dolly's discriminating palate. There should also be storage space for the miniature pots and pans and dishes, as well as for the sample packages of standard foods, and the small containers of real or simulated staples.
In order to conserve space, a cupboard with a hinged table front is pictured in Figure 4.27. For endurance it is constructed for the most part from 2-in. stock.
The cupboard is butt jointed as shown, with the top overhanging the sides 1/2 in., and the rear edges of the 7-in. shelves flush with the rear edges of the side pieces, allowing 3/4 in. at the front for flush doors and table top, when closed. A piece of wallboard can be tacked across the back.
Lumber List
Pieces | Thickness, in Inches | Width, in Inches | Length, in Inches | Description |
Cupboard | ||||
2 | 3/4 | 73/4 | 333/4 | Sides |
1 | 3/4 | 73/4 | 19 | Top |
4 | 3/4 | 7 | 161/2 | Shelves |
2 | 3/4 | 81/2 | 135/8 | Doors |
1 | 1/4 | 18 | 33 | Back |
Table | ||||
1 | 3/4 | 161/2 | 173/4 | Table top |
2 | 3/4 | 21/2 | 141/2 | Legs |
1 | 3/4 | 21/2 | 111/2 | Stretcher |
1 | 3/4 | 21/2 | 161/2 | Hinged cleat |
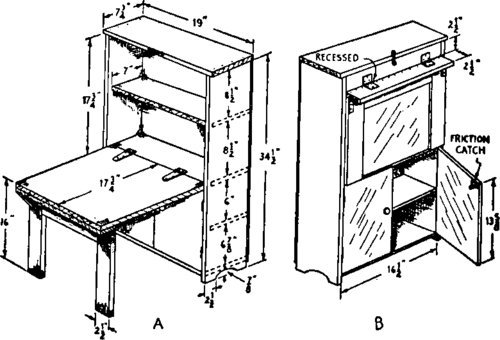
Fig. 4.27. Table-cupboard.
The table top is a piece of 3/4-in. plywood 161/2 in. wide by 173/4 in. long; or two pieces of f-in. stock can be fastened together on the underside by cleats slightly less than 111/2 in. long, to clear the legs when the table is closed against the cabinet, as in B. As indicated in A, the table is hinged flush with the center shelf. If it is decided to cover the top of the table with linoleum or Masonite, it must be remembered that an equal thickness must be subtracted from the upper dividing shelf, or from the table top itself, to permit it to close flush with the sides.
The 21/2-in. legs are doweled flush against the ends of an 111/2-in. stretcher of the same width. While the glue is setting, mortises for a pair of flush table hinges can be marked and cut at the rear of a f-in. strip or cleat 21/2 in. wide by 161/2 in. long, and in the opposite locations on the underside of the table (see B). The legs and their stretcher are then butt jointed flush with the rear edge of the cleat, and the inside hinges attached. The legs may be strengthened with triangular blocks as in A, or angle irons as in B. A rotary butterfly nut in the center of the cabinet's top edge will hold the table shut while the remaining hinge leaves are being attached. A pair of folding supports salvaged from an old bridge table will add additional security to the legs when they are down, or "open."
A pair of f-in. doors 81/4 in. wide by 135/8 in. long are butt hinged to the under section of the cupboard. Since the doors will rest against the dividing shelf, friction catches screwed to their upper inside corners will hold them closed, and any type of available knobs or handles can be attached for opening them.
After the nail or screw heads are countersunk and filled with wood putty, all surfaces are sanded smooth before the white enamel coats are flowed on. Instead of applying the white enamel to the inside of the cupboard, however, a bright color which will blend with the color scheme of the room may prove interesting and welcome.
Continue to:
My Books

