Jumping Jack
Description
This section is from the book "How To Build Games And Toys", by B. W. Pelton. Also available from Amazon: How To Build Games And Toys.
Jumping Jack
One of the oldest of motivated toys, the jumping jack, retains its popularity from century to century. Equally beloved is the clown, with his traditionally white, grinning face and shapeless costume. The 10-in. clown jumping jack pictured in Figure 2.11 is of simple construction and finish, presenting the characteristic facial makeup of John Reilly, one of Ringling Brothers' star clown performers.
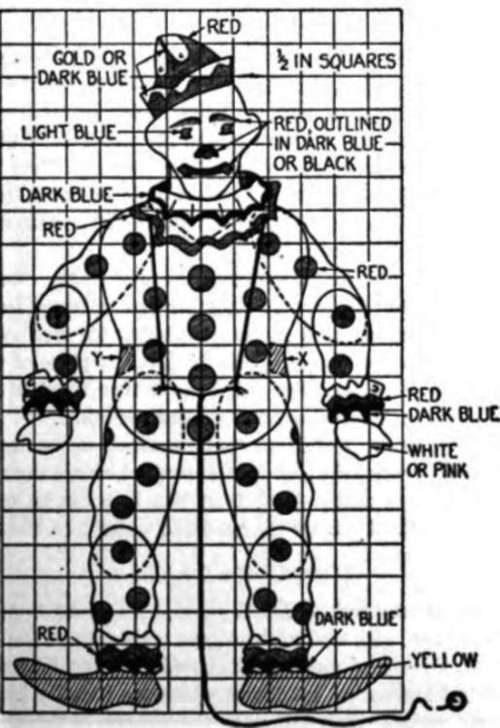
Fig. 2.11. Jumping clown.
To assemble this toy, cut two outer bodies, including heads, from two pieces of 1/4-in. plywood. These can be bradded together in the waste material outside the pattern, and a single body and head traced on the upper piece. After all the holes have been drilled, both pieces can be cut simultaneously. A third head with a neck extending as indicated by the dotted line in the X-rayed figure is then cut out as a separator between the front and rear bodies which conceal the strings actuating the arms and legs. The latter are externally joined at the knees and elbows as illustrated.
The drawing shows identical legs and arms which, like the bodies, can be sawed out in duplicate. The enclosed, rotating surfaces at the shoulder and thigh joints should be planed or filed, then sanded smooth for easy movement.
With the extra head glued or bradded to the front body, and pivots inserted temporarily in the upper arm and thigh joints, lay the partially assembled figure upside down upon the work table and tie the ends of two pieces of fishline about 4 1/2$ in. long through the upper holes at the ends of the thighs and upper arms, as shown in the drawing. Then tie an 18-in. length through the thighs, letting the excess pull cord hang from a knot in the center. Finish off the end of the cord with a small curtain ring, a plastic teething ring, or a large wooden bead.
The forearms can now be permanently pivoted at the elbows, and the lower legs at the knees, so that the assembly can be tested for smooth action, and any adjustments made in the cords before the rear body is secured in place. Small separators X and Y can be glued in place at this time for additional rigidity, if desired. The rear body is then fastened in place and the edges of the three heads and necks sanded smooth.
Over a thoroughly dry undercoat, white enamel can be applied. Bright red is used lavishly, with light blue for the eyes (which are in reality Reilly's eyelids, which he keeps nearly shut). Dark blue lines can be applied with a small pencil brush. Hold him by the head and watch him kick.
Continue to:
My Books

